I’ve been meaning to write one big fat post on my Emacs journey, and how I use Emacs, for ages. It’s time. I was thinking today about whether and how my life would be different if certain open-source / libre software had never been developed. Git, for example. Though I feel like inevitably some other SVN would in that case take the place of git, what if not? Same for Emacs. If I wasn’t easily tracking my time-by-task for my contracting gigs through Emacs, would I just be using some app? What about the tons of notes I take in org-mode for my classes? Would I just be using Notion or Hackmd or something? Text files? What about tracking all my todos?
I guess what I’m getting at is that while probably Emacs isn’t necessary to get done the kinds of things I like to get done, I really appreciate how Emacs has made all of those things very easy, all while protecting my wrists from Repetitive Strain Injury (RSI), which was the original reason I started tinkering with Emacs back in 2016.
The first section, “Why Did I Start Using Emacs,” is me just sort of blogging, and can be skipped if you aren’t interested in exploring in a narrative manner why someone might pick up emacs. The other sections get into the nitty gritty. This post is very long, so I also recommend taking a good look at the table of contents and navigating directly to your interest areas.
Also, if you’re a newer developer wondering whether you should try using emacs as your primary IDE, I believe you shouldn’t. You should use vscode, which is enormously popular, extremely easy to use, and integrated with all the hot-new-shit webdev technology, which is probably what you’re being paid to program. Focus on getting the programming job done first, spending your spare time upskilling in the wide world of webdev technologies, before you start down this path.
I’ll be using emacs style keystroke notations in this post.
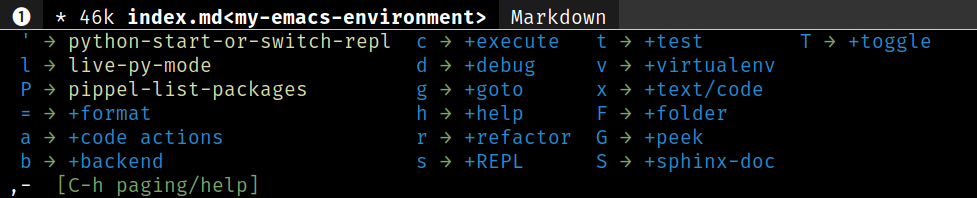
- Why Did I Start Using Emacs?
- On Emacs and Spacemacs Versions
- On Programming in Emacs
- On Productivity in Emacs
- Quick Notes and Tips
Why Did I Start Using Emacs?
In 2016, I was a few months into my first software engineering job, at Electric Imp. I had until then spent the previous 6 months developing in Atom on Windows, because I was in a coding bootcamp and just didn’t have any clue what I was doing. I did, however, have a strong sense of superiority over my fellow students that were using Sublime. Every time they clicked away the “please pay for me” banner I’d smugly say some shit like “imagine paying for a text editor.” Then again, during the bootcamp, one of the teachers showed us some webstorm setup they had that completely blew our little minds, so there was some attraction to the “fat, paid for IDE that can do magic.” Right towards the end of this is when vscode came out, which I picked right up because I liked how little input delay there was. It felt like the difference between playing a game at 60 fps and 120. People will say “acTuAllY the HuMAn EyE caN’T seE hIgHeR tHan whatever fps,” I say no, vscode was smooth, I’d stake my life on it. As I remember it that was the very beginning of the vscode days, so I also got the early-adopter feeling of superiority. We bootcamp kids were big on the “we set ourselves apart by quickly adapting to new technology” mindset, so any chance we could get to get a headstart on something that might be the Next Big Thing, we took. Hindsight, I really wish I had taken a crack at writing some vscode extensions back then, the thing is so ubiquitous that I’ve had times at jobs where it was literally required to develop on a given app with any kind of productivity due to extension integration.
Anyway, so there’s me at Electric Imp, wet behind the ears and devving on a Macbook for the first time in my life, hanging with the real grownups with actual Unix environments (I had used Windows Subsystem for Linux at the bootcamp and on reflection I’m honestly shocked I made it work). I learned a lesson very early in my life from World of Warcraft: mouse users (we called them clickers) are at a significant disadvantage to pure keyboard users. So I spent a lot of time trying to memorize as many vscode hotkeys as I could, including adding my own. As I added more and more, I realized that I wasn’t really following any kind of convention, I was just making up stuff, resulting in contradictory, convoluted hotkeys that sometimes didn’t make sense. I thought, surely smarter people than me have been mapping keys, maybe I can just copy how they do it? And right as I was in the middle of this path, I started getting RSI, really really badly.
From going to meetups and mini hackathon type things, I’d hung out with enough older engineers to know that RSI was a pretty serious problem to get as an engineer. I remember one older guy used to carry around a split keyboard with his laptop because otherwise he literally couldn’t type, so bad was his wrist pain. I remember articles getting posted on Hacker News, speculating on how to treat RSI, and the comments getting thousands deep. I pretty quickly realized that the main cause of mine was constantly moving between my mouse and keyboard, so I doubled down on trying to stay keyboard-only in vscode.
Inevitably, I took a look at vim. I had until then only two knowledge points about vim:
My buddy Riley complaining about how much time was wasted in one of his college courses learning vim because some purist computer science teacher was trying to convince the students that “no you’ll definitely need this, and it’s a better way of writing code anyway.” The way he described it, with different modes for writing and navigating code, sounded nightmarish.
My also-sort-of-purist coworker at Electric Imp that used vim and various gnu/linux tools exclusively as his programming environment.
Regarding my coworker, while part of me wanted to roll my eyes at what seemed to be outdated tooling, I had to admit it was cool to watch him work. Sometimes he worked vim magic that I had no idea how to replicate in vscode. I wasn’t even sure if it was possible. I did like how he never had to take his fingers off the keyboard, so I decided to spend some time trying out vim. At the very least, I thought, I could port some of the keybindings over to vscode.
I poked around some resources before finding the very cool vim adventures game. You navigate a little character around obstacles using vim commands. That combined with the built-in vimtutor got me to where I could at least switch between the two main modes of vim, and get some basic things done. From there it was just practice, which I did, on and off. At work, if what I was doing mostly involved staying in one file, I’d try editing in vim instead of vscode. It was great, my wrists were already thanking me.
Of course, vim alone is not an IDE, it literally edits text and nothing else, unless you start adding plugins. And so started a very sloppy and indecisive journey, where I waffled between trying to turn vim (or nvim) into a passable IDE, and trying to get a vim plugin working in vscode in a reasonable way. The first path involved a lot of accidental destruction of my vim and nvim environments due to all the methods of installing plugins that were supposed to “make it easier,” a lot of trying to copy other people’s .vimrc files, starting from scratch my own, and other great ways of diving head-first into rabbit holes. As for vim plugins for vscode, back then they kinda sucked, or at least they did on my machine. Their input lag was abysmal, I was never sure when I should try to use a vim :command or instead a vscode native command, and when I did want to access vscode functionality, there was always conflicts. It sucked.
During this process, I had learned about emacs and the emacs vs vim holy war. I also tried it out a couple times, but found that the convoluted key combinations were doing more harm than good. On that note, I did pick up one tip during this time period that probably, more than anything else, has saved my wrists: rebinding CAPS to CTRL. What a lifesaver that has been. Absolutely essential for emacs usage of course, considering how many critical key combinations start with CTRL (or C- in emacs-lingo), but in general has been great across all situations for me. Hell, even gaming.
Once I started realizing that vanilla / modded vim, nor vscode with vim plugins, was going to be any good, I started feeling pretty down. I don’t know if it’s my ADHD or just my personality, but any kind of friction between me and the task at hand is particularly painful, and there was all sorts of friction between me and getting code on the screen where I wanted to. I was idly browsing more through more vim vs emacs holy war stories, when I started hearing tell about evil-mode, which is a sort of vim plugin for emacs that makes emacs a modal editor with vim bindings, while still leaving access to all the emacs functionality. That bit of information led me straight into the hands of the at-the-time most popular Emacs suite of plugins, spacemacs. In their words, “The best editor is neither Emacs nor Vim, it’s Emacs and Vim!”
Even back then, when I was almost utterly unfamiliar with emacs (and the vim bindings I was using with spacemacs), it felt like exactly what I was looking for. I could have the side-bar file browsing I for whatever reason really lean on when I’m editing. I could have full-project text search and replace. I could have easy window / tab splitting and switching. In fact, after a while, I found I could have all of those things at a much greater power and flexibility than I could at vscode. And it was hella fast. And it seamlessly worked with the vim bindings that I had grown to appreciate, that let me keep my fingers entirely on the keyboard.
I dedicated a month or two to using spacemacs exclusively, until I could at least match my productivity in vscode. I’d switch back during critical times, but I’d note what functionality had dragged me back to vscode, and then when I had time, learned how to do the same in spacemacs. It took about two months before I was fully integrated, and to my joy I could do my entire job without ever moving my hands off the keyboard (except to use Jira). Nirvana, and that was just the beginning.
As I was using emacs, I was hearing rumors here and there of things like org-mode (task and time organizing in emacs), or mu4e (email within emacs), and various other weird shit people were forcing into emacs. RSS reading. Webcomic browsing; hell, all their internet browsing. And with all this came that kind of weird but kind of cool and arguably quite ethical gnu community. I was settling right in. Emacs was militantly open source, kinda old school, completely modifiable, and had a huge swath of things for me to learn about it. Also, it felt kinda neat being the office emacs guy.
So, why did I commit to the switch?
- I could use emacs to do my job (writing code) without taking my hands off the keyboard. Over time, more and more of my job could be done within emacs, such as handling emails (I’ll talk about this more later).
- emacs as a tool and its community / developing entity (gnu) are radically pro-software freedom. I was (and am) attracted to this movement
- It felt kind of brutalist, which, take a look around you at this blog, dunno if you can tell, but I’m really into. It was quite simple on the face, but at the same time very capable.
- It’s ostensibly an older, or baseline technology, which I’m just attracted to for whatever reason. I don’t really know yet how to define this feeling, but the best I can say is this reason for liking emacs is the same reason I like being good at git, or learning unix tooling (sed, grep, etc).
- I could use vim commands and hotkeys within it, which let me do some pretty wild code editing
Narrative over, now behold the part of the blog post other people might actually find useful.
On Emacs and Spacemacs Versions
The emacs version doesn’t matter too much, so long as you’re above like 26. I use 27.1. You can download emacs on the website. If possible, I highly recommend building from source, as it’s probably easier than you expect, and for me that’s always led to the most stable environment.
Spacemacs is a little different, I use the develop branch, which differs significantly from the main branch (or at least it did when I installed it). I recommend everyone use the develop branch. After following the installation instructions, which have you git clone the spacemacs repo into your ~/.emacs.d folder, in that same folder do git checkout develop to use the develop branch of Spacemacs.
On Programming in Emacs
So far, I’ve comfortably programmed Javascript, Typescript, Python, various kinds of Lisp, an Assembly language, Go, Scheme, and Racket in emacs. Within the web development world, I’ve worked with Vue, React, Styled Components, SASS, and SCSS without issue. I’ll get something out of the way right now: vscode is the most popular IDE, and simply has the most developed tooling for web development. Everyone is on macbooks with vscode, that’s how it is, and if you’re heavily web-dev-tooling dependent, that’s where your bread and butter will be. For example, Github Copilot is only being released as a vscode extension.
Bearing in mind that I use Spacemacs as an emacs platform, I’ll go project type by project type, discussing the plugins and bits of my .spacemacs file (the spacemacs version of init.d) that make me productive in those project types.
Basic IDE Needs
There’s some stuff that’s universal regardless of project type. Like, project-wide text searches, search and replace, file browsing, that kind of thing.
Frame, Window, and Buffer Management
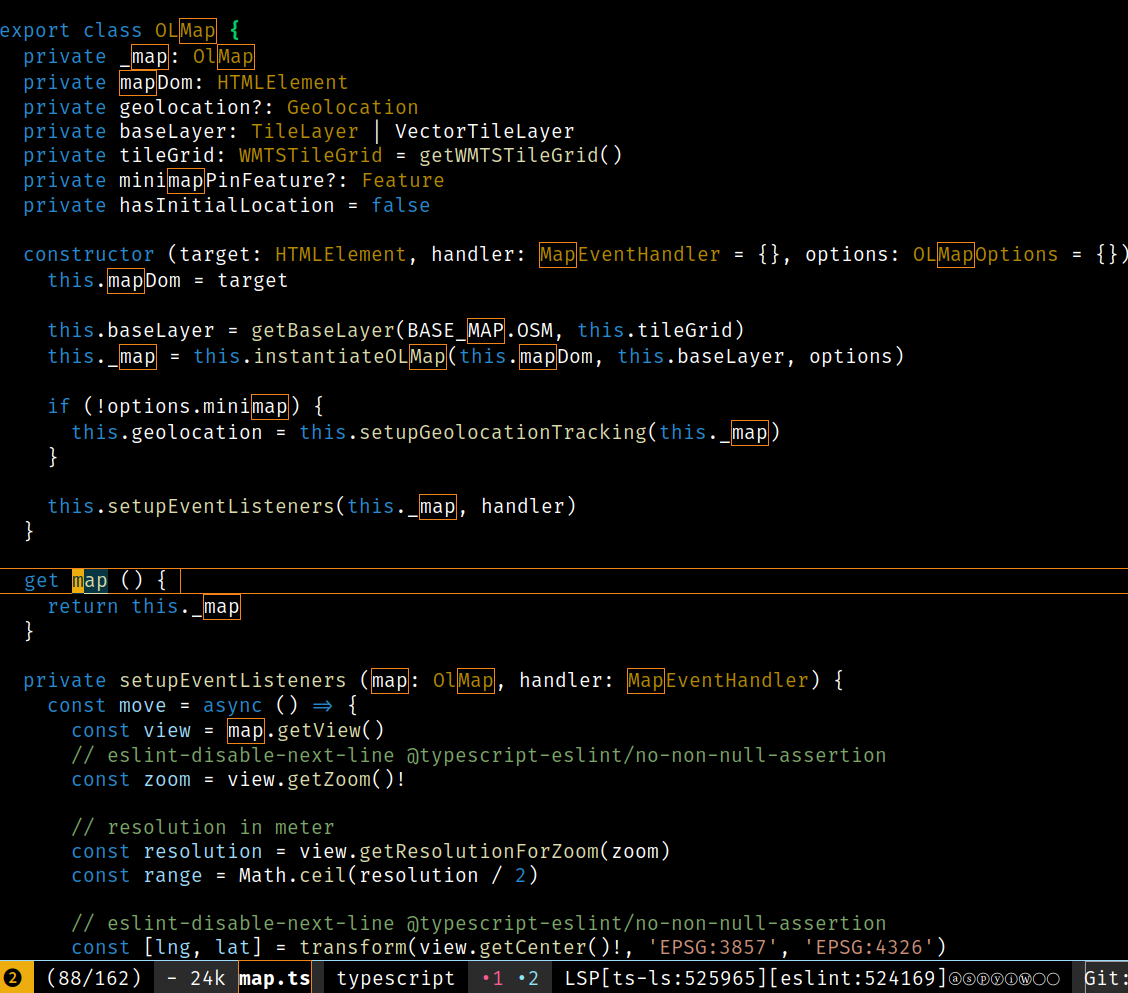
First off, the layout of my “workspace,” by which I mean the full screen on which I edit code. I use gnome as my display manager, which allows me to have “workspaces,” what other operating systems or display managers might call “desktops.” I feel very strongly that I paid for all the pixels on the screen, so gosh darnit I’m gonna use all the pixels on this screen. Part of the reason I hate OSX is how it makes it so hard to do that, but, rant for another day. Here’s what my workspace looks like right now:
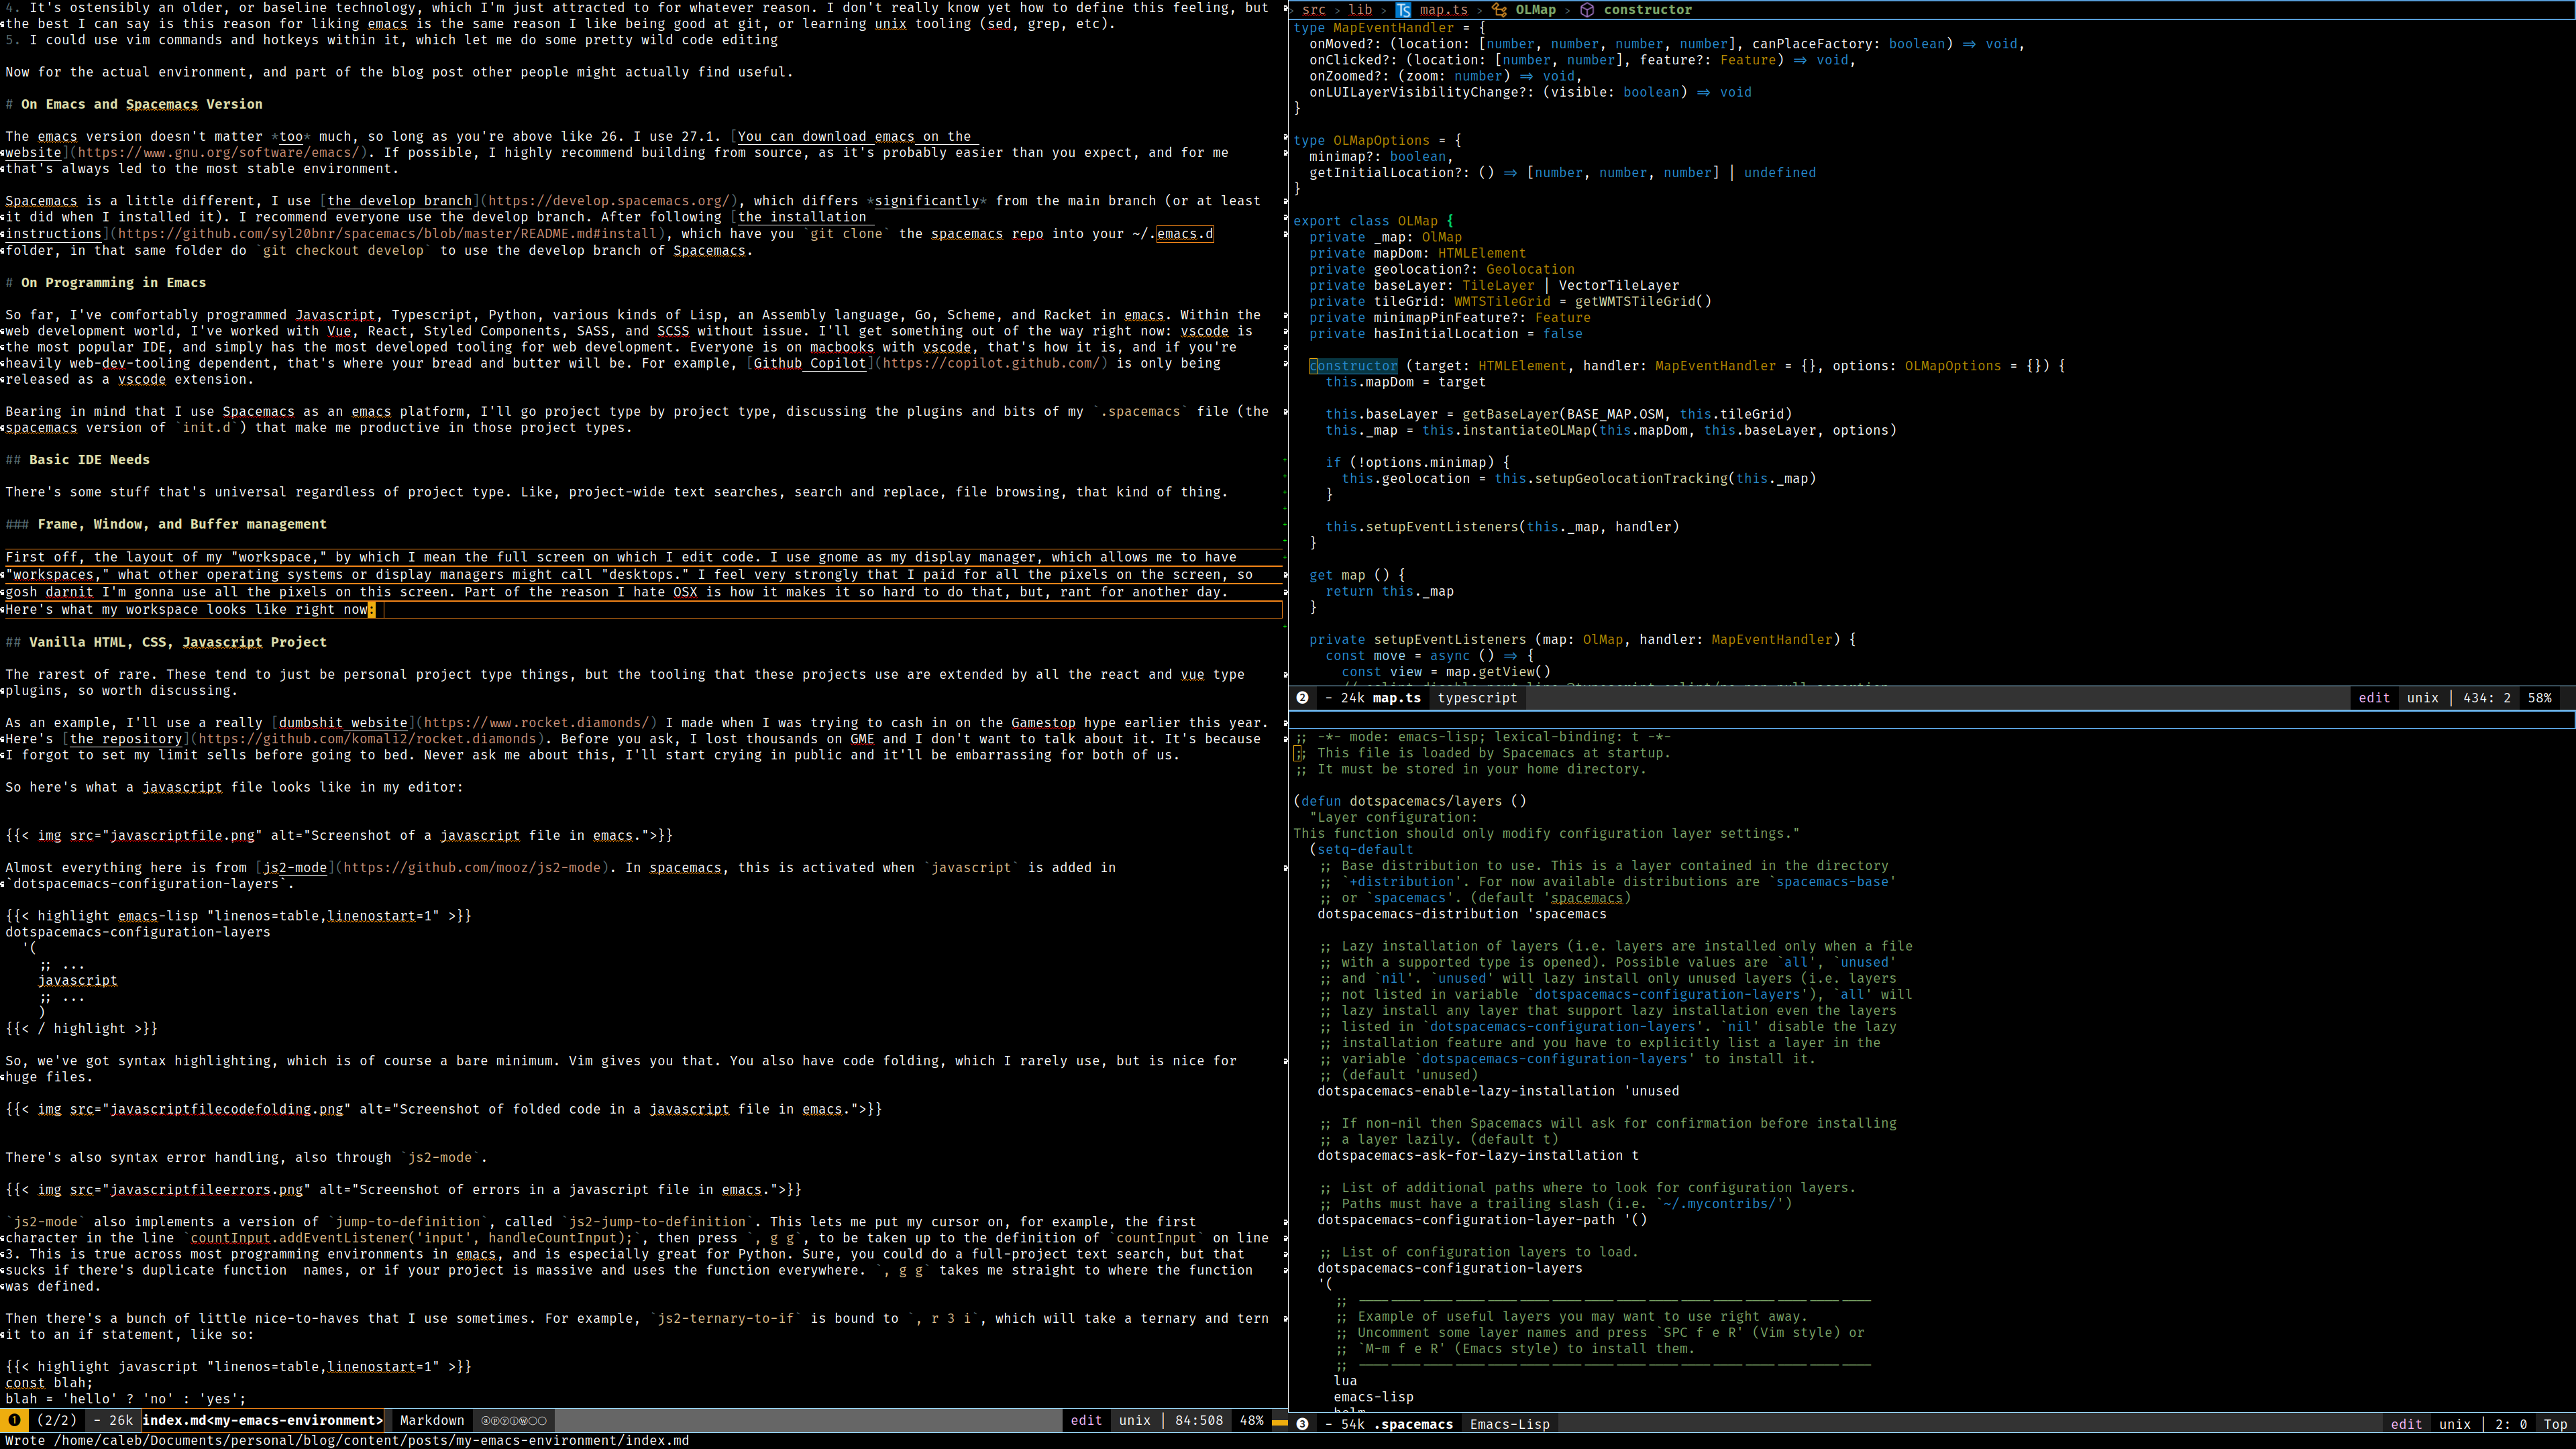
It’s fullscreened, which you can accomplish by hitting f11, or have emacs launch as such by setting, inside of dotspacemacs/init, dotspacemacs-fullscreen-at-startup t.
In emacs, a “frame” is what other paradigms might call a “window.” It’s one “instance” of emacs, which contains multiple “windows.” In the above screenshot, you’re looking at one (fullscreened) frame, within which there are three windows, which other paradigms might call “frames” or “panes”. Each window displays one “buffer,” which kind of means “file being edited,” but buffers represent things other than files, such as the output of a git command, or the output of a linter, or a list of emails. In the screenshot above, the large window on the left half of the screen is occupied by a buffer that’s editing the index.md of this blog post, the top-right window has a buffer that’s editing the map.ts file, and the bottom-right window has a buffer in it that’s editing my .spacemacs file. I’m going to stick to the emacs nomenclature from here on out, so bear the above definitions in mind, or read up someone smarter than me explain it.
I usually am popping open and closing windows constantly. So for example, if I wanted to edit something at another location in this file real quick, and then quickly return back to this exact line, I’d open a new window horizontally, by doing SPC w -, which invokes split-window-below. Then, I’d jump to wherever else in the file I need to go, save, and close the window by doing SPC w d, which invokes delete-window. I’m then brought back to the previous state of my workspace, with my cursor exactly where it was when I opened a new window. Typically, if I want to open and work on a new file, I’d do SPC w /, which invokes split-window-right. Some combination of such usually results in the kinds of workspaces pictured above.
Moving around windows is easy. SPC 1 brings me to window 1, SPC 2 to window 2, etc. The numbers maintain sequence based on location on the screen, not when they were opened. So in the above screenshot, if I did SPC 2 to switch to window 2, then split-window-right, the new window would be window 3, and the previous window 3 would become window 4.
Sometimes an action I do will cause a new buffer to entirely replace the buffer from which I performed the action. For example, if I do , g g in a python file, I’ll be brought to the definition of the variable I’m on. If that variable is in a different file, a new buffer gets created that “visits” that file, and my window gets taken over by that buffer. When I’m done, I can do either SPC b d to kill the buffer, or SPC b p to go to the previous buffer. Both cases will bring me right back to where I originally triggered the action, killing the buffer simply removes it from the open buffer list.
The open buffer list can be accessed with SPC b b. It looks like this:
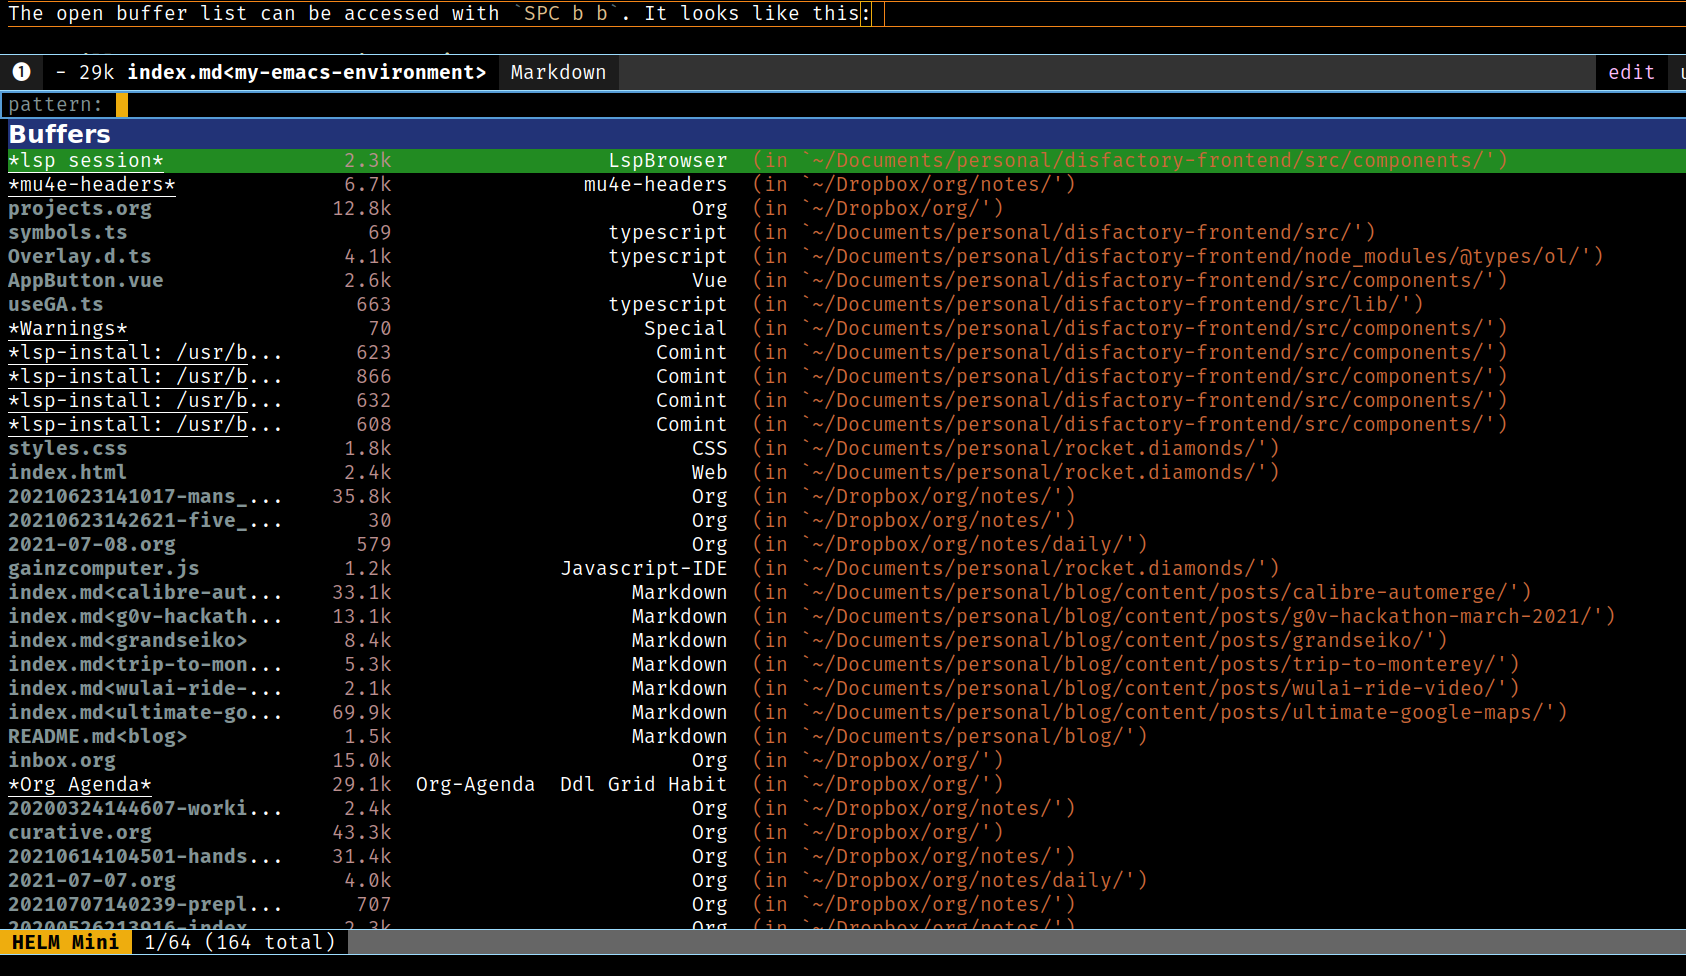
Those are all the files that “are being visited” by emacs. Even if a buffer isn’t visible in a window, it can still be actively visiting a file. In fact, you can switch away from a buffer without saving a file, and when you switch back, the file will still be in its modified, unsaved state. If you try to kill a buffer like this with SPC b d or similar, you’ll get a warning from emacs asking if you want to save the file first. Incidentally, you’ll get a similar notification if the file is within a git project that just had git status triggered on it from within emacs, using magit, which I’ll talk about later.
This buffer list can be handy if you’re working in a big project, on a somewhat large number of files. I’ll talk later about how I search across projects, but while convenient, doing a project-wide file search is not a great way to quickly get back to a file you’re working on. From within that list I can type the first part (or any part, really) of a file I’ve recently visited, hit RET, and I’ll be taken to that buffer. This is also kind of convenient for doing things like, if in a big web project with .ts, .vue, .json, etc type files, you can do SPC b b .json to have the buffer list filtered to only show .json files that you’ve recently visited. That’s more of a nice thing about helm, which I’ll talk about below.
In the screenshot above, what you can’t see is that I have another frame open, on a separate workspace in my display manager. I have gnome set up with 5 workspaces, that I access with C-M-{workspace number}. I can use that keybind to access the other emacs frame, or, I can simply use the SPC w {number} bind, entering the number of some window in that other frame. Frames, unlike windows, maintain sequential order, so if I have 3 windows open, then open a new frame with SPC F n, it will open with a window numbered 4. If I make a change to a window on the first frame, the other frame’s windows numbers will also update. This can be useful if you like to have, for example, email permanently open on some other workspace. Make that the second frame you open, and it will always be identified with the largest window identifier number (if you have 3 windows open, your email will be window 4. If 5, it’ll be window 6, etc.)
Helm, or, Magic Emacs Command Suggestion and Listing Mechanism
Emacs has a lot of commands, but it also has a strong concept of discoverability. Basically one of the most oft-recommended add-ons to vanilla emacs is an autocomplete mechanism such as helm or ivy. From helm’s website:
Helm is an Emacs framework for incremental completions and narrowing selections. It helps to rapidly complete file names, buffer names, or any other Emacs interactions requiring selecting an item from a list of possible choices.
The buffer list I showed earlier was possible because of helm. Helm also makes it a lot easier to learn how to use spacemacs over time. I can press any command-initiating key, or prefix combination, such as SPC, C-c, C-x, or , (or others but those are the ones I use most often), and be shown a list of possible commands. For example, if I press SPC:

From here I can explore each of those options deeper by pressing whatever given key. It’s a great way to learn all that’s possible for a given major mode. For example, if you want to see what you can do in a Javascript file, upon entering one, try pressing , (comma) or SPC-m, which is typically how major mode functions are accessed, and explore what’s made possible (it shows major mode commands).
To enable helm, add it to your dotspacemacs/layers, as helm. I think it’s there and enabled by default in spacemacs, or perhaps spacemacs asks you whether you want helm or ivy during first-time setup, I don’t remember.
Finding Files and Text Within Projects
A very typical workflow for me is to do full-text searches across an entire project. By “project” I usually mean the root of whatever you get when you git clone something. In fact, that’s basically how projectile, the tool that enables great project workflows in emacs, determines what “project” is as well: a .git directory.
For example, if I’ve been instructed to modify how a button works on a frontend app, I often just go look at whatever text is in the button, and then do a text search across the whole project for that text, using SPC /, which is bound to (spacemacs/helm-project-smart-do-search). Then I input the text, and choose viable candidates from a list to investigate. It looks like this:
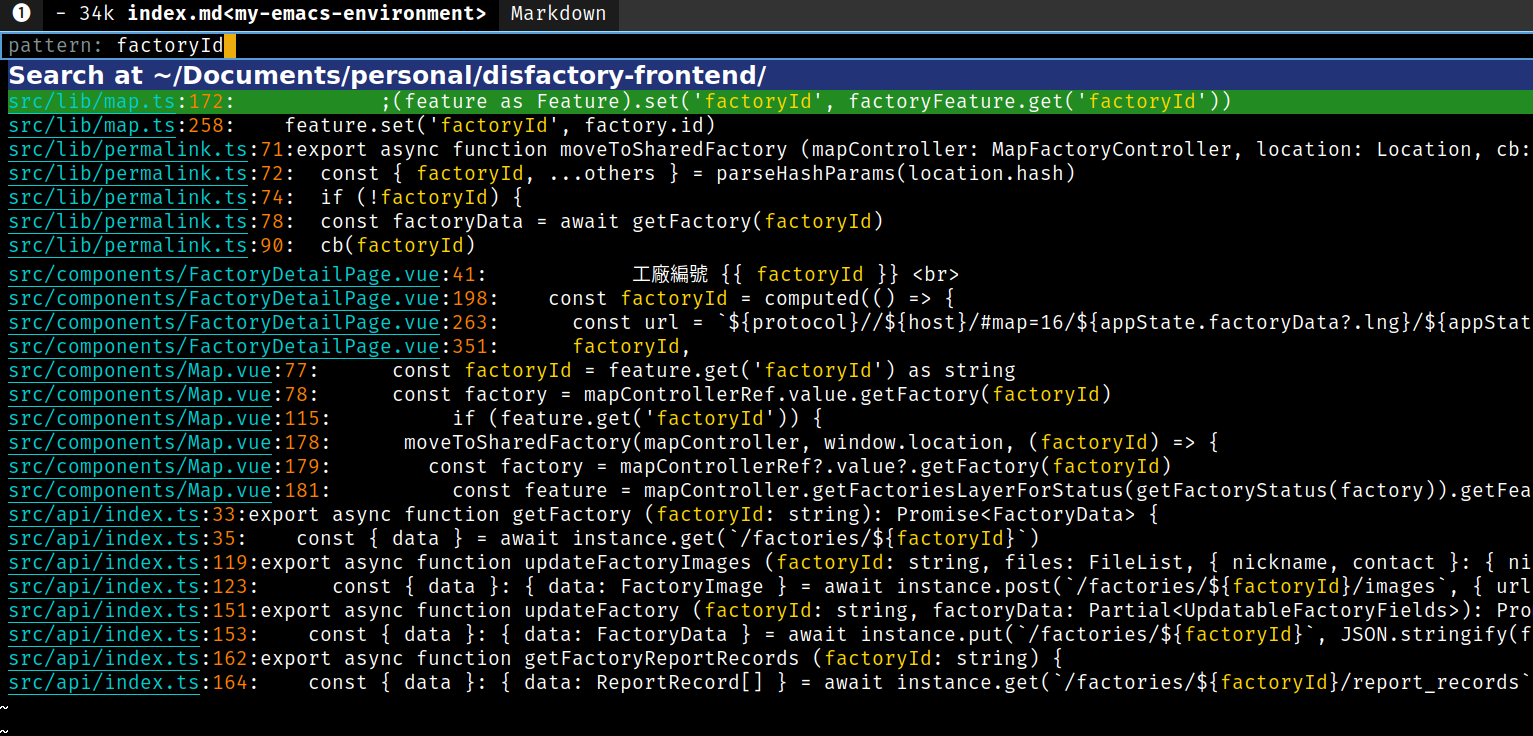
I can navigate up and down this list with C-j and C-k (vim conventions, I think), then open a given file by pressing RET. I’ll be taken directly to the line where the given text was found.
Sometimes I want to find files by filename, rather than by text within them. To do so, I do SPC p f, which invokes projectile-find-file. It brings up a list of literally every file in my project that isn’t in my .gitignore, which I can narrow down by entering some text. It looks like this:
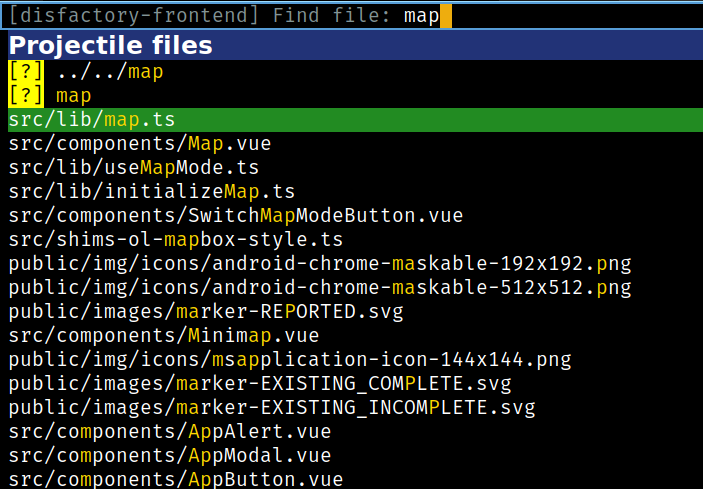
I generally find the sorting to be quite sane by default.
Finally, if I simply want to look at a file tree, similar to the left pane of vscode, I can do SPC f t, which invokes treemacs. It looks like this:
From here I can open a file in many ways. The RET functionality is somewhat annoying, it’ll simply open the file in window 1, taking over whatever was there previously. I can do o h to open the file in a new window, split horizontally from window 1, or o v to open the file in a new window, split vertically from window 1. I can navigate up/down with j and k, I can search within the entire file tree using / (discussed later under in-file text searches), and I can nest into directories using TAB. I can also open files and directories from here straight into dired, which is emacs’ native file browser, but I never do that, because I’m a coward.
It’s worth pointing out that it’s possible to do a ton of other wild stuff with projectile and dired, like project-wide filename changes, but I don’t know how to do that, I just know it’s possible.
To do the above, you need projectile, which comes default with spacemacs. You need treemacs for the sidepanel file browsing, which can be had by adding treemacs to your dotspacemacs/layers. Spacemacs main branch used to (still does?) have some other side-panel file browser, but now treemacs is where it’s at I guess.
Very important: if you want your file searches to be any kind of fast, you should install ripgrep, which is, for some reason, way faster than ag, pt, ack, and grep. You can swap around which search tool is used for these kinds of functions with dotspacemacs-search-tools inside dotspacemacs/init. Mine looks like
dotspacemacs-search-tools '("rg" "ag" "pt" "ack" "grep")
There’s some interesting integrations between projectile and org-mode that I played with in the past, but that I ended up abandoning. I mention it in case it draws your fancy. The package to investigate if this interests you is org-projectile.
Finding and Replacing Text
There’s lots of options here, because there’s emacs and vim ways of doing this. Within a buffer, to quickly find text, I typically simply use /, which invokes (evil-ex-search-forward). Then, I type the text, hit RET, and use n (next result) and p (previous result) to browse the results. It looks like this, after I press RET:
The numbers wrapped in parentheses indicate how many results there were (the right number), and which result I’m on (the left number). In the editor, the orange-line highlighted bits of text are matching results. If I switch windows, my search is brought to that window as well, so I can hit n and p there as well to jump around.
One trick to quickly replace text is to use this search feature, combined with vim’s . paradigm (which repeats the previous command). This is good for short text changes, such as in:
| |
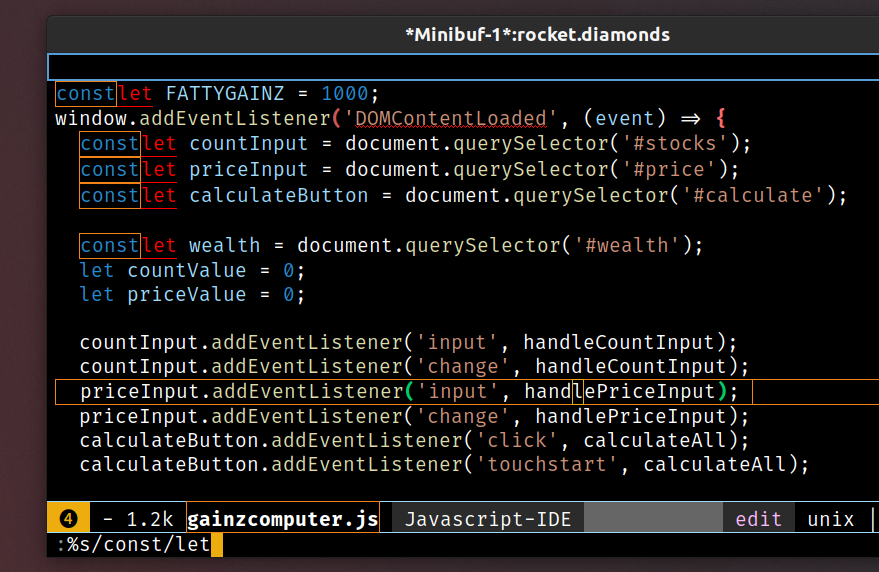
To quickly change all const to let, I’d do / const RET to initiate search for const and put my cursor at the first letter of one of the results. Then I’d do c w let ESC to change the word under cursor to let. Then I’d quickly press n . (n period) repeatedly until all const were changed to let. c w is a vim binding, so it comes from evil-mode. So does ..
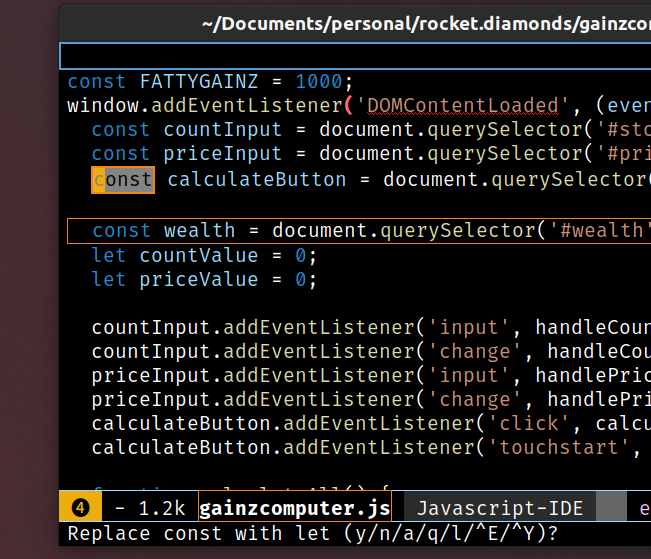
If I wanted to change ALL instances of const across an entire file, I have two options (that I know of). The first is the same way I’d do it in vim, with the %s command. I don’t know what it’s called, sorry, we’re in vim land now. To start it, you do : s % / followed by the text you want to match for, then another /, followed by the text with which you want to replace the matched text. You can preview the results in the window, then press RET to trigger the change. So, if I wanted to change all instances of const to let, my full stroke order would be : s % / const / let RET (remember the spaces are there as part of the emacs key notation style, it doesn’t mean press space). It looks like this:
You can also do the changes one item at a time, by doing : s % / const / let / c. You then navigate through results, pressing y or n to either replace, or skip, the highlighted result. It looks like this:
Another way to find text is to use *, which invokes (spacemacs/enter-ahs-forward). I think this just comes baked in with spacemacs by default. To use it, you put your cursor on a word that you want to find across an entire buffer, and press *. It looks like this:
You have lots of options. You can navigate results with n (next) and p (previous), you can trigger the same search across the entire projectile project with / (which is the same as doing SPC / and entering the same text manually), or you can edit the text across the entire file. To edit all instances in the file, press e, which invokes iedit. This tool I think is a lot more powerful than I realize, but the only way I know how to use it so far is to, after pressing e and having one item highlighted, pressing S to do some magic vim “change all” type command, then entering the desired text, then pressing ESC ESC. So to change all instances of let to const, I’d put my cursor on one instances of let, then do * e S const ESC ESC. Again, I think this tool is way more powerful than I realize, but it does what I need it to do as-is.
Finally, to replace text across an entire project, put your cursor on an instance of the text you want to replace, and do SPC p R, which invokes projectile-replace. You’re then presented with the text under your cursor in your minibuffer (at the bottom of the frame), which you can edit as needed. Then, upon pressing RET, you’re asked which text you want to replace the selected text with. After entering that text and pressing RET, you’re brought into a replace transient state, similar to when using the c flag on the vim s% command. From here, there’s a lot of commands, so I’ll just copy the full help text
 Query replacing regexp OLMap with butt.

Type Space or ‘y’ to replace one match, Delete or ‘n’ to skip to next,
RET or ‘q’ to exit, Period to replace one match and exit,
Comma to replace but not move point immediately,
C-r to enter recursive edit (C-M-c to get out again),
C-w to delete match and recursive edit,
C-l to clear the screen, redisplay, and offer same replacement again,
! to replace all remaining matches in this buffer with no more questions,
^ to move point back to previous match,
u to undo previous replacement,
U to undo all replacements,
E to edit the replacement string.
In multi-buffer replacements type ‘Y’ to replace all remaining
matches in all remaining buffers with no more questions,
‘N’ to skip to the next buffer without replacing remaining matches
in the current buffer.
Again, tool is probably hella powerful, but I just use it for project-wide search and replace. This comes baked in with projectile, no changes needed to .spacemacs.
Managing Git
Working with git is so feature-rich and ideal, due to magit, that I’ve encountered dozens of people that literally use emacs for nothing other than magit. This is one aspect of emacs usage I especially recommend reading up more on outside of this post, as I’m painfully ignorant of all that’s possible in magit, or the best ways to use it. That being said, I’ll describe how I use it.
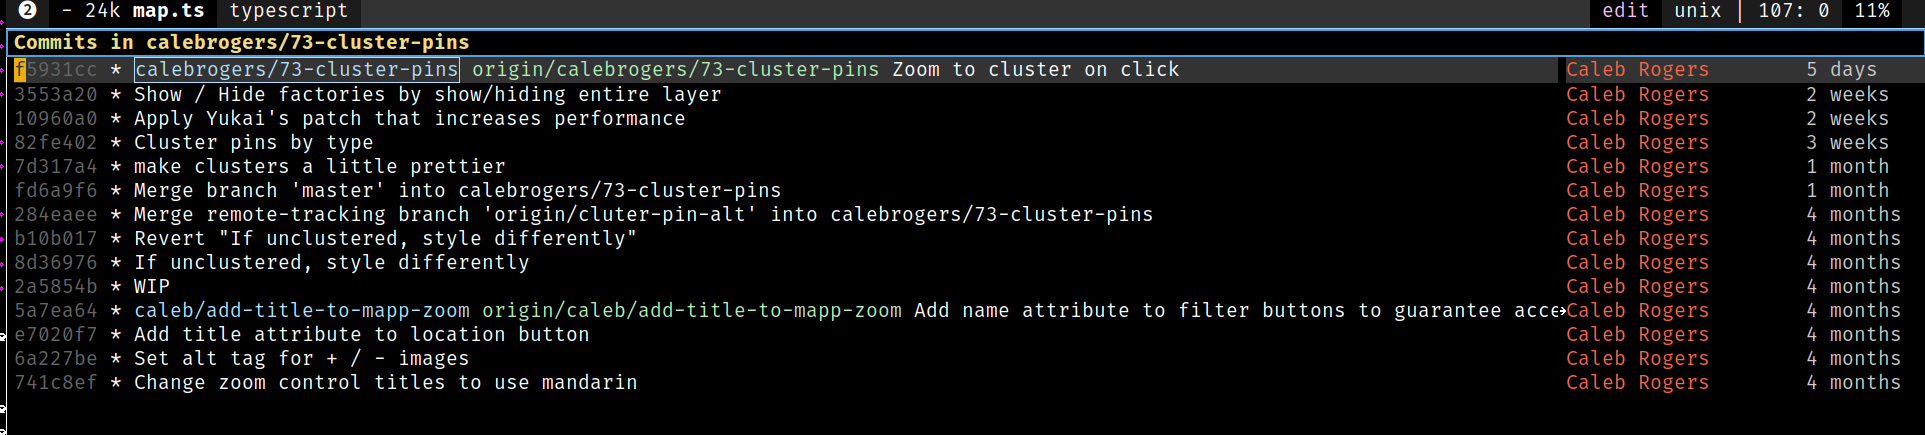
My most common command flow with magit is to view, stage, and commit my changes. I do so by pressing SPC g s which invokes magit-status. This is what the resultant status buffer looks like (it opens in a new split window):

As you can see in the screenshot, the status window alone is kinda neat. You can see your HEAD branch name (calebrogers/73-cluster-pins), as well as the last commit title on that branch (“Zoom to cluster on click”). You can see the current Tag, if you use tags. Then, you can see untracked, unstaged, and staged files. From here, usually what I’m doing is going through my chunks and staging what I need to stage. All of this functionality is possible in git from the command line, but so much easier from magit. For example, if I have two changes in the same file, but I want those changes in separate commits (or I want to commit one change now and keep working on the other change before committing), I can do that! I move my cursor to the filename in question and press TAB, which opens up to show the changes:
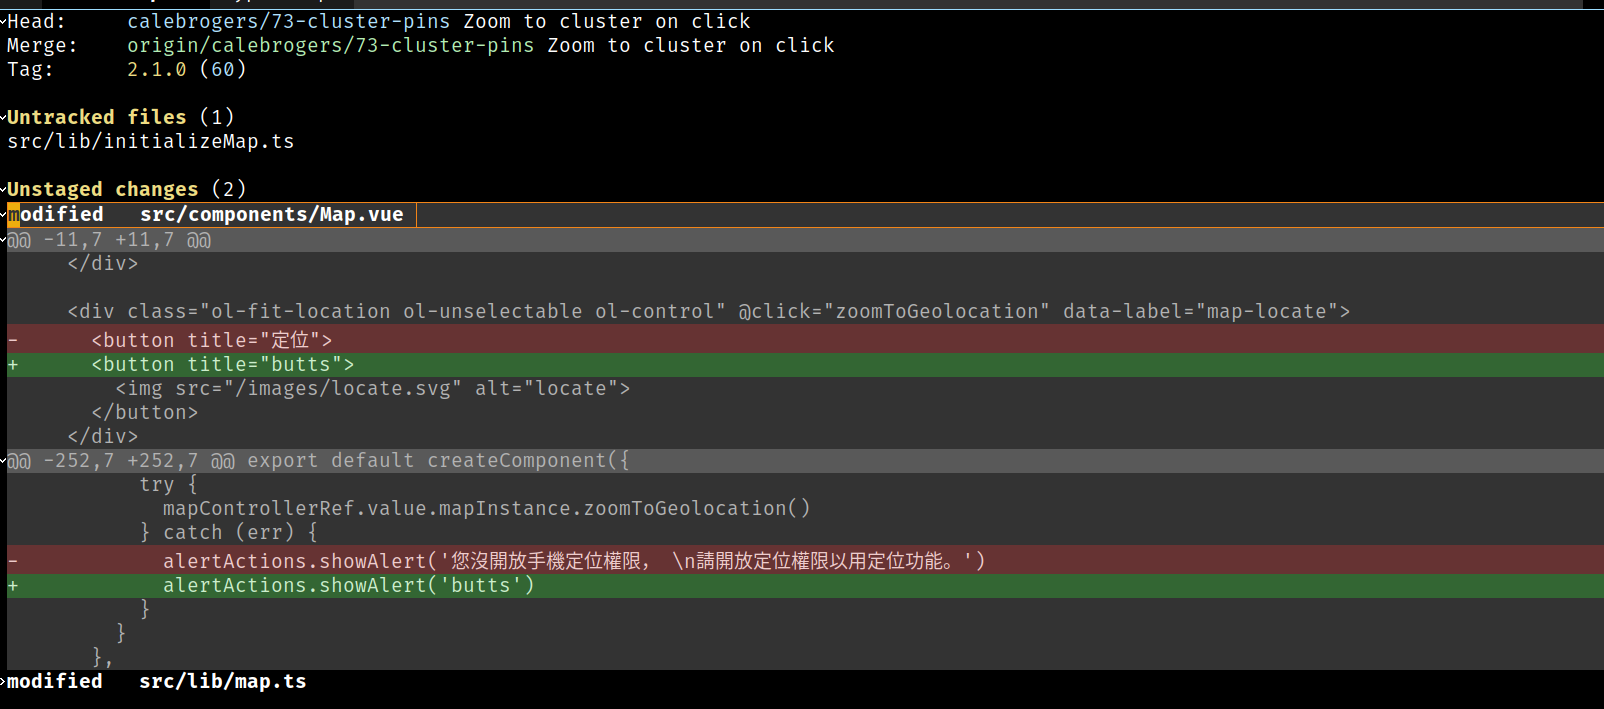
Changes are broken into chunks, which I can stage separately. I move my cursor to the header of the second chunk (@@ -252,7… etc) and press s to stage this chunk:
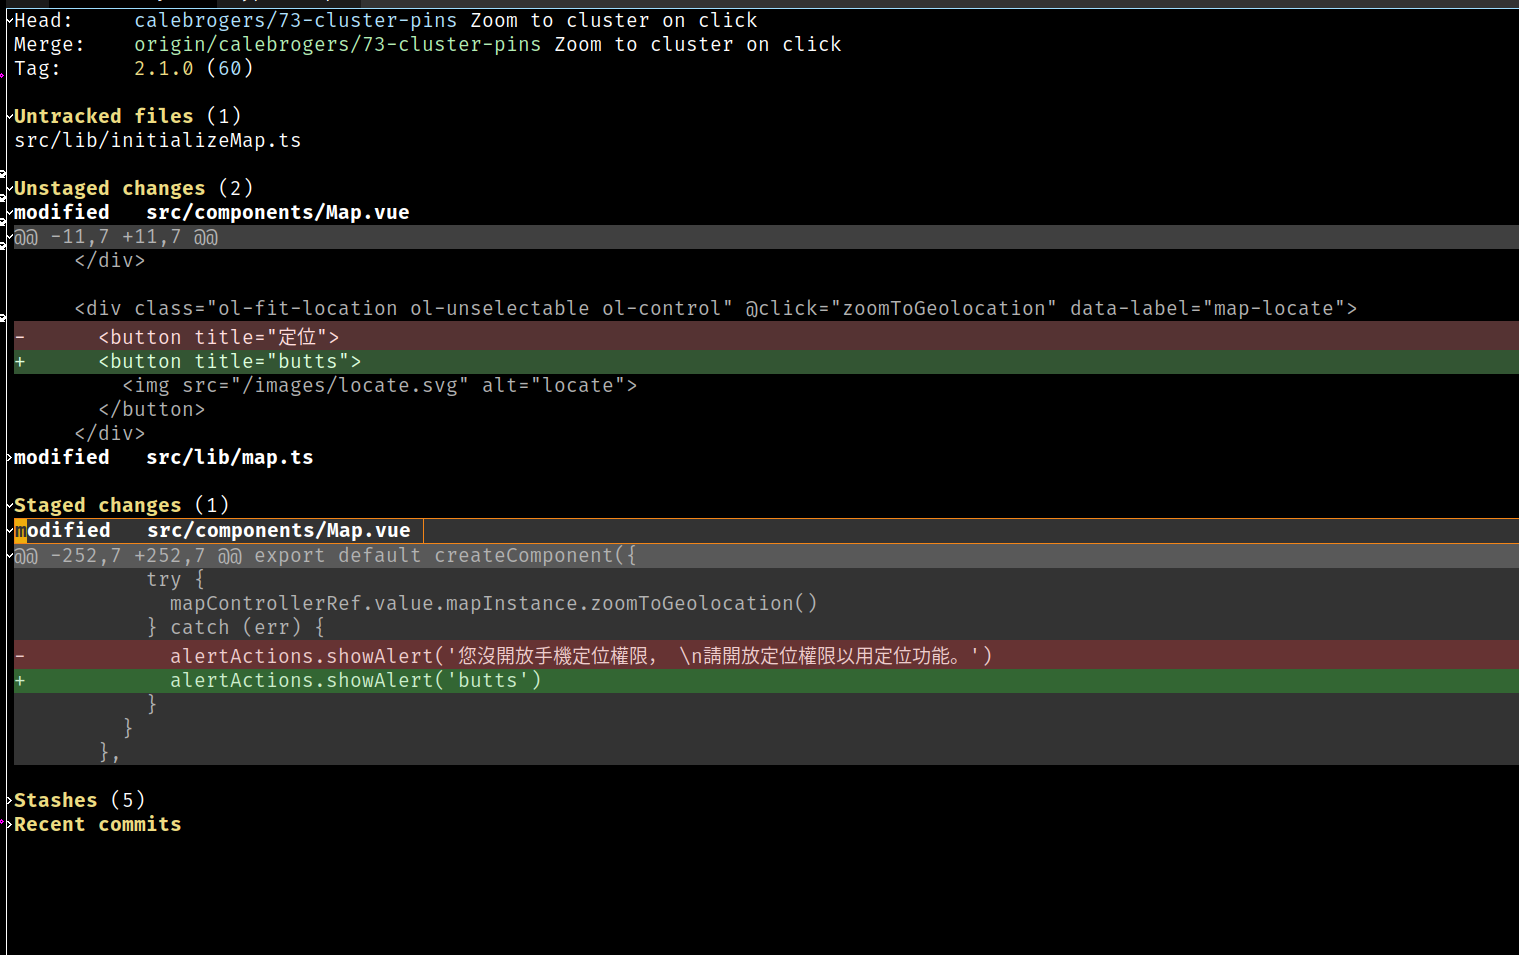
Now, that change is staged. From here, I can unstage it with u or commit it by pressing c to open the commit options:
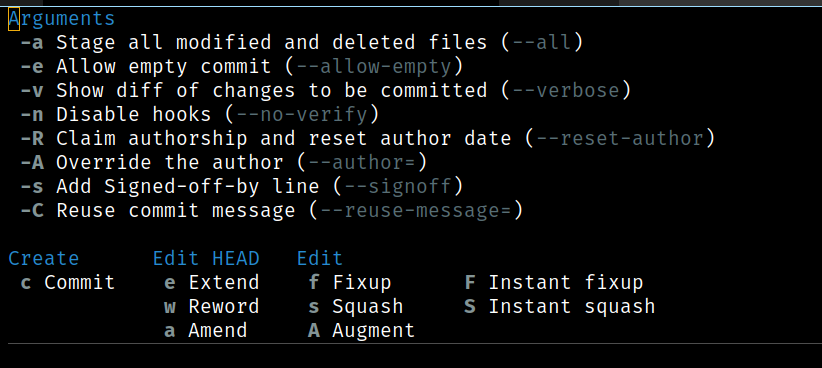
I don’t really do anything with these ever so usually I just immediately hit c again to causes two windows to split open. One has a buffer showing the staged changes, the other is a buffer where you input the commit message (the same that’s opened if you do git commit from your terminal).
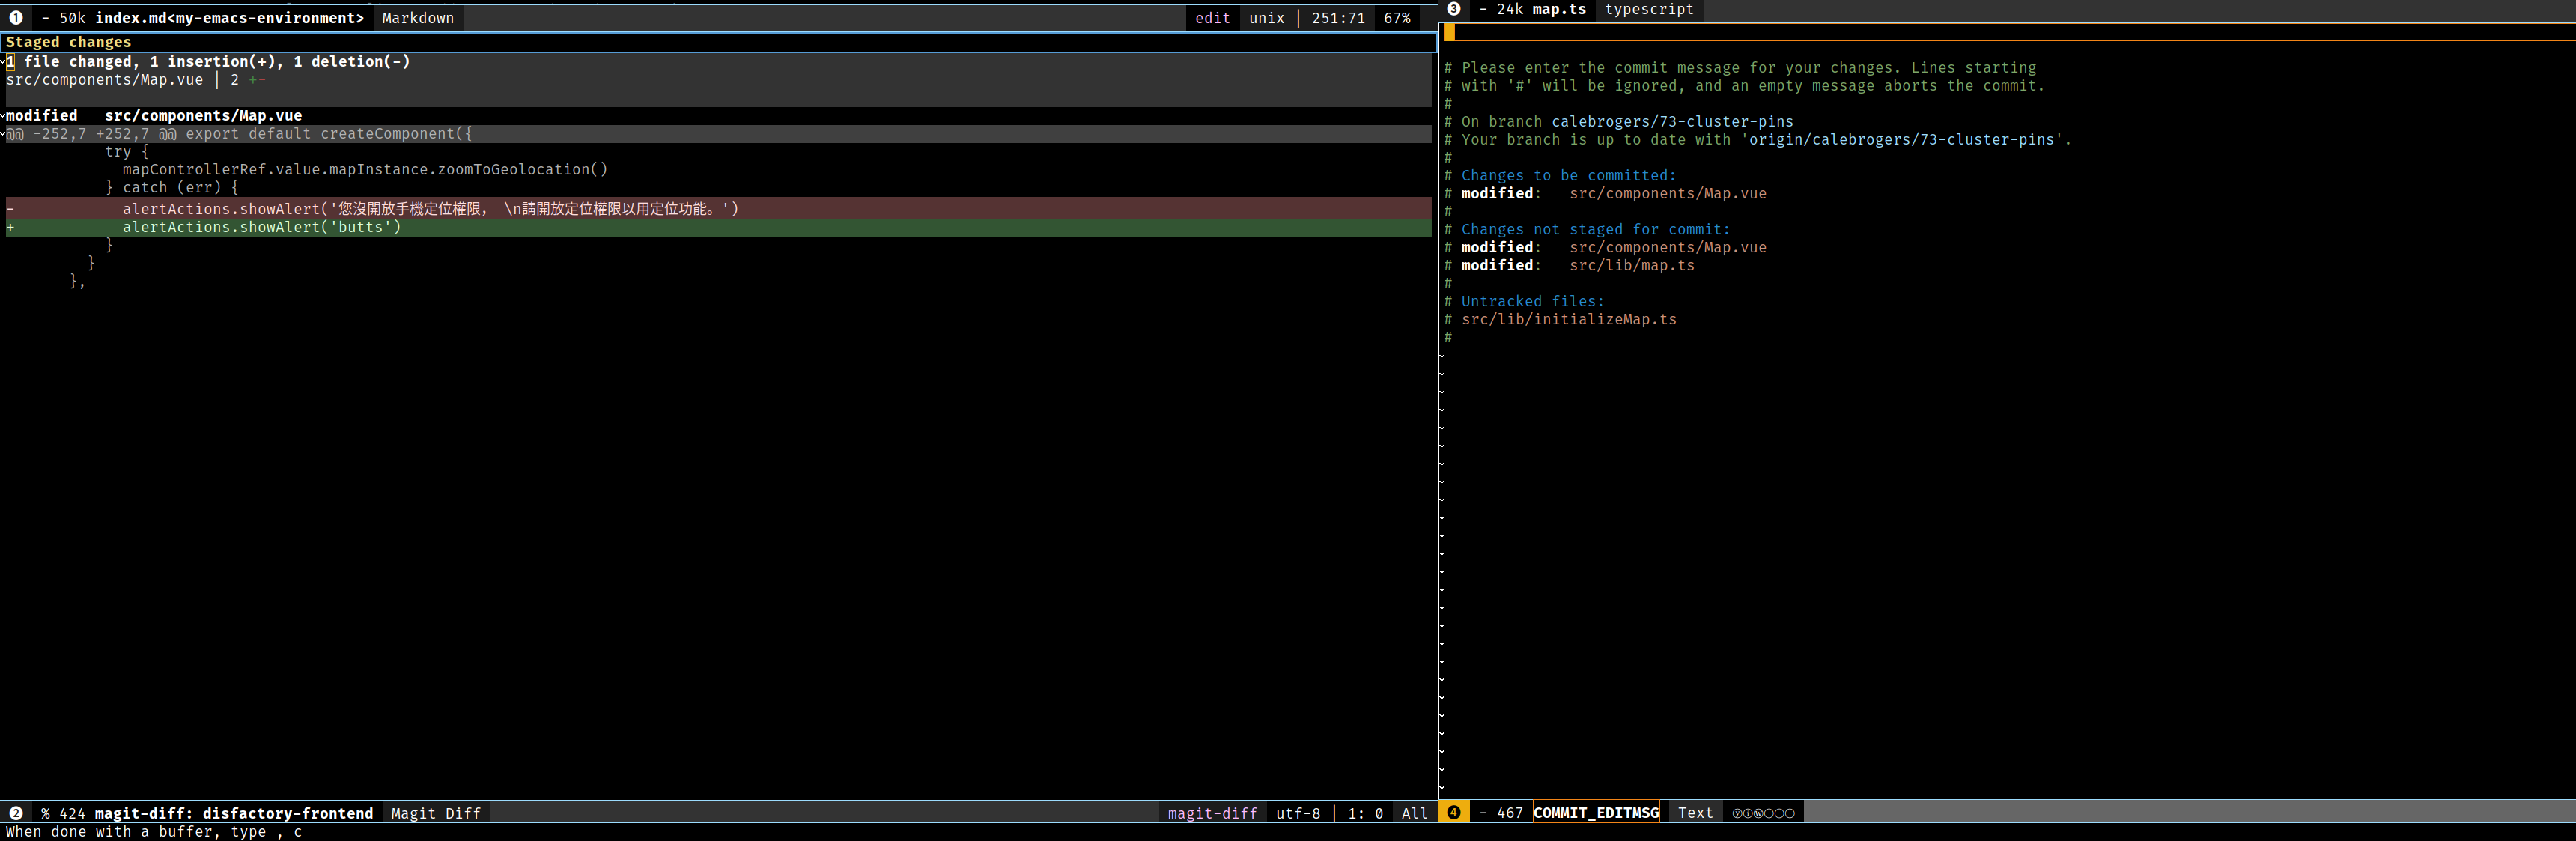
I type out the commit message, then hit , , to run git commit, or , k to cancel the commit (leaving the files staged).
This is an enormously helpful workflow for me to review everything before I commit it, which nearly 80% of the time has resulted in me finding something that I in fact don’t want to commit (like perhaps an errant console.log) or just want to change slightly before doing so.
Wait, that’s not all! I also use magit to browse git history. First, I do SPC g m to invoke magit-dispatch, which shows a list of available magit commands:
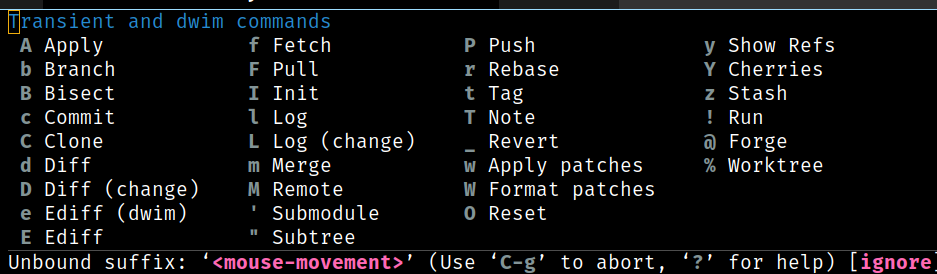
To view history, I press l from within this menu, which brings up git log options:
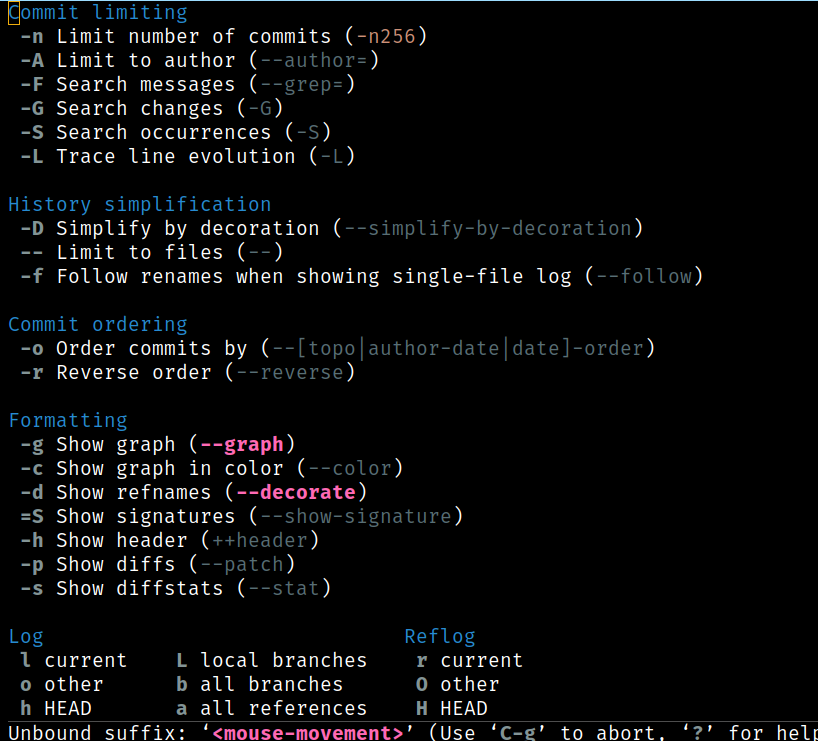
which obviously has TONS of options. This time, I want to figure out which of my commits broke something, so I add the author flag by pressing - A, which then lists all authors that have contributed to this repository:
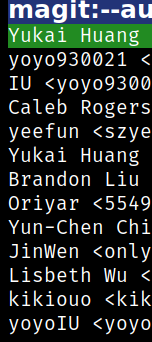
I select myself with RET, then am brought back to the git log options, where I press l to log on the current branch (I think that’s what l means). I’m shown a list of all commits that match my flags:
From here, I can choose a specific commit by navigating with j and k, then pressing RET to split another window that will show me a detailed view of that commit, INCLUDING a diff!
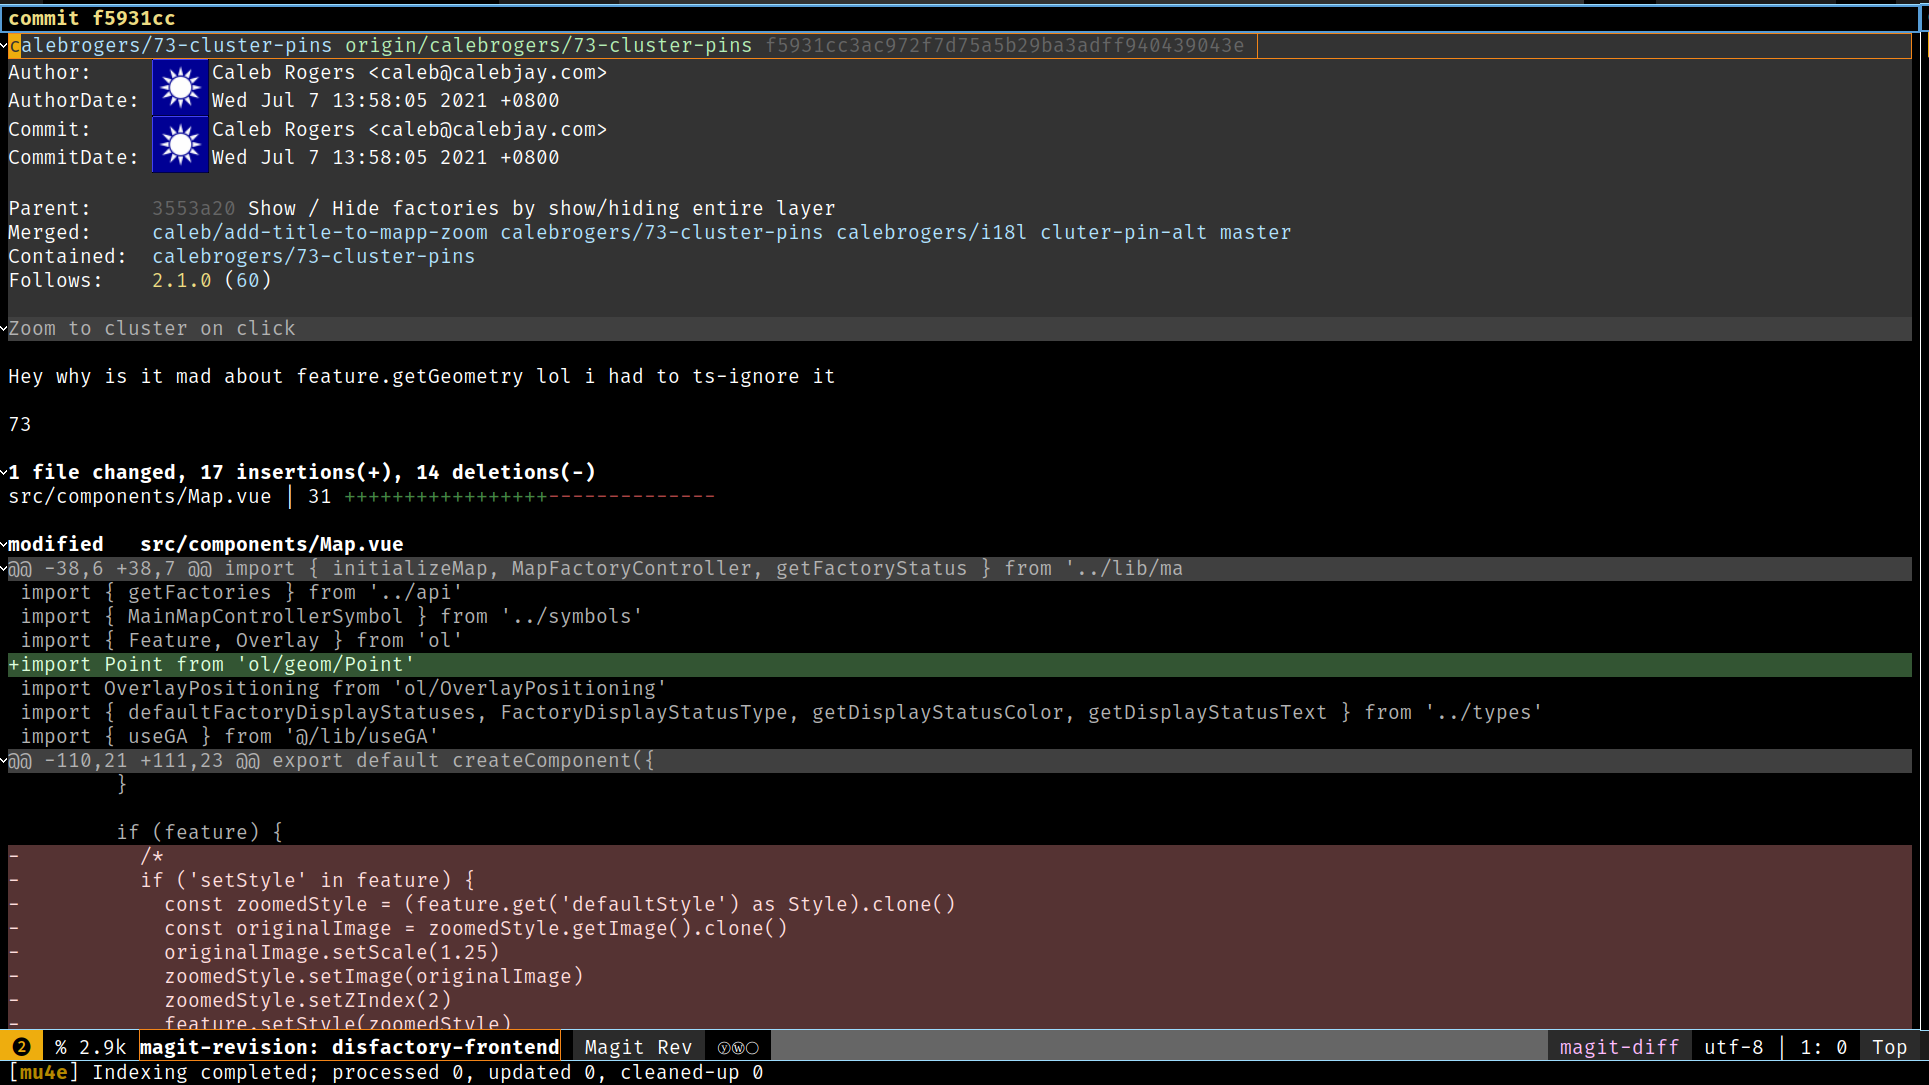
If I show commits by all authors (no - A flag), it displays them with helpful indicators of branch points:
There’s an incredible amount of power here, with a surprisingly usable UX, especially compared to just using git from the command line. You can also invoke magit directly on a file, for example if you want to do a git blame or diff that file specifically to see its git log. Those are the main things I use magit for, but I again highly recommend exploring what else can be done with it. People online constantly rave about it.
Programming a Vanilla HTML, CSS, Javascript Project
The rarest of rare. These tend to just be personal project type things, but the tooling that these projects use are extended by all the react and vue type plugins, so worth discussing.
As an example, I’ll use a really dumbshit website I made when I was trying to cash in on the Gamestop hype earlier this year. Here’s the repository. Before you ask, I lost thousands on GME and I don’t want to talk about it. It’s because I forgot to set my limit sells before going to bed. Never ask me about this, I’ll start crying in public and it’ll be embarrassing for both of us.
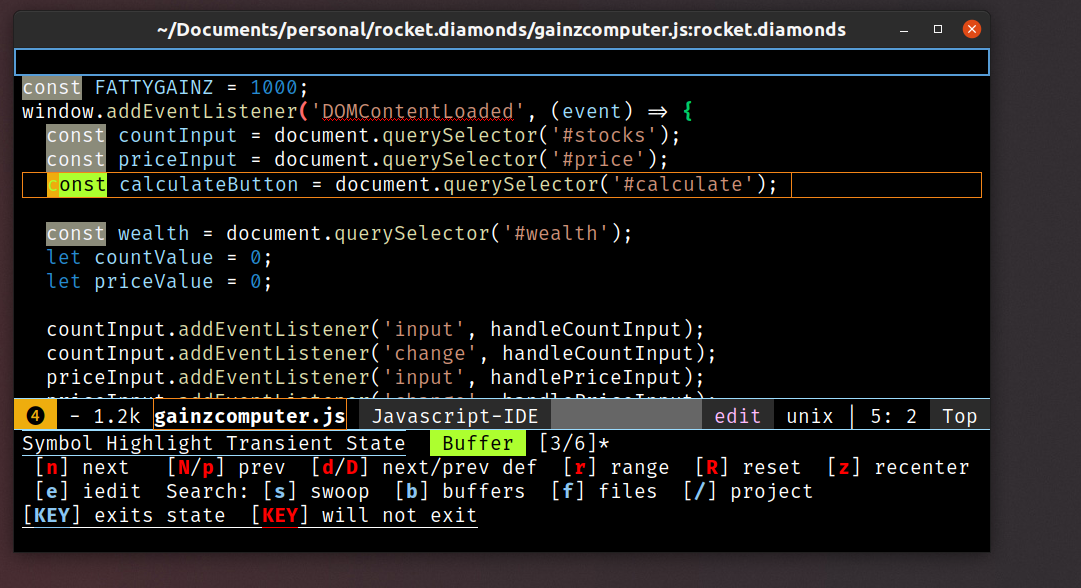
So here’s what a javascript file looks like in my editor:
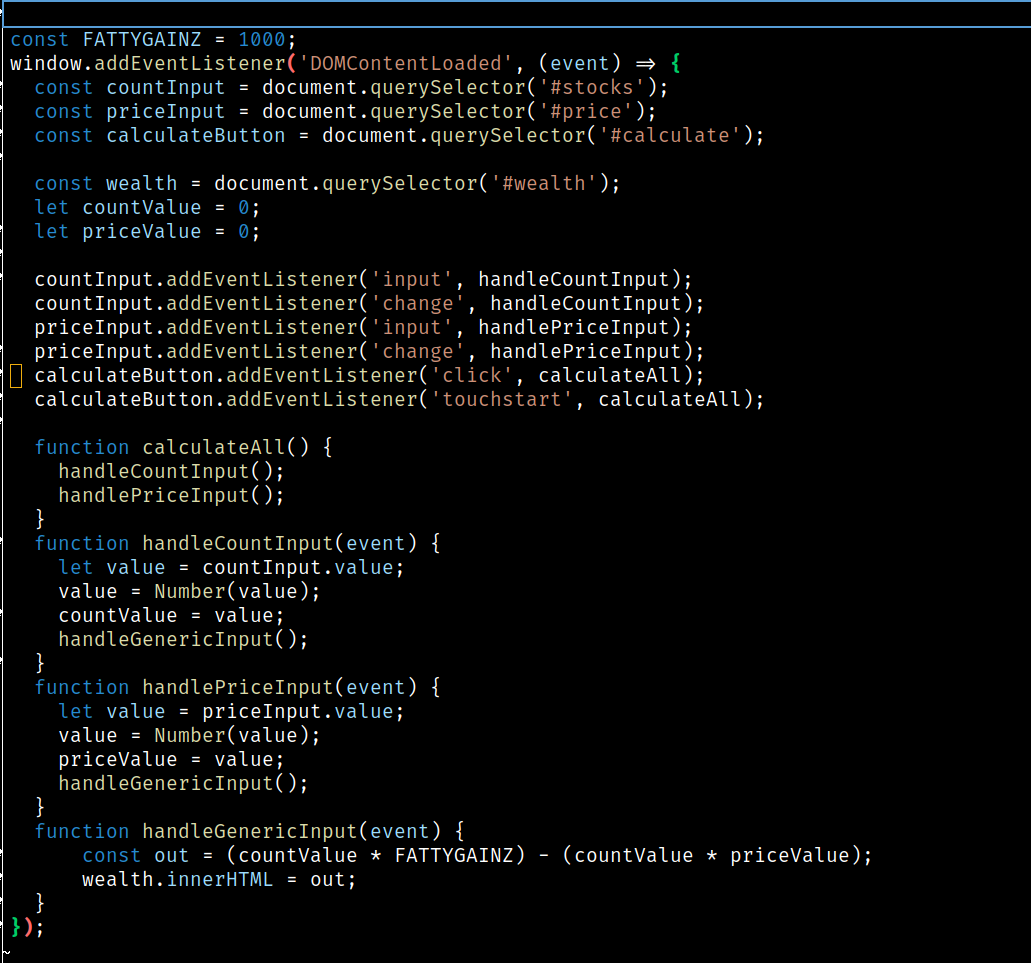
Almost everything here is from js2-mode.
So, we’ve got syntax highlighting, which is of course a bare minimum. Vim gives you that. You also have code folding, which I rarely use, but is nice for huge files.
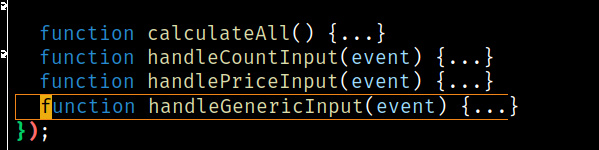
There’s also syntax error handling.
js2-mode also implements a version of jump-to-definition, called js2-jump-to-definition. This lets me put my cursor on, for example, the first character in the line countInput.addEventListener('input', handleCountInput);, then press , g g, to be taken up to the definition of countInput on line 3. This is true across most programming environments in emacs, and is especially great for Python. Sure, you could do a full-project text search, but that sucks if there’s duplicate function names, or if your project is massive and uses the function everywhere. , g g takes me straight to where the function was defined.
Then there’s a bunch of little nice-to-haves that I use sometimes. For example, js2-ternary-to-if is bound to , r 3 i, which will take a ternary and tern it to an if statement, like so:
| |
becomes
| |
There’s some other random stuff like js2r-wrap-in-for-loop, but that’s about it.
Here’s what an HTML file looks like in web-mode.
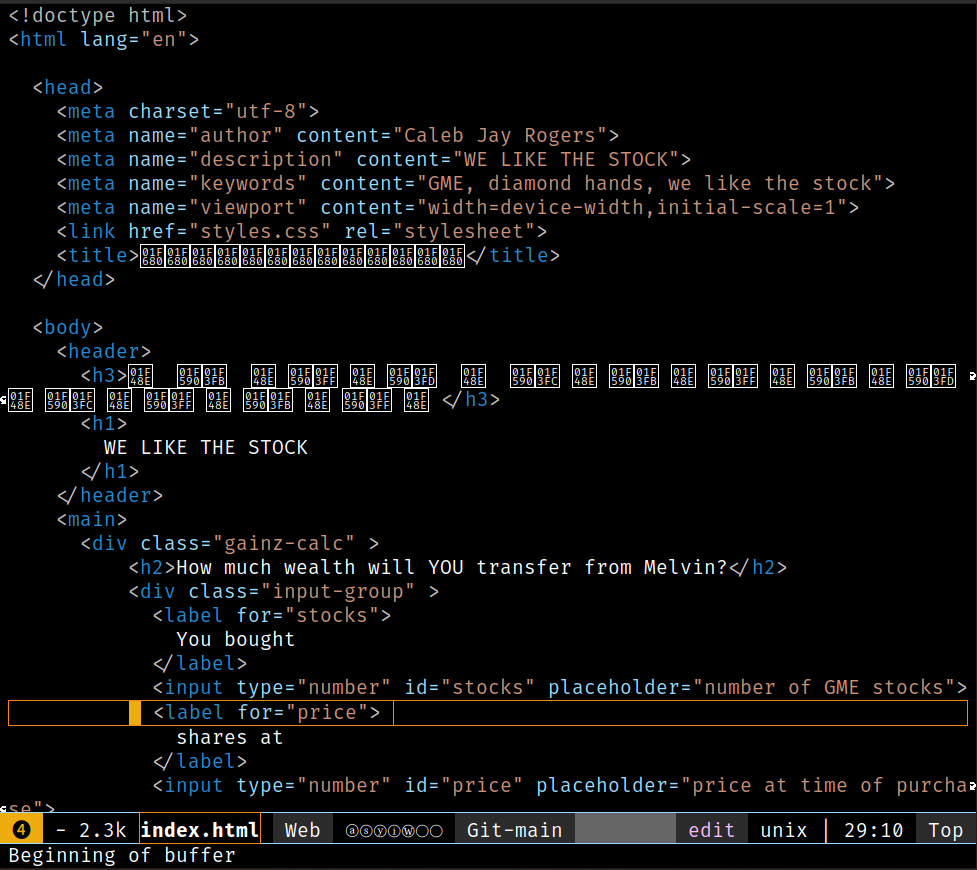
Those funky looking errored characters are emojis. I think you can render emojis in emacs, but I haven’t bothered to set that up.
Anyway, as you can see, basic syntax highlighting. However, there’s this awesome thing called web-transient-state, which I activate by , ., the common paradigm for transient states in emacs (magit has one too). web-transient-state is fantastic. It looks like this:
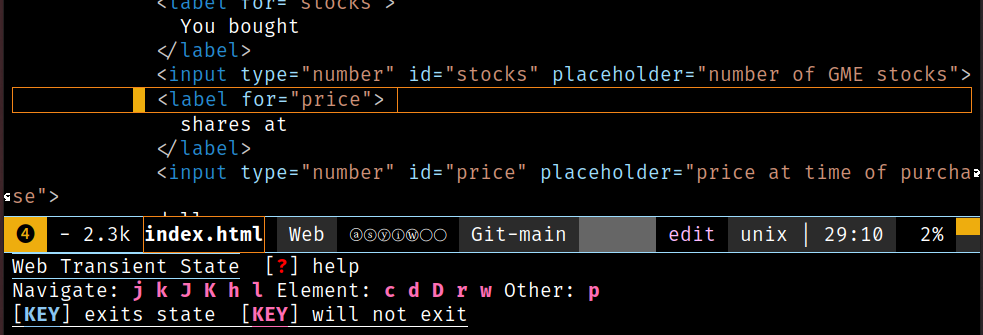
From this state, I can quickly navigate through HTML DOM elements, using vim-style keys. j and k will move me up and down through any element, regardless of how nested. J and K will move me through sibling elements, or to a higher hierarchy if encountered, but never lower. h and l will pop me to the next deepest hierarchy, if there, or pop me out to the next parent hierarchy. I can edit stuff too: c will duplicate an element and all its children, d will delete an element but keep its children intact (and auto-indent as necessary), D will delete an element and all its children, r will rename an element to whatever type you input after pressing r (and its closing tag), i.e. from a div to a span, and w will wrap an element in whatever element type you input after pressing w .
There’s impatient-mode, triggered with , I, that will immediately launch a web server and serve the contents of the HTML file’s directory. Good for quickly checking whether styling is working, for example. There’s lots of , g “goto” type commands that make navigating through a huge nested HTML file very nice (for example, go to parent, child, or sibling). You can instantly check for DOM errors with , E l. . There’s also some autocomplete goodies, such as if you type out an element, like a <div>, when you type the upcoming slash in </div>, the element will close for you.
As for CSS, I mean, I dunno what vscode is doing for CSS these days, but I’m not entirely sure what there is to do for CSS. Here’s a screenshot:
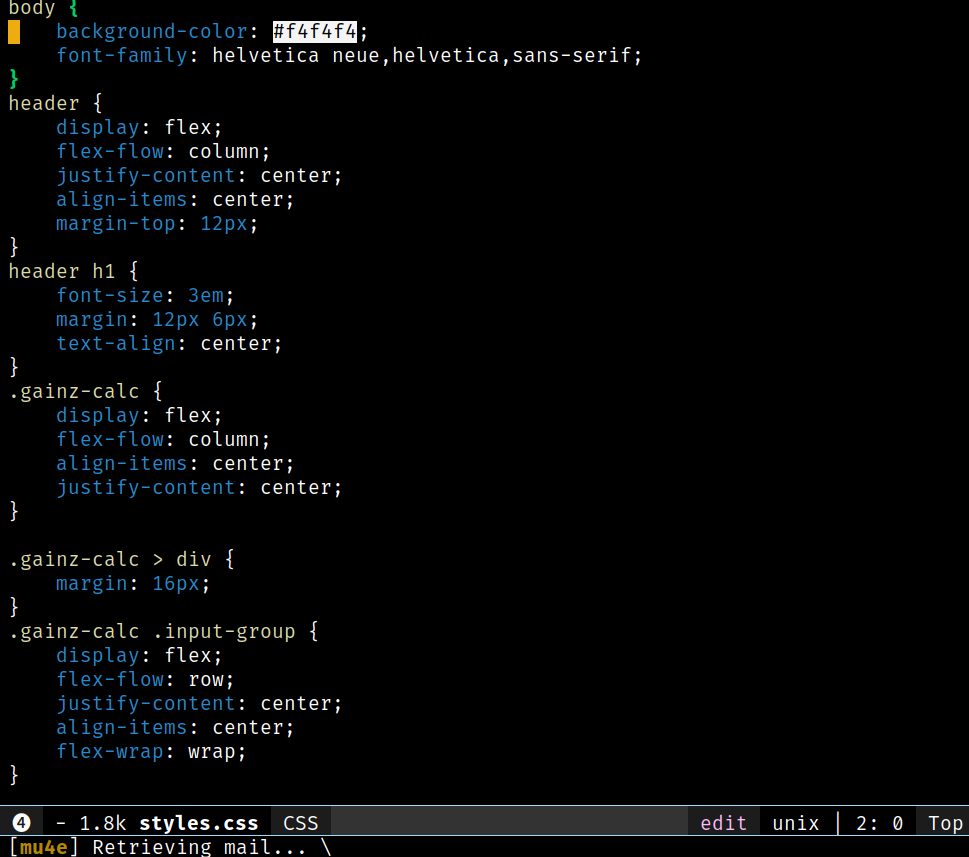
Syntax highlighting, hex color applied as a background color to the attribute, what else do you need? No seriously, if there’s cool shit going on in the vscode world of css editing, someone tell me.
Setting up Javascript, HTML, CSS
In an HTML file, the major mode I use is web-mode. In spacemacs, you get this by adding html to your dotspacemacs-configuration-layers.
In a JS file, the major mode I use is js2-mode. Add javascript to your dotspacemacs-configuration-layers to use it.
I believe that css-mode comes baked-in when you add html to spacemacs.
Programming a Vue, Typescript, SCSS Project
Ok, now for an actual project. I’ll be using as an example the open source Disfactory project I’ve been contributing a bit of time to. it’s an app for reporting and tracking illegal factories here in Taiwan.
Here’s what it looks like, in three screenshots to demonstrate the template, script, and style areas of a vue file:
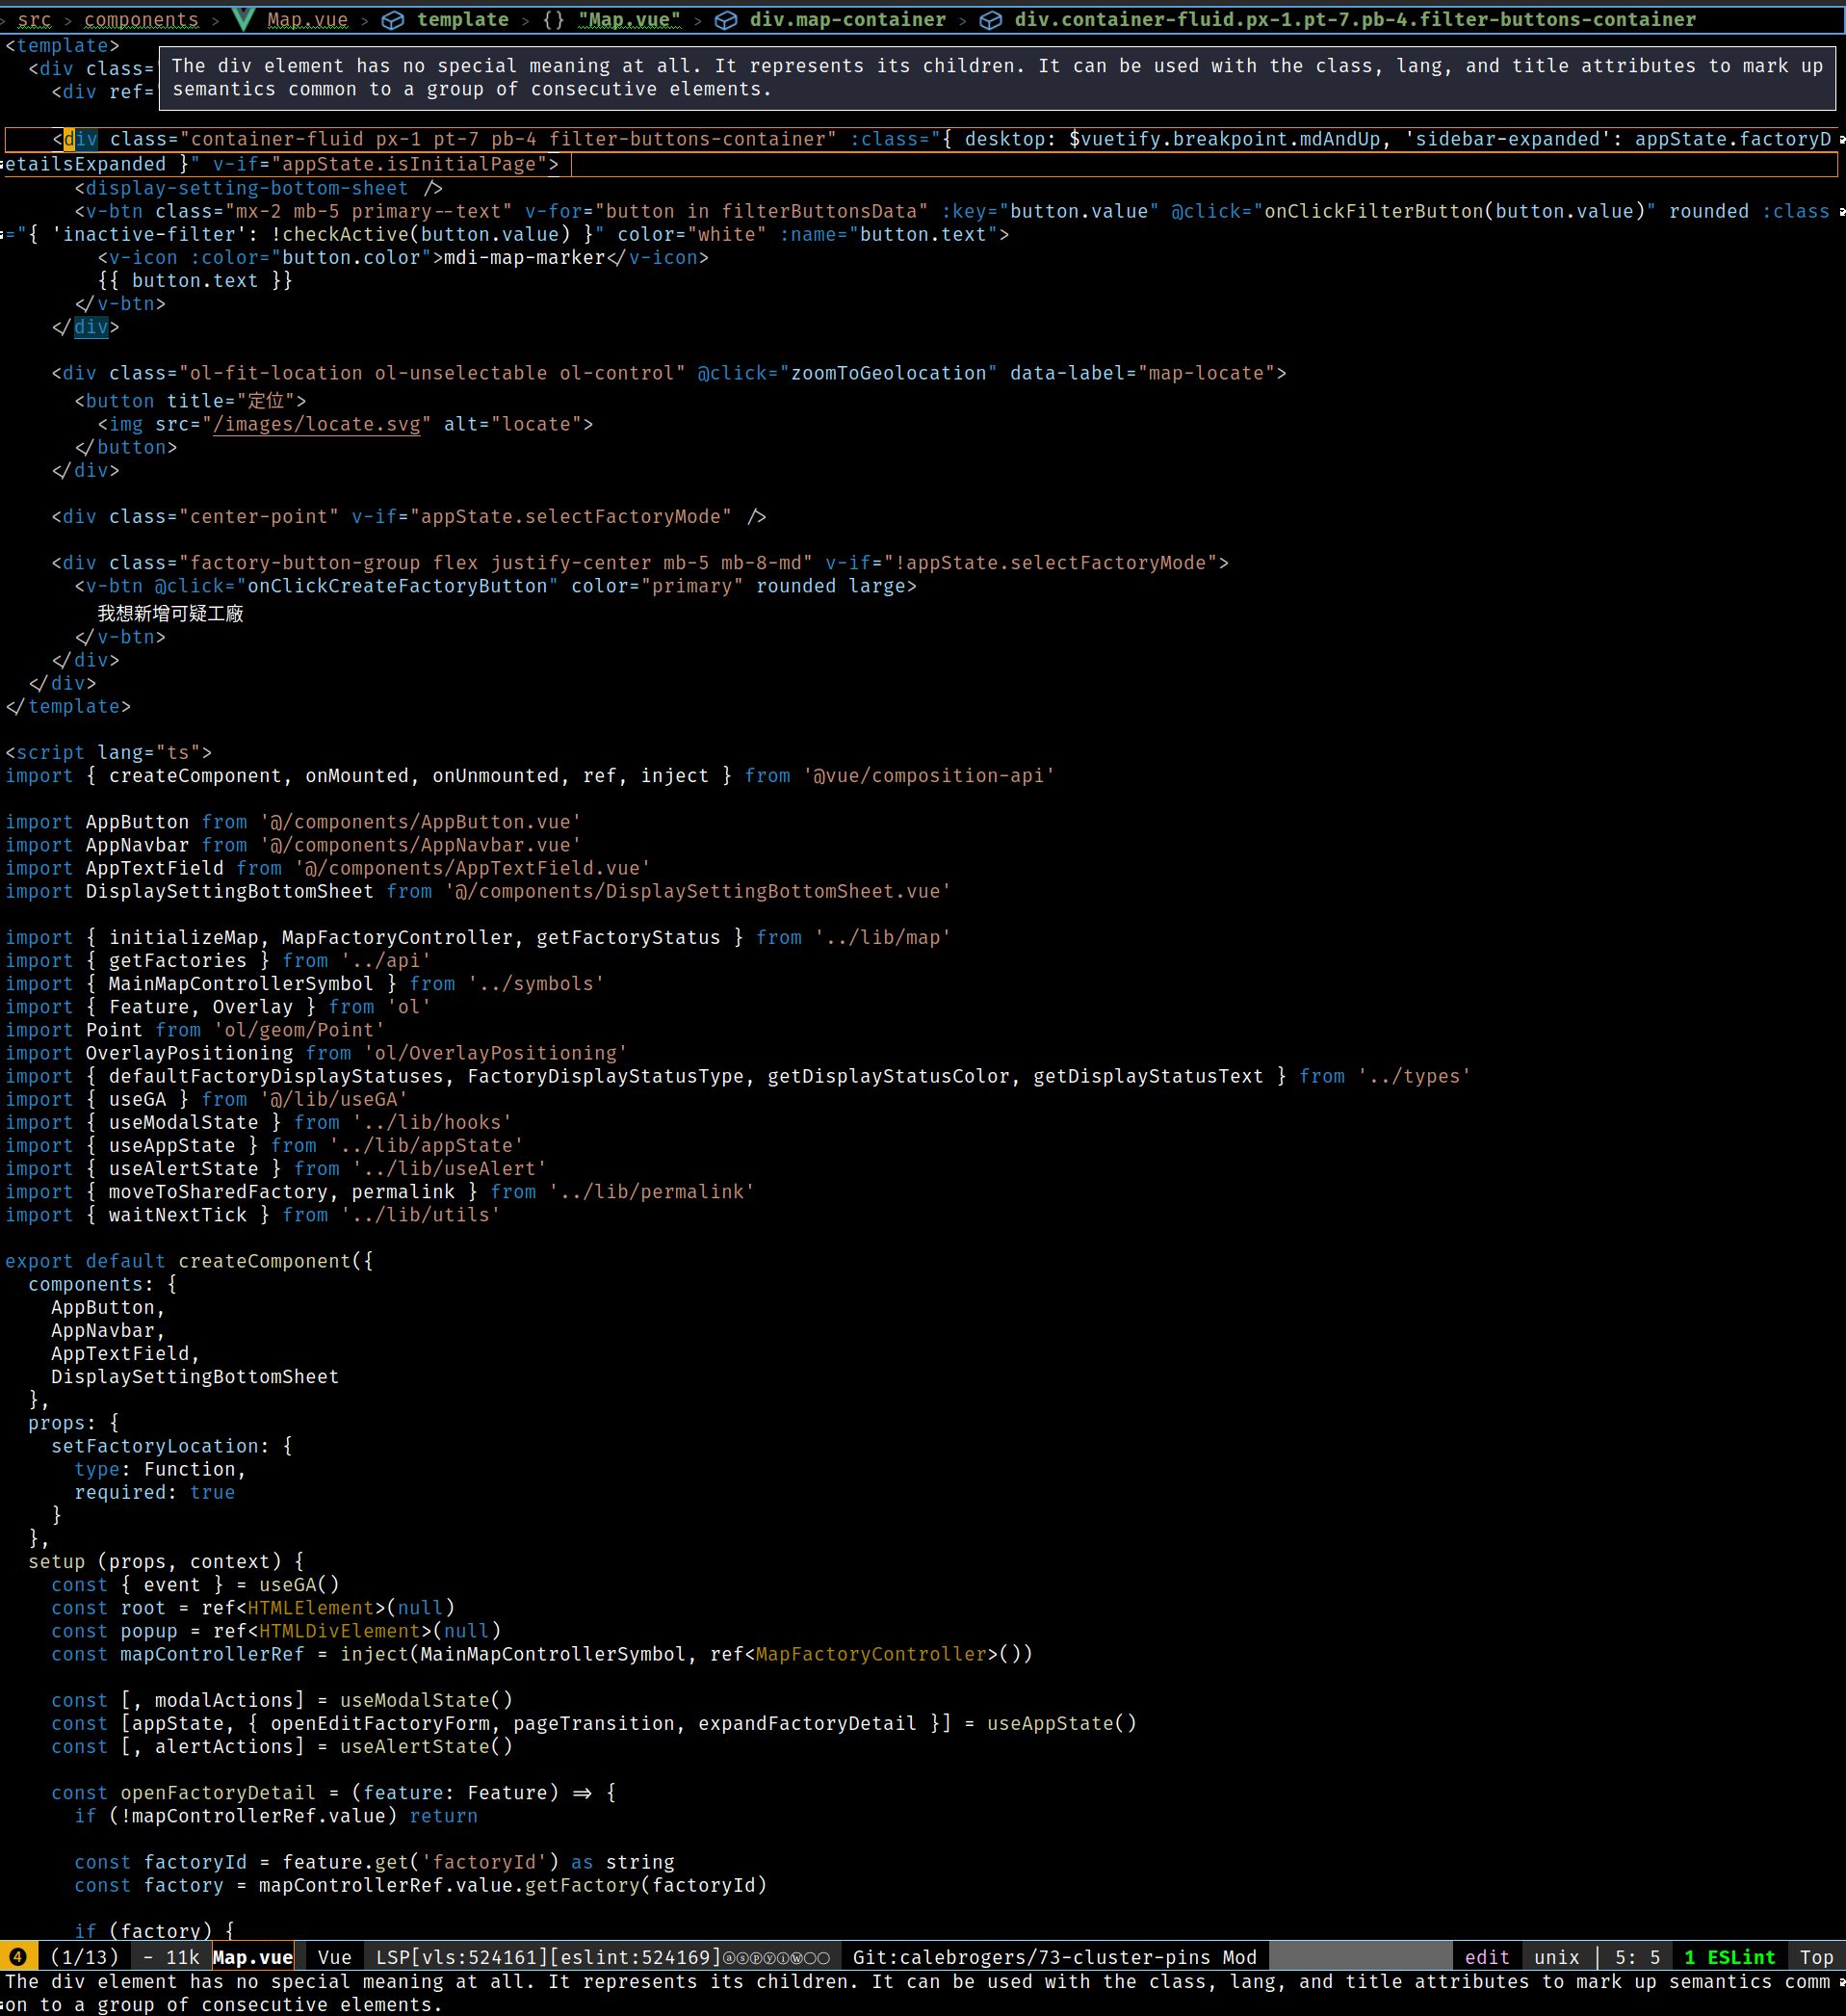
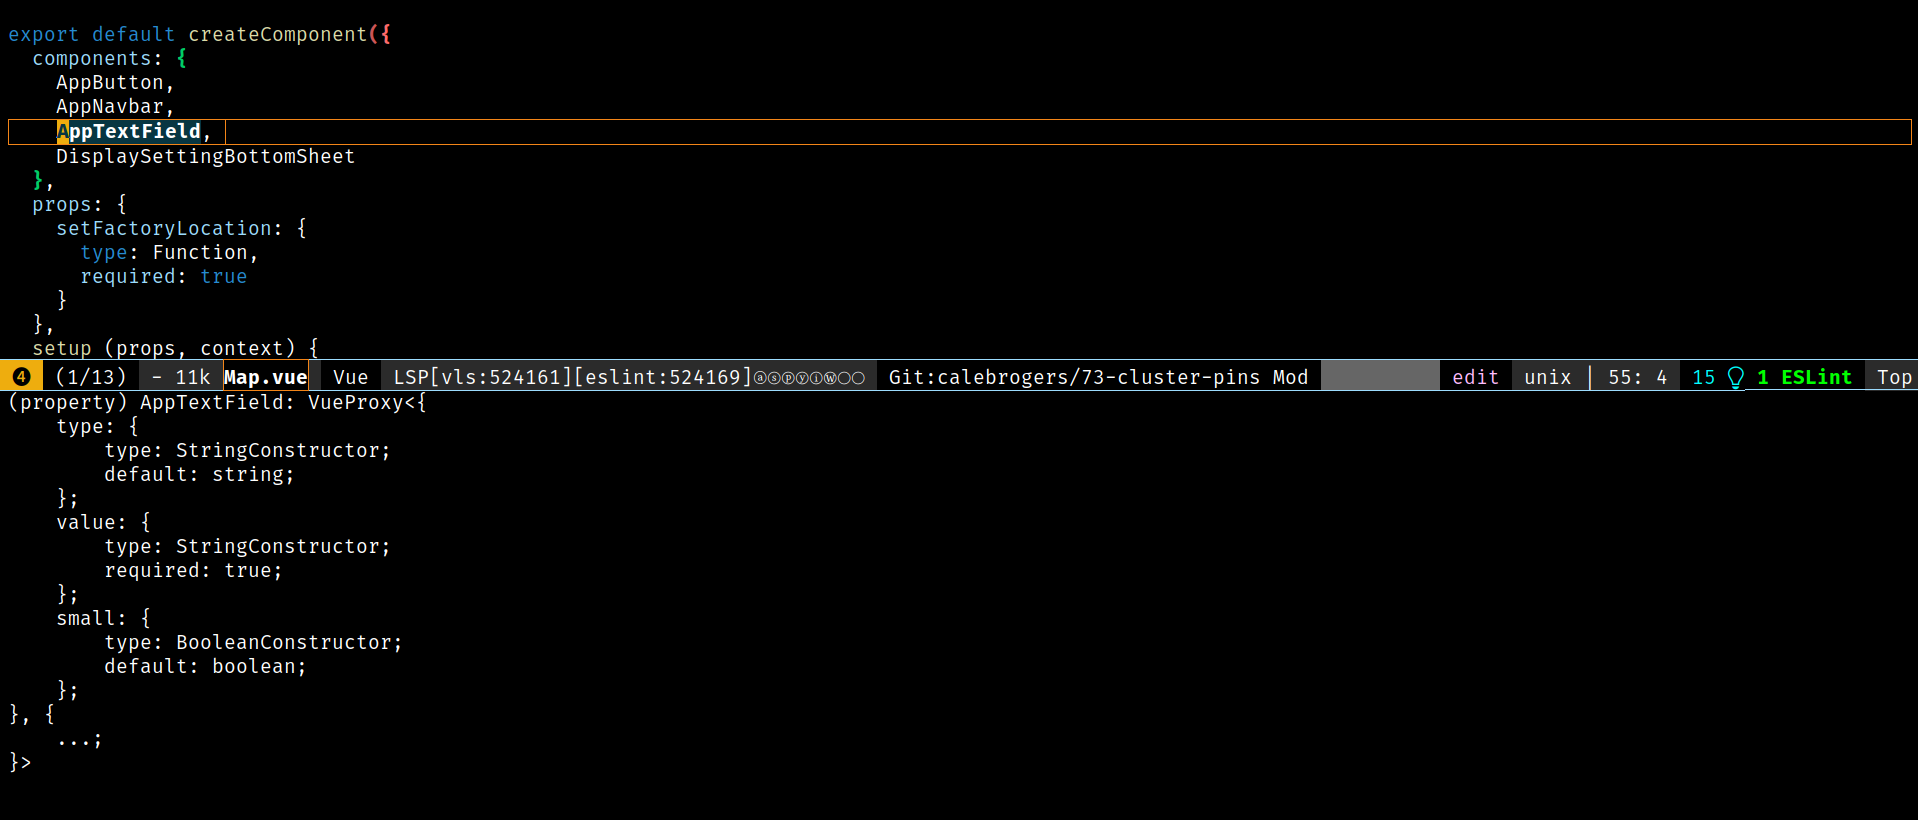
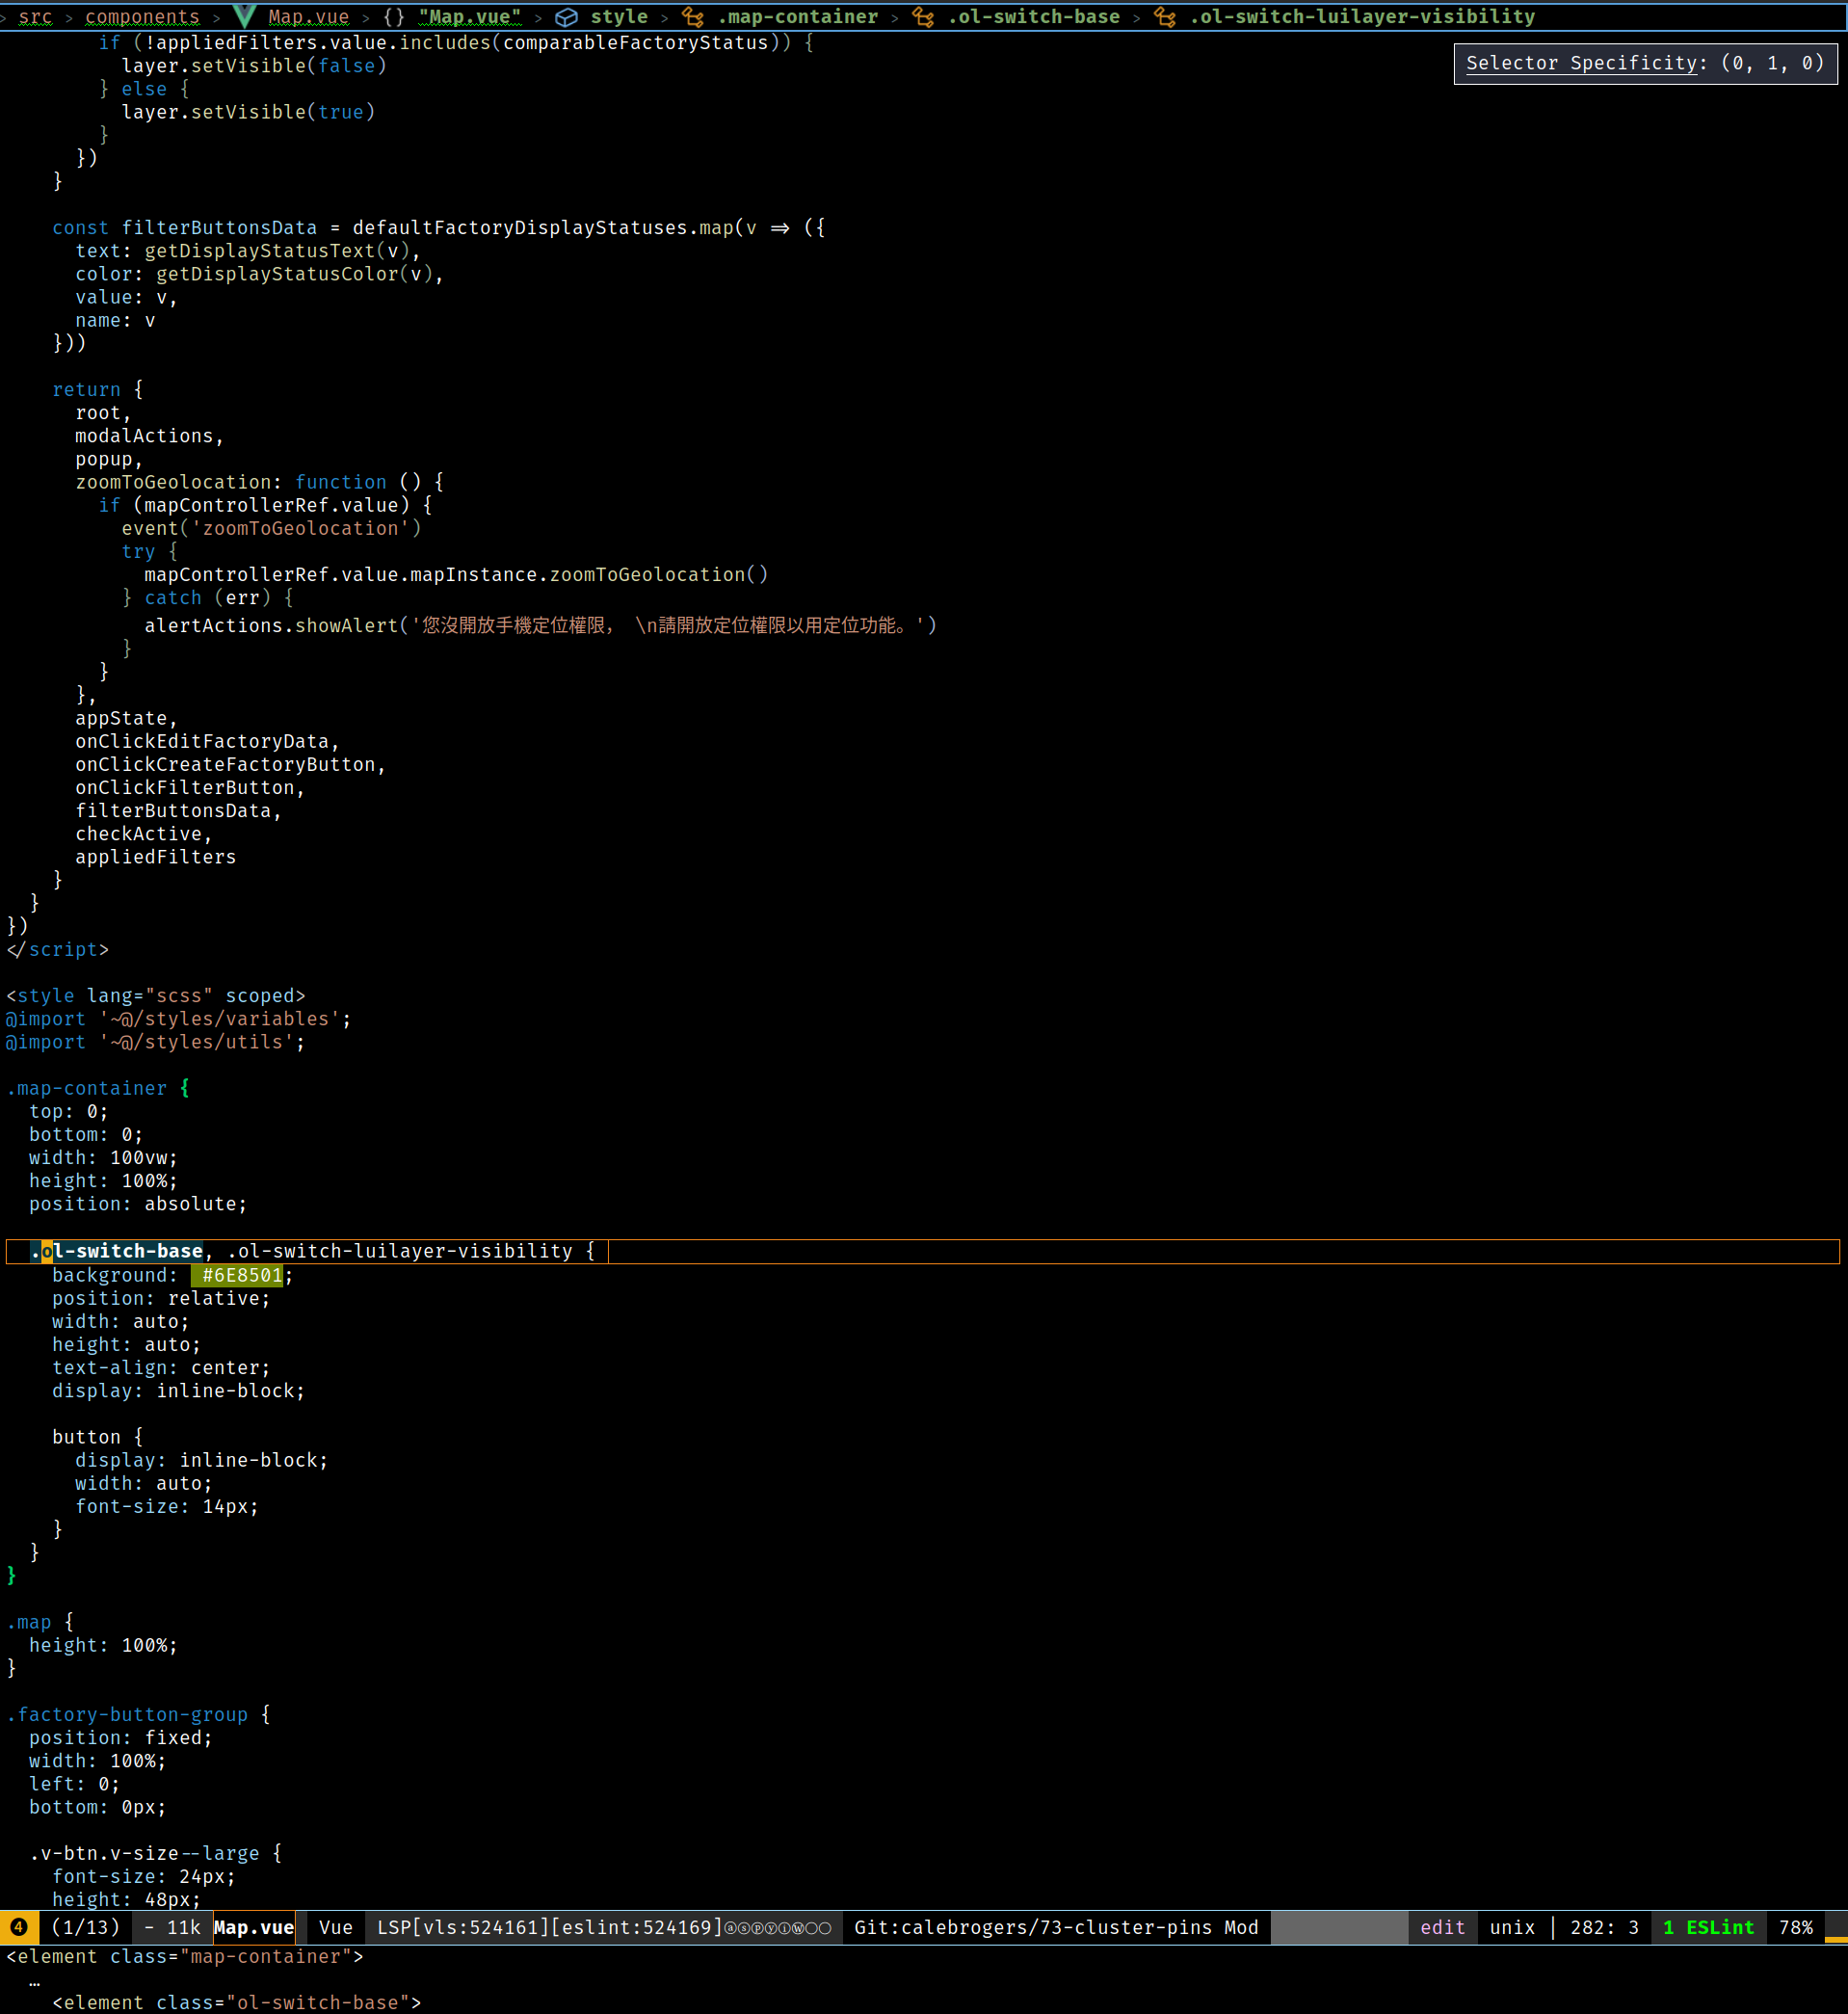
I shrink down inline images in my blog to save page size, but you can click them to see the full sized image.
LOTS of goodies to go through.
First of all, there’s there “lsp lens” functionality, which will show information about whatever is under the cursor. If it’s an html element, it will have some information about that element and its purpose and usage. Or, if I have it on something like a Class, it will show a brief overview of some of the properties and methods on that Class, and since we’re in typescript, their types! If I set the cursor on a function invocation, it’ll display the parameter and return types. One of my favorite uses is under the style portion of a vue file, if I set my cursor on some nested SCSS rule, it’ll tell me what sort of elements will be matched by that rule, which I demonstrate in the third screenshot above.
There’s pretty robust “go to definition” type functionality, so for example, if I set my cursor on MainMapControllerSymbol in the first screenshot above, and press , g g, I’ll be jumped straight to where that is defined, even if it’s in a different file.
Check out the top of the emacs client. The header bar will display “where” I am in the file. If the cursor is in the script area, it’ll show the filepath -> filename -> component name (there could be multiple components in a file!) -> script/template/style -> then break down where I am in a function. In SCSS, it’ll show similar, but also include any style nesting. Same for HTML DOM nodes. Very helpful when I’m buried deep in a template.
Also, remember earlier I said that web-mode would still be relevant, down the line? Because of how vue mode is constructed in spacemacs, it technically has extended web-mode, so any functionality I mentioned above in web-mode is available! That means transient state for node jumping around, duplicating, wrapping, etc. The same is true for the style portion of a vue file!
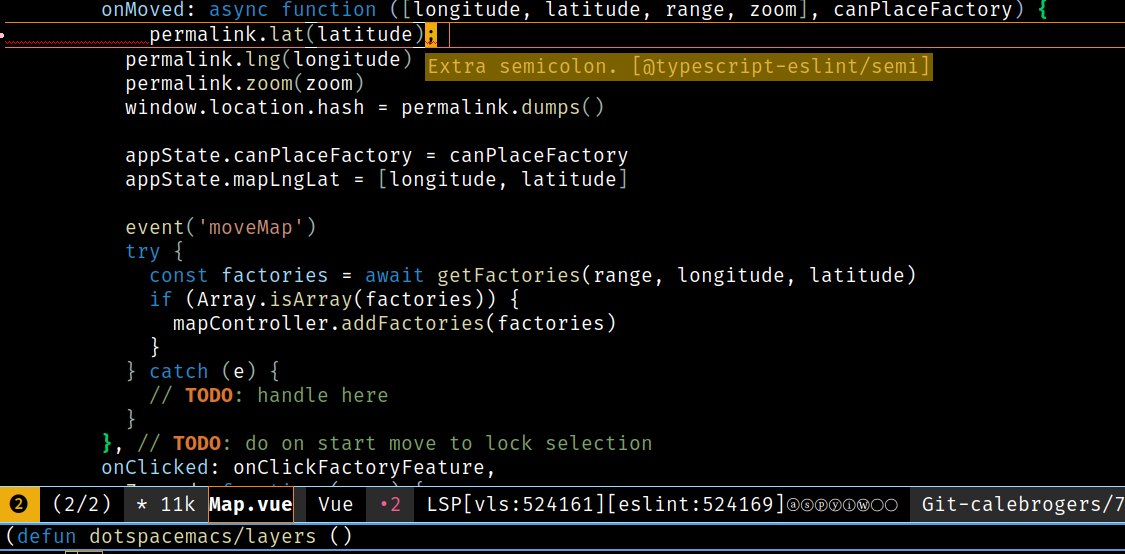
Also, there’s built in linting with eslint, and it pulls the rules from my project root. If there’s an error, it underlines it with a little msword style red zig-zag underline, and if you put your cursor on the error, it says what the issue is. Furthermore, at the bottom of a window, it shows how many errors total there are in a file. You can list all the errors in a separate buffer, and then go item to item fixing them, if you want.
It works in .ts files as well, with type errors:

Unfortunately I haven’t managed to get typechecking working in vue files yet.
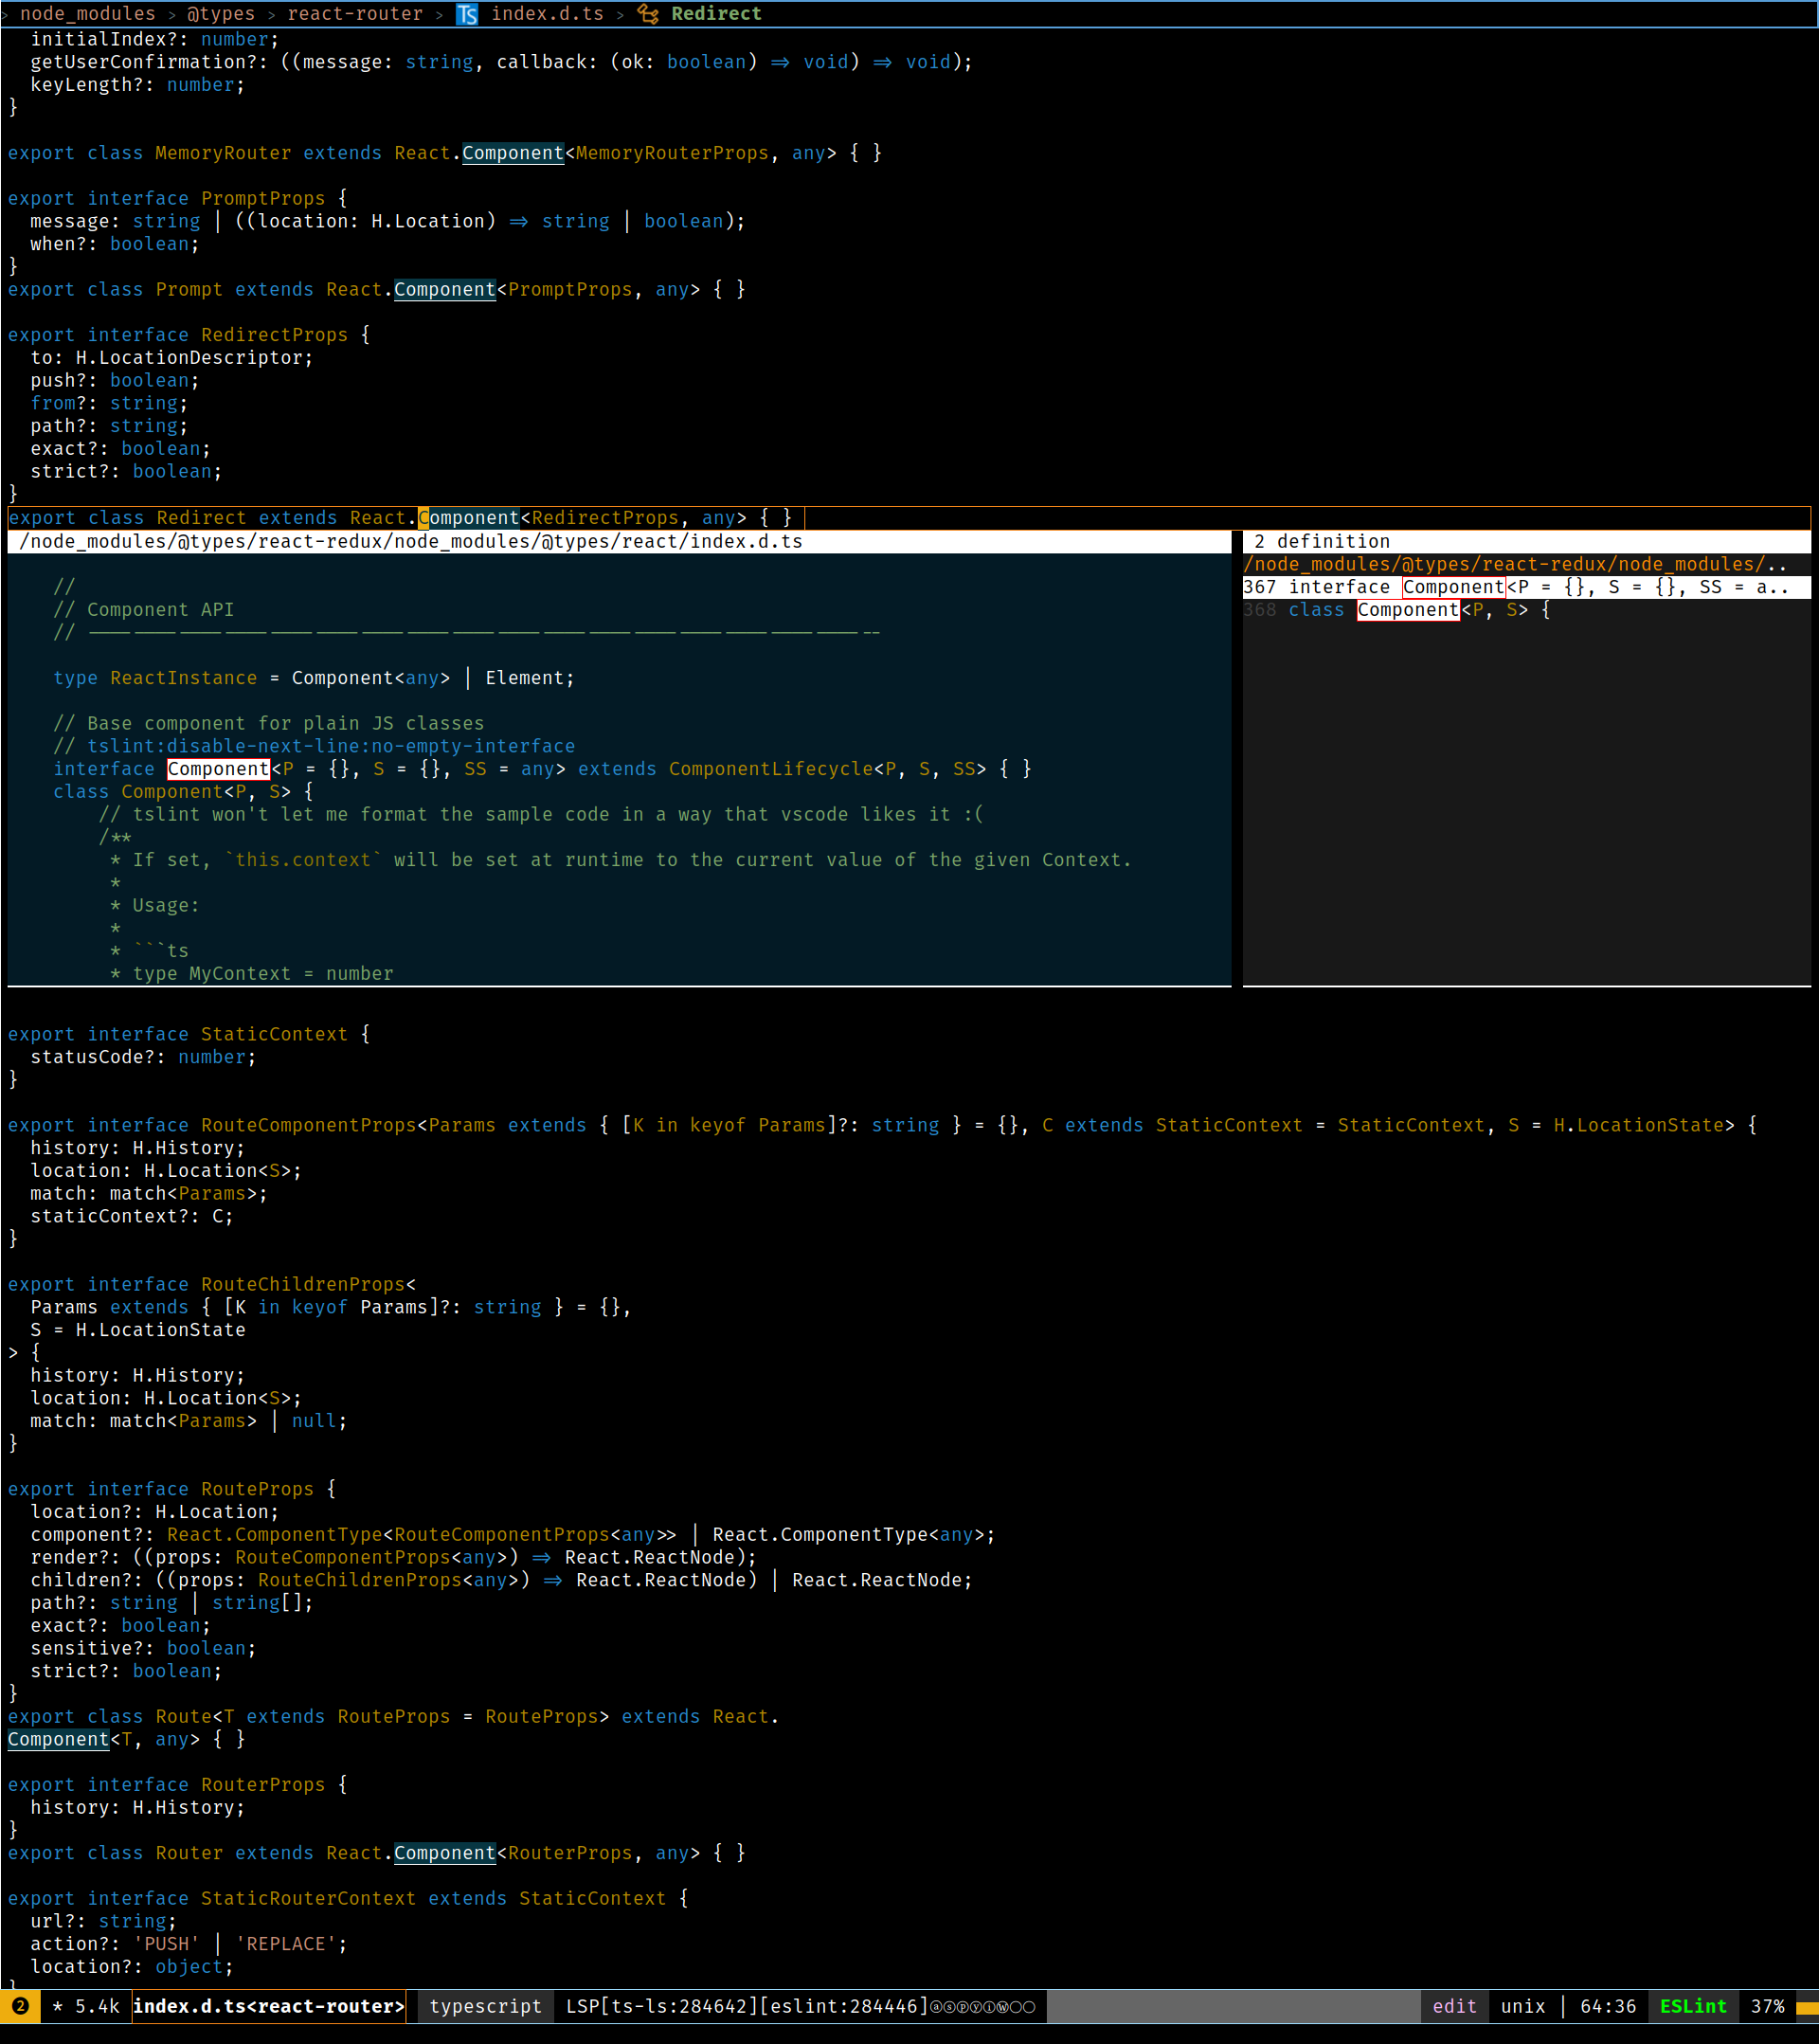
Typescript files also have the ability to jump not only to a given variable’s definition, but its type definition as well.
Also, within typescript file, you can use lsp-ui-imenu to get this overview of a file, its classes, functions, etc, but I never really use this. Looks kinda cool though:

Setting up Vue, Typescript
Setting this up was a little convoluted. First of all, I have vue in my dotspacemacs-configuration-layers. It’s added as (vue :variables vue-backend 'lsp), because a lot of features require a language server. That means I also need to have lsp in my dotspacemacs-configuration-layers.
LSP itself is a bit of a rats nest to get set up. I’ve found the emacs-lsp instructions to be the best, as they, unlike spacemacs, indicate all the things you need to do to get LSP working. So first, add lsp to dotspacemacs-configuration-layers. Then, you need to install a “language server” for your language of choice. Generally that means doing M-x lsp-install-server and choosing from the list of servers. For vue, though, that means installing Vue Language Server, via npm install vls -g. I also had to use M-x lsp-install-server to install ts-ls, and whatever other servers helm lists for things like html, css, etc. For getting eslint and typescript linting to pull rules from your project root, you need node in your dotspacemacs-configuration-layers, with node-add-modules-path t, as in (node :variables node-add-modules-path t).
Programming a React, Typescript, Styled Components Project
Wow, does React have some major tooling. And god almighty do people love it. I hate it, arbitrarily. But it’s worth saying, 99.999% of people writing react code, are doing so in vscode, and so therefore, vscode is probably quite simply the “best” (has the most tooling) editor when writing React.
But doing so in emacs isn’t so bad.
Here’s what it looks like:
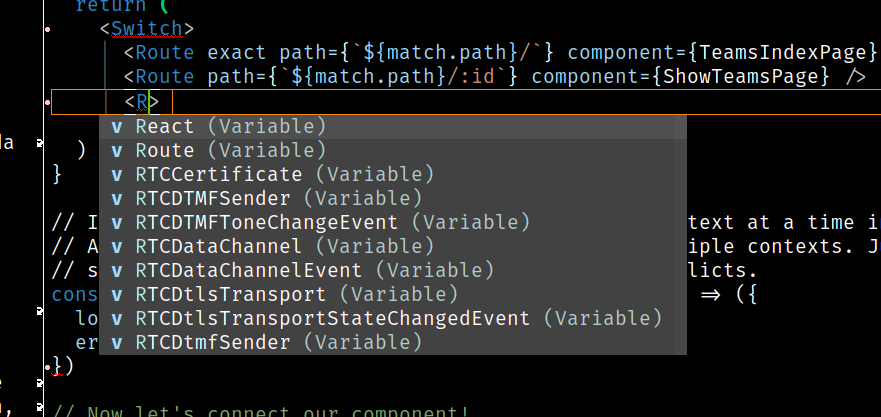
You’ve got your syntax highlighting, bracket highlighting and auto-closing, template component tag highlighting and auto-closing, as a baseline. I think that’s what comes out of the box with emacs, actually. Also in that screenshot, you can see in the middle I have an lsp “peek” open. By putting my cursor on any variable and pressing , G d, I can run lsp-ui-peek-find-definitions, which, if there’s multiple definitions (for example in typescript, an interface and class might have the same name), lets you scroll through those definitions on the right with j and k, while viewing the implementation on the left. Notice that this falls through to libraries, as well. In the screenshot, I can view definitions for native react methods. If there’s only one definition, you’ll simply be taken directly to its file (or location, if within the same file).
Just like in Vue, you can do typechecking, with error displays (see the vue section for an example screenshot) and error list capabilities. There’s also IntelliSense, so you can start typing and then get a list of suggestions, as exampled in this screenshot:
I can navigate this list with C-j and C-k, and select with RET. Great for finding out quick info about some component or method.
For more information specifically about typescript functionality, see above in the vue section, where I write about .ts files.
There’s also the possibility of debugging react in emacs, though I haven’t bothered with it, because I prefer debugging directly from the browser.
Setting Up React
You’ll need to have LSP, which means having lsp in your dotspacemacs-configuration-layers. Apparently, emacs supports IntelliSense and code navigation out of the box, so for autocompletions, you don’t need anything. To get LSP working, though, you should also add react to your dotspacemacs-configuration-layers.
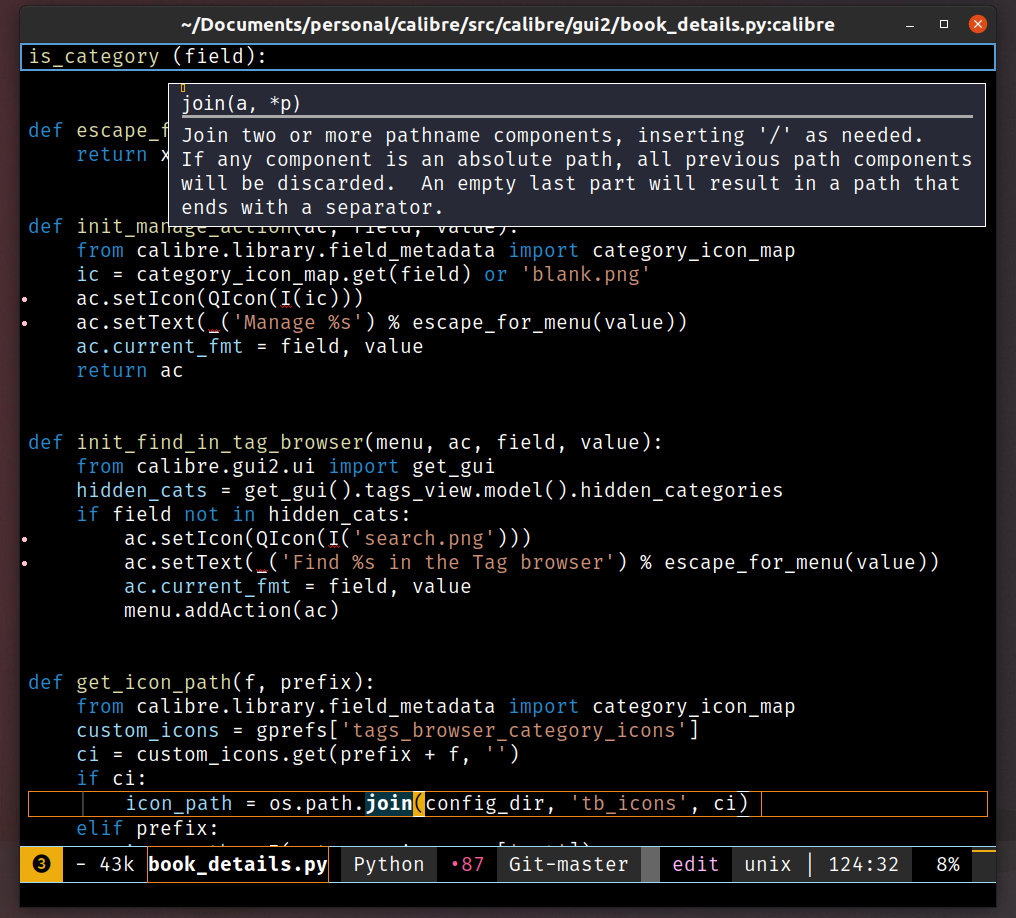
Programming a Python Project
I’ll be using the Calibre application for this example, which I had been playing with for a personal project recently.
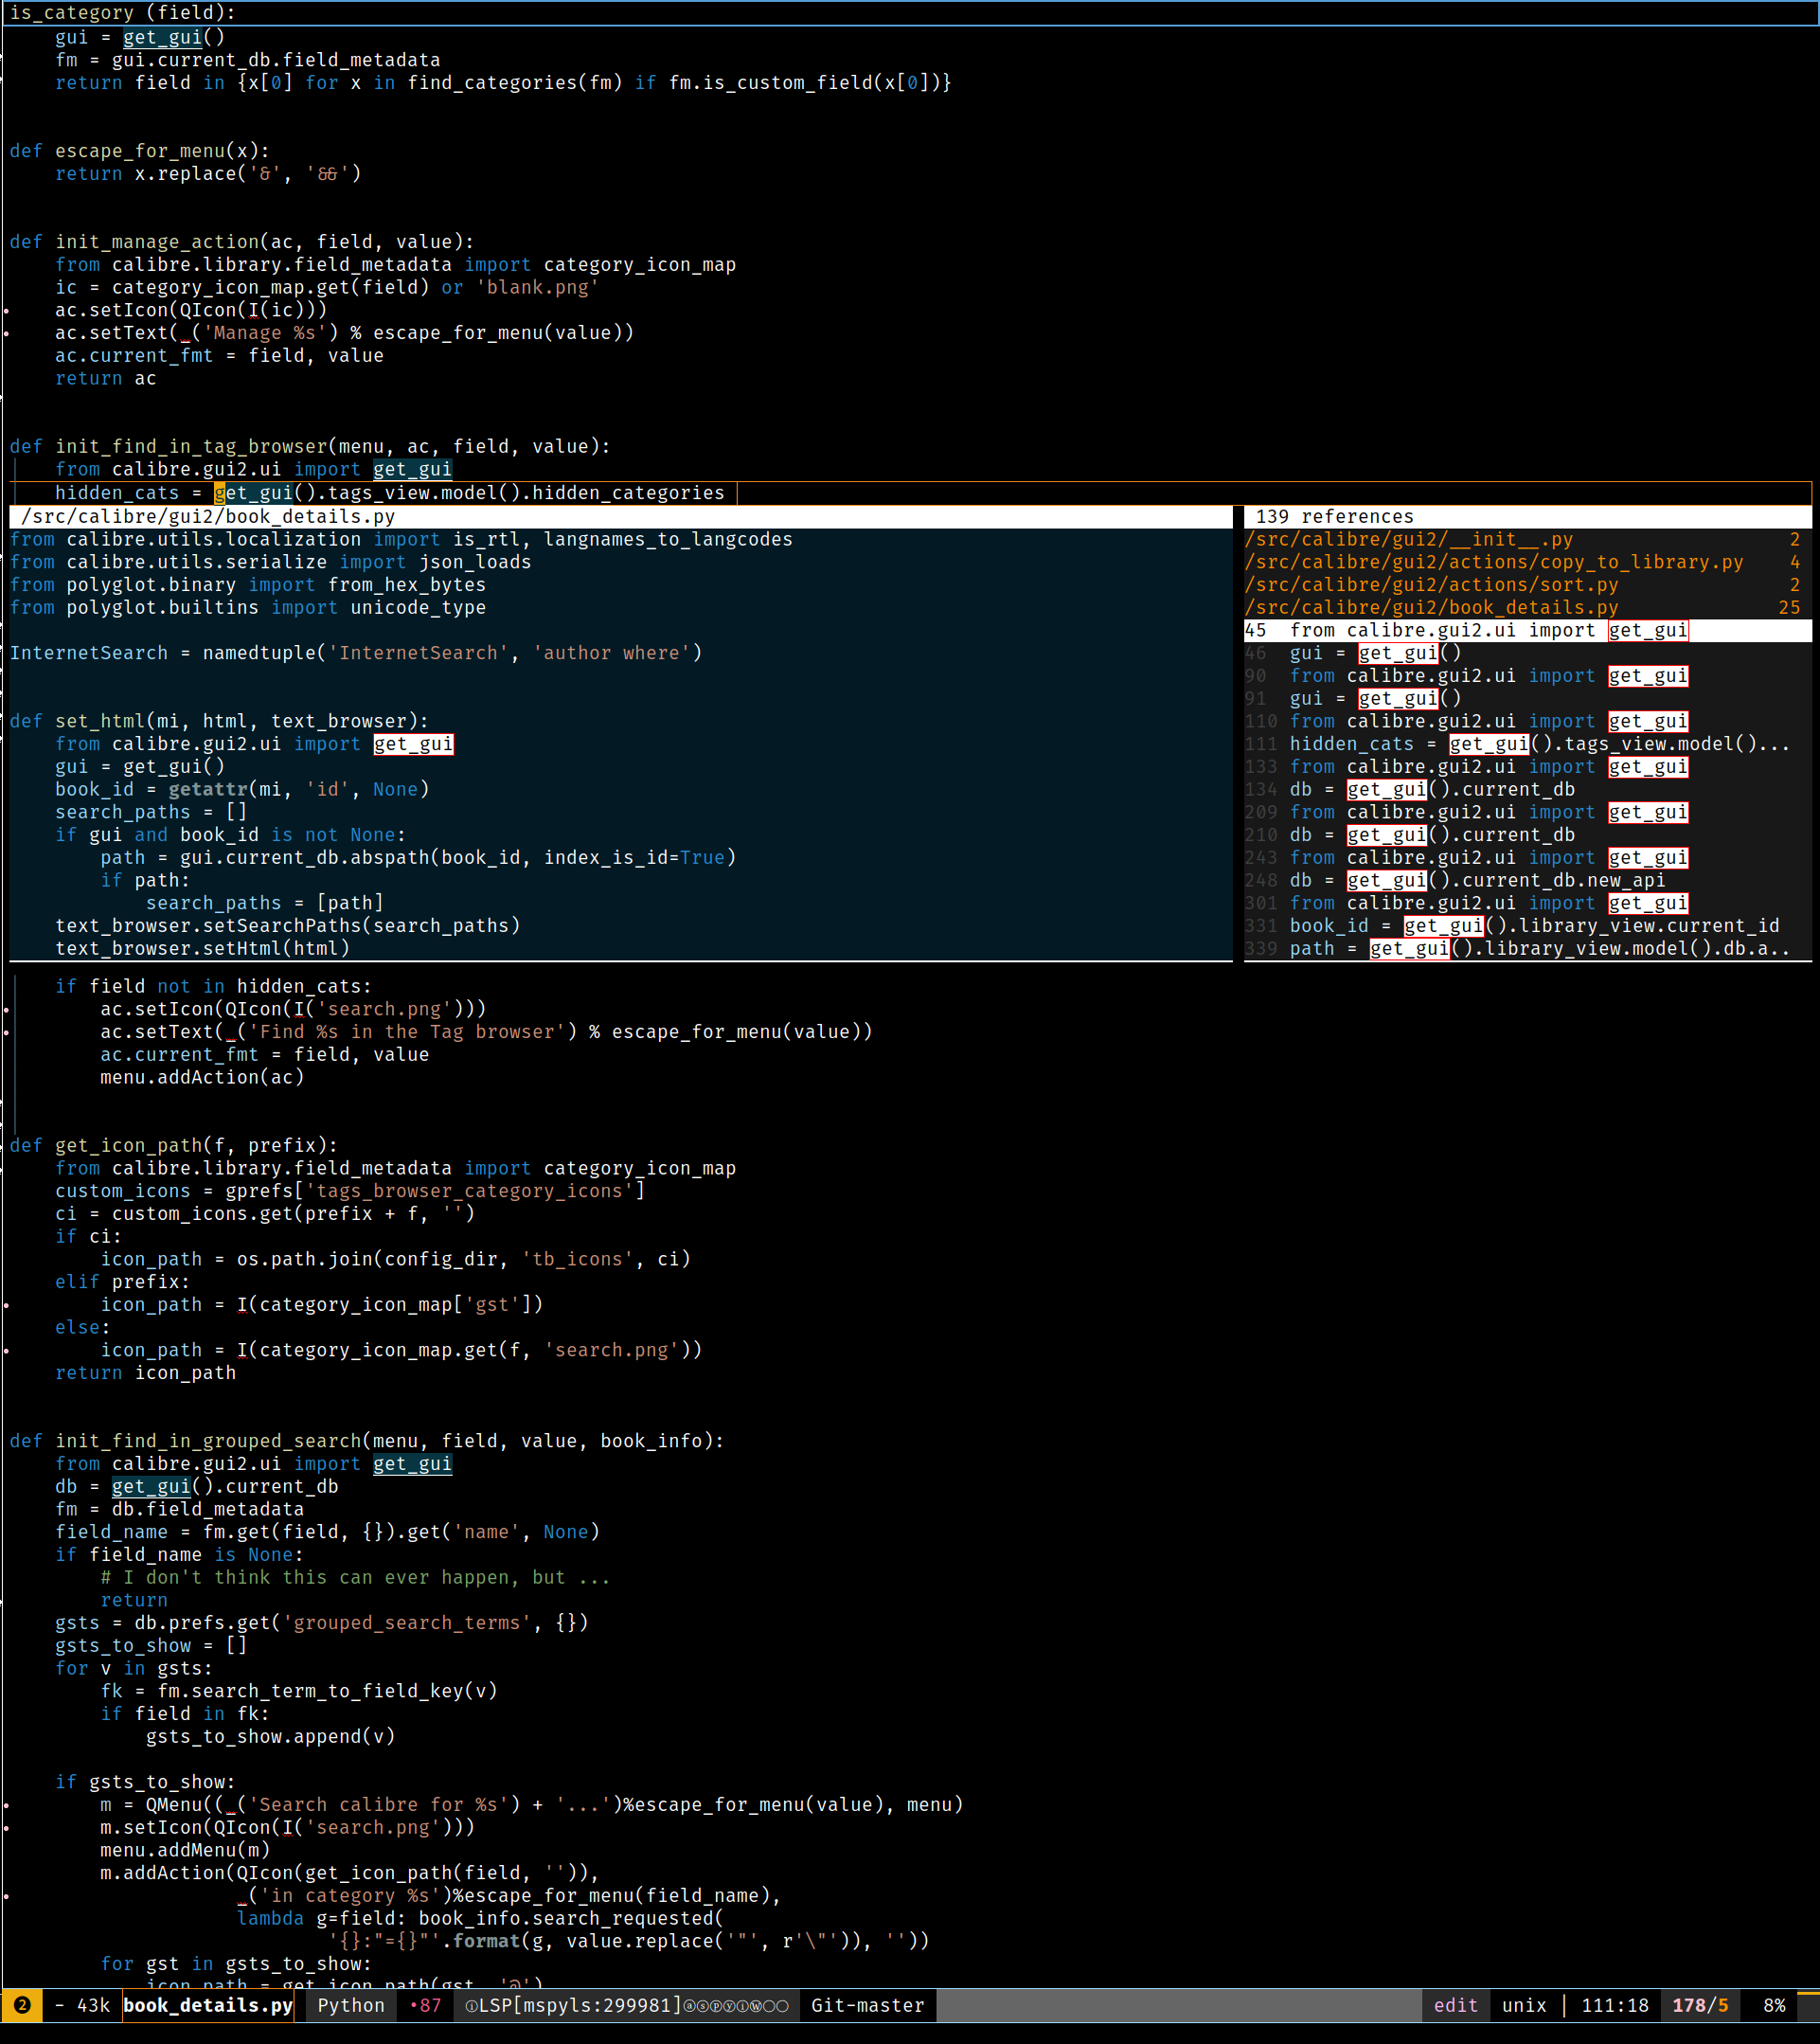
Python functionality is similar to typescript, with the ability to jump to definitions with , g g, peek definitions and references with , G r and , G d, typechecking, error helpers and error listing, and obviously, syntax highlighting and bracket jumping. Here’s what a python file looks like opened:
There’s also a lot more functionality available, especially with REPLs, debugging, and testing code. I don’t get to work in python enough to speak confidently to any of this, but here’s the major mode menu for a python to give you an idea:
As someone that doesn’t get to dev in python too often, I especially like the helper pop-ups for native python functions. They look like this:
Setting up Python
Just add python and lsp to your dotspacemacs-configuration-layers, and use M-x lsp-install-server to install the python LSP server.
On Productivity in Emacs
I use emacs for more than just programming in my life. As a frequent contractor, I also use it to track my tasks against companies and projects, while also tracking my time against companies, which makes billing quite easy. In general, I use emacs for all of my task tracking. I also use it for taking notes for meetings, which connects well into my task management flow. Finally, I use it for note taking for things like classes, with tooling that leads to very cool opportunities for linking the various things I’m learning and reading about. Oh, and because why not at this point, I also check my email from within Emacs.
Tracking Tasks and Time
Similar to magit, I have heard countless stories of people using emacs solely for org-mode. Org mode is a sort of markdown-editing mode, except instead of markdown files, it’s used to edit org files (.org). The best way to learn a quick overview is to play with the example of an org file on the front page of the org-mode website.
I’ll go through a couple flows I use for tracking tasks. After, I’ll demonstrate what parts of my .spacemacs enable a given flow.
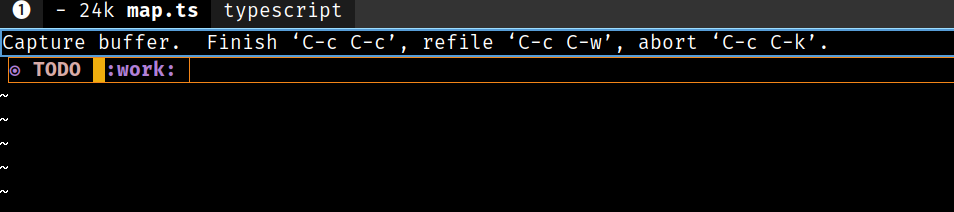
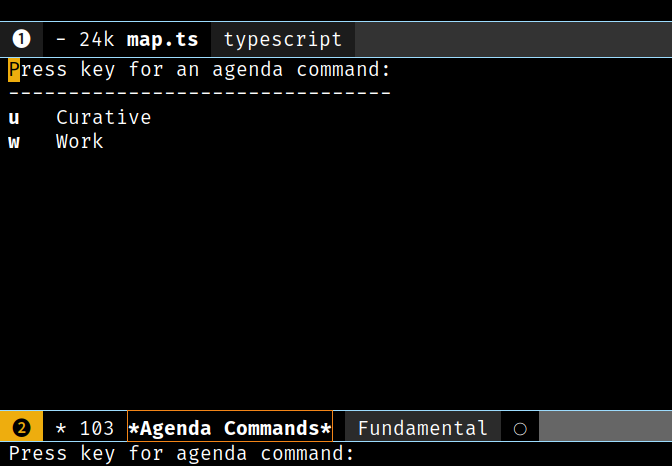
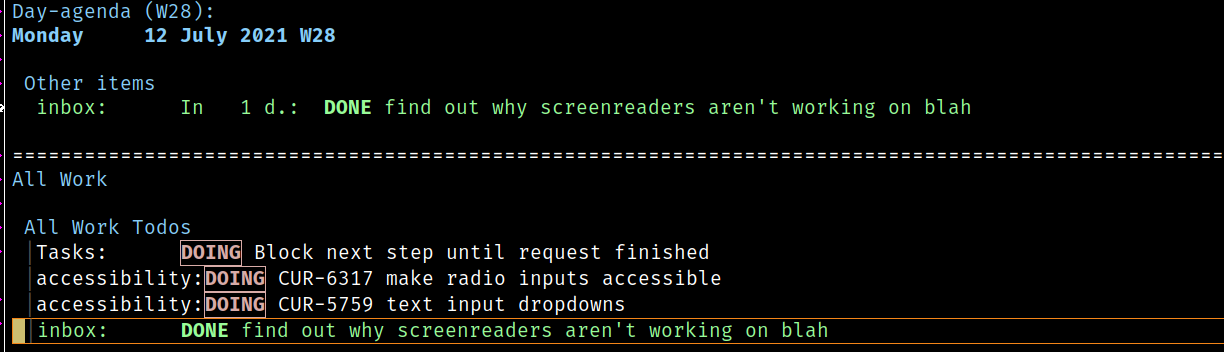
First, the basic intake. Imagine the following scenario: I get a call from my manager, and he says “look into why screenreaders aren’t working on xyz.com/blah”. I press SPC a o c to run org-capture, where I’m presented with keys assigned to my custom capture templates.
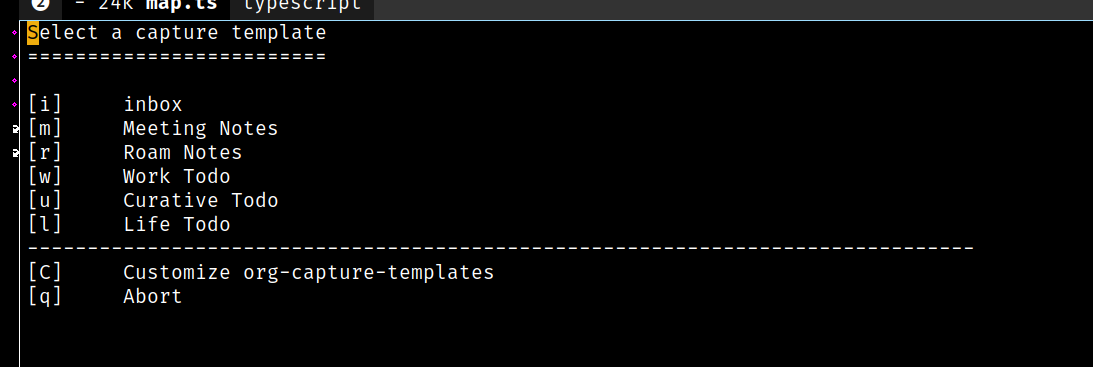
I press w to initiate the recording of a work TODO item. Then I press , , to save this TODO item.
Done! Later, it’s time to start work, so I press SPC a o o to invoke org-agenda,
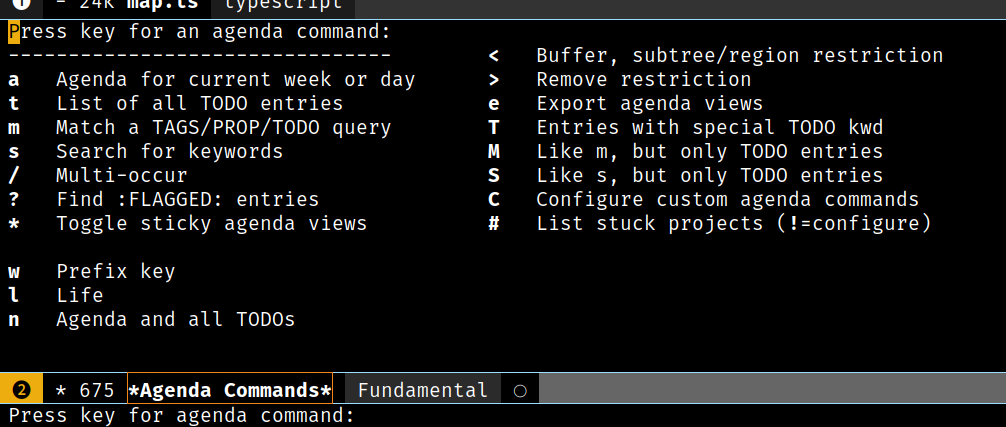
w to access my list of work related agendas,
then w again to access my general work agenda.
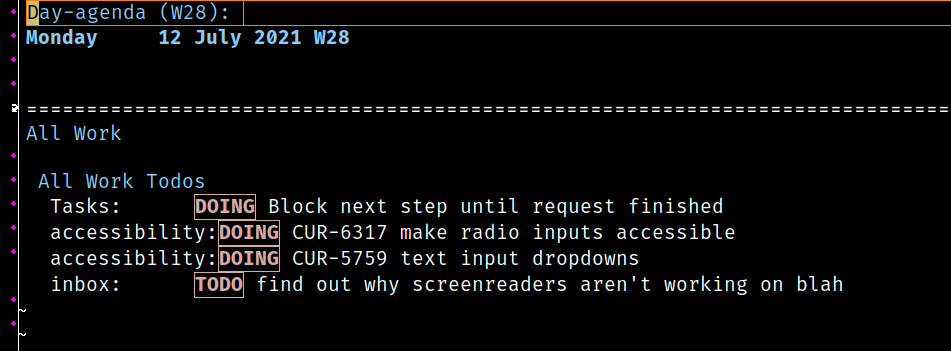
Now I can see a list of tasks! The task my manager just gave me has a deadline tomorrow, so I navigate to it with j and k, then press , d d to invoke org-agenda-deadline. Now, the task will appear under the deadline area at the top of my agenda:
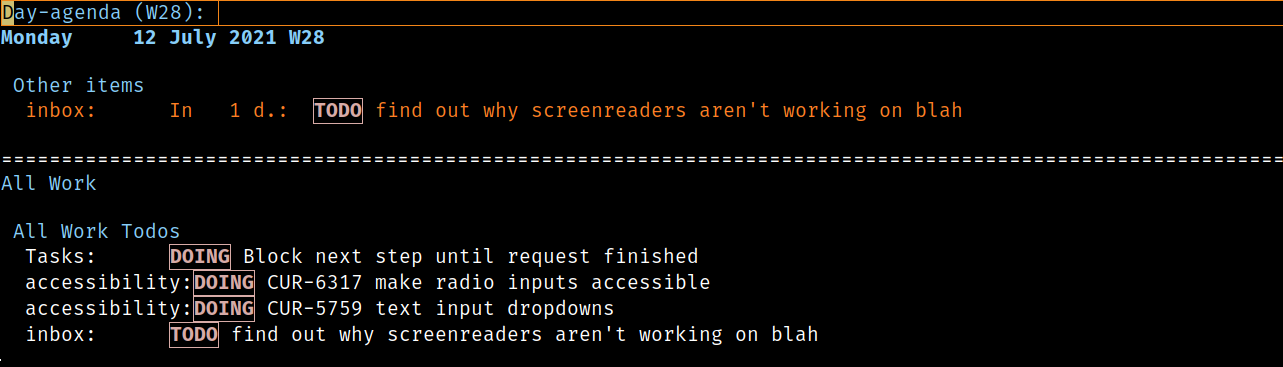
It’s time to get to work on this issue, so I move my cursor to the item, and do , C i to invoke org-agenda-clock-in. A timer has started that will record how long I work on this issue. When I’m done working on the issue, I go back to the TODO item and do C-c t to cycle the state from TODO to DONE. Doing so automatically invoked org-agenda-clock-out, and so now my total time against the task has been logged. Here’s what the TODO item looks like now from the agenda:
That’s just from the agenda view, though! Behind the scenes, what all these commands have actually been doing is modifying text in a file called inbox.org, where I’ve chosen to organize general tasks like this. I can press RET on the task from the agenda to be taken directly to its location within the org file. Here’s what a portion of the file looks like:
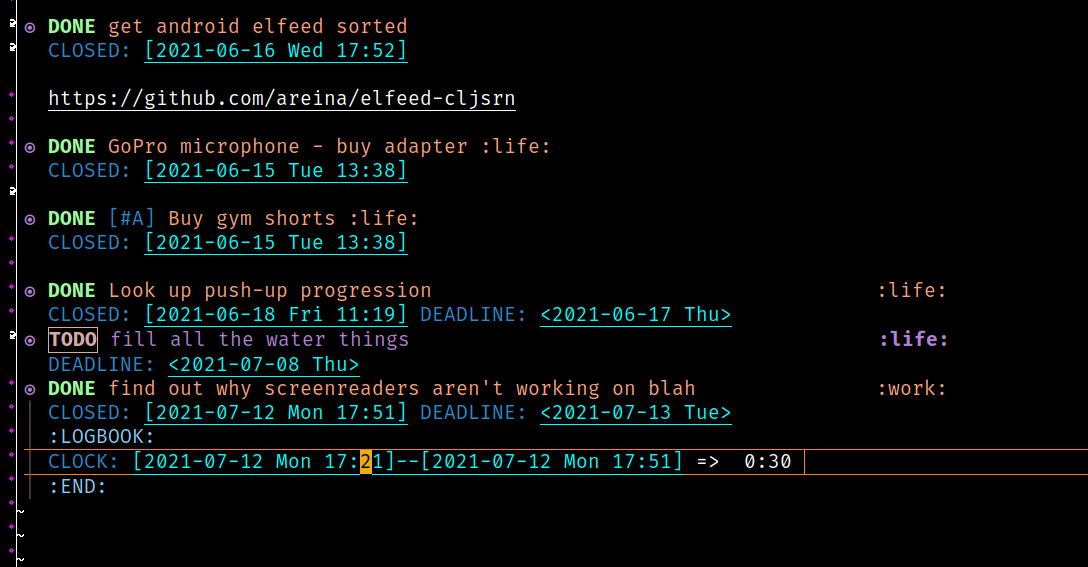
All of the information is recorded against the item. The clock time is inside the :LOGBOOK, the CLOSED date is tracked as a timestamp, as is the DEADLINE. org-mode knows its a work TODO item because of the :work: tag. And the state is determined from whether there’s a TODO or DONE at the beginning of the item.
Now, it’s time to get my boss to pay up for however long it took me to fix his issue. I have an org file for each of the companies I do work for, and at the top of each is an org clock table. Here’s one for one of my personal weekly reviews:
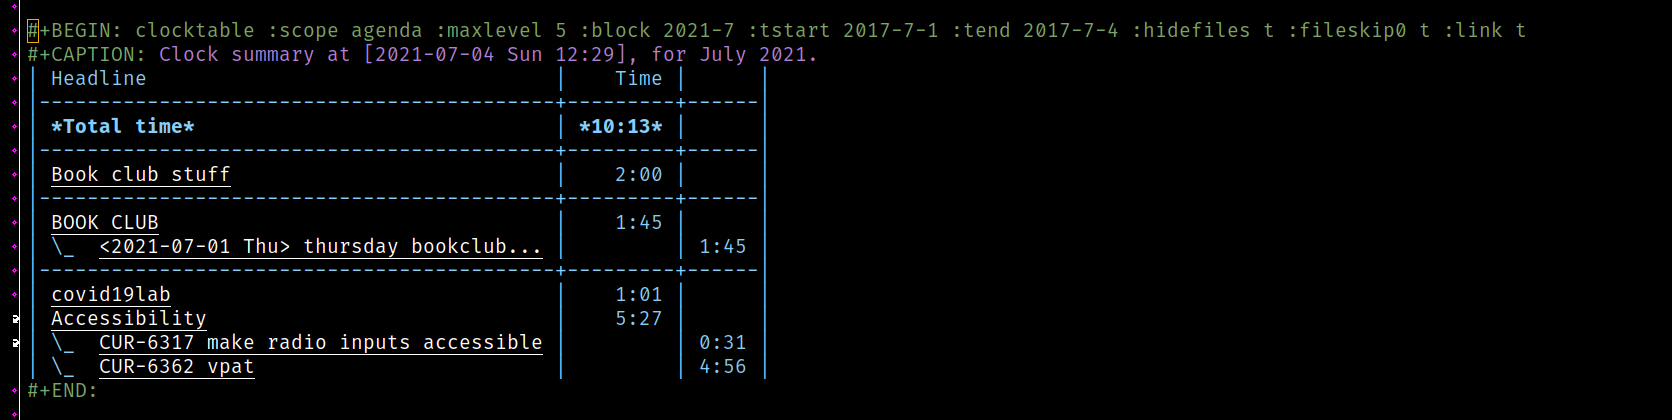
There’s tons of power there, you can make a table that pulls only from certain files, for certain tags, or for certain time periods.
I have a couple other flows, but first let me talk about how the above is possible.
First, obviously, you need org-mode. Add org to your dotspacemacs-configuration-layers. For reasonable control over your agendas, you also need org-super-agenda. Add org-super-agenda to dotspacemacs-additional-packages (NOT configuration layers).
Org requires hella configuration. The first part of configuration goes within the org declaration inside of dotspacemacs-configuration-layers. Here’s mine:
(org :variables
  org-directory "~/Dropbox/org"
  org-projectile-file "~/Dropbox/org/projects.org"
  org-enable-roam-support t
  org-enable-org-journal-support t
  org-roam-directory "~/Dropbox/org/notes/"
  org-roam-index-file "~/Dropbox/org/notes/20200526213916-index.org"
  org-default-notes-file (concat org-directory "/inbox.org")
  )
org-directory determines your root org directory, against which many org functions are invoked. Having it within a Dropbox folder can be useful for backing up, but also if you use org-mode management apps on your phone, or just use org-mode on multiple machines.
org-projectile-file can be useful if you want to use org-projectile. I don’t use that anymore, but it’s cool for doing things like creating TODOs on a per-projectile-project basis.
Roam and journal will be discussed later.
org-default-notes-file determines where org captures will be saved if you don’t pass in any custom template properties. I use inbox.org because I follow a sort of Getting Things Done (GTD) type workflow. Because of the powerful nature of org agenda filtering and the ability to write custom capture templates, it’s not necessary to do a lot of organization by file type. I’ll demonstrate why later.
Now for even more customization. Inside of dotspacemacs/user-config, create a with-eval-after-load 'org invocation. This function causes included code to run after the passed-in mode has been loaded, in this case org-mode. Like this:
(with-eval-after-load 'org
;; ...where all our further configuration will go
)
Now, I might be wrong about some of this stuff, as I recently learned I was putting stuff within this with-eval-after-load that could instead go up under (org :variables), so take what I write with a grain of salt. This is just how my .spacemacs is set up and it seems to work great.
First, require org-agenda.
(with-eval-after-load 'org
  (require 'org-agenda)
)
That way you can use agendas. Then, activate org-super-agenda-mode by default:
(with-eval-after-load 'org
  ;; ...
  (org-super-agenda-mode)
)
Also, apply this fix that fixes some problem that’s ubiquitous but I’ve completely forgotten about. I think it’s something about capture template hotkeys.
(with-eval-after-load 'org
  ;; ...
  (org-defkey org-mode-map [(meta return)] 'org-meta-return)  ;; The actual fix
)
Now, tell org what directories and files it can look through to generate agendas and clock tables.
(with-eval-after-load 'org
  ;; ...
  (setq org-agenda-files
    (seq-filter (lambda(x) (not (string-match "/.git/"(file-name-directory x))))
      (directory-files-recursively "~/Dropbox/org" "\\.org$")))
  )
Now tell org what your TODO keywords are. The default are fine, I think they’re TODO and DONE, maybe some more. Whatever you put here are what org will cycle through when you C-c t on a TODO item.
(with-eval-after-load 'org
  ;; ...
  (setq org-todo-keywords
        '((sequence "TODO" "DOING" "WAITING" "|" "DONE")))
)
Now for capture templates. These are what are listed when, as in my above example, you do SPC a o c.
(with-eval-after-load 'org
  ;; ...
  (setq org-capture-templates
        `(("i" "inbox" entry (file ,(concat org-directory "/inbox.org"))
           "* TODO %?")
          ("m" "Meeting Notes" entry (file+olp+datetree ,(concat org-directory "/meeting_notes.org"))
           "* %?")
          ("r" "Roam Notes" entry (file+olp+datetree ,(concat org-directory "/notes/notes.org"))
           "* %?")
          ("w" "Work Todo" entry (file ,(concat org-directory "/inbox.org"))
           "* TODO %? :work:\n")
          ("u" "Curative Todo" entry (file+headline ,(concat org-directory "/curative.org") "Tasks")
           "* TODO %? \n")
          ("l" "Life Todo" entry (file ,(concat org-directory "/inbox.org"))
           "* TODO %? :life:\n")
          ))
)
I have a lot for various situations. inbox is my default, real-quick, will-sort-later capture. Because it has no tags, it’ll go within a refile section of my inbox, so I know to organize it more later. As you can see from my other capture templates, that might involve putting it in a proper file (such as a company-specific file), or adding a relevant tag (such as life or work). Incidentally, this is what that looks like:
If you want, you can have your captures stored under a new date heading, by using file+olp+datetree. That will result with a file organized by year, month, and then date subheadings, with the final level being the title of the note you enter. See my meeting_notes.org file as an example:
Or, you can put your captures under a specific headline within a file, such as how I do for my “Curative Todo” items, because my curative.org file is organized into various project types, with a special place for general tasks:
The other half of that is your org-agenda-custom-commands list. There is where you generate the various agenda views, those being the ones listed when you do SPC a o o. I have a lot.
To create these, you set them equal to a variable, which we then will add to the org-agenda-custom-commands list later.
My work one is a simple example, basically just searching for a single, specific tag, and showing only TODO items that have that tag.
(setq w-view
           `("ww" "Work"
             (
              (agenda ""
                      (
                       (org-super-agenda-groups
                        '((:discard (:not (:tag ("work")))))
                        )
                       (org-agenda-span 'day)
                       (org-deadline-warning-days 365)
                       ))
              (tags-todo "work"
                         ((org-agenda-overriding-header "All Work")
                          (org-agenda-files '("~/Dropbox/org/"))
                          (org-super-agenda-groups
                           '((:name "All Work Todos"
                                    :and (:tag ("work"))
                                    )
                             (:discard (:anything t))
                             )
                           )
                          (org-agenda-sorting-strategy '(deadline-up priority-down tag-up))
                          ))
              nil
              )
             )
           )
All of that is made possible due to org-super-agenda. I have literally the sketchiest understanding in the world of the seemingly back-asswards logic employed by org-super-agenda-groups to achieve a desired result, so just, copy the above if you’re trying to get a view for one specific tag. That :discard bit is tricky. Maybe I’m just dumb.
I like my company-specific work views to be broken into the various project type categories. Recall in the screenshot of my curative.org file above, I had a couple project types, such as Email Templates or Accessibility. Those display like this within my curative agenda view:
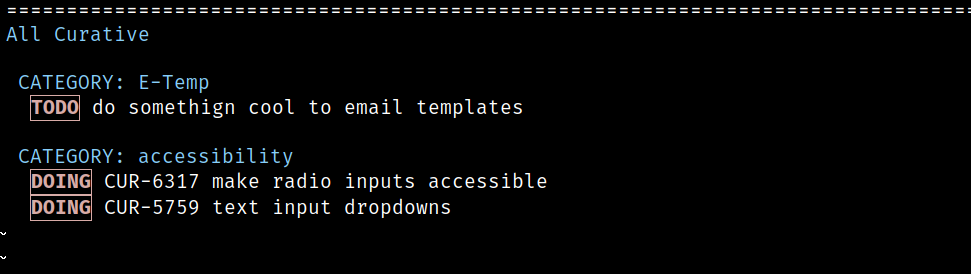
There’s a couple things necessary to achieve this. First, my actual agenda view:
(setq curative-view
           `("wu" "Curative"
             (
              (agenda ""(
                         (org-super-agenda-groups
                          '((:discard (:not (:tag ("curative")))))
                          )
                         (org-agenda-span 'day)
                         (org-deadline-warning-days 365)))
              (tags-todo "curative"
                         ((org-agenda-overriding-header "All Curative")
                          (org-agenda-prefix-format "  %?-12t% s")
                          (org-agenda-files '("~/Dropbox/org/"))
                          (org-super-agenda-groups
                           '((:auto-property "CATEGORY")))
                          (org-agenda-sorting-strategy '(deadline-up priority-down tag-up))))
              nil)))
First, it only shows items that have the tag curative. Everything in my curative.org file has that tag, because I have this at the top of my curative.org file:
#+FILETAGS: :work:curative:
Next, the agenda automatically creates groups based on the CATEGORY property of an item. Properties are inherited from parent items in org-mode, and so I achieve this by giving the CATEGORY property to each of the headers in my curative.org file. Like so:
* Accessibility
  :PROPERTIES:
  :CATEGORY: accessibility
  :END:
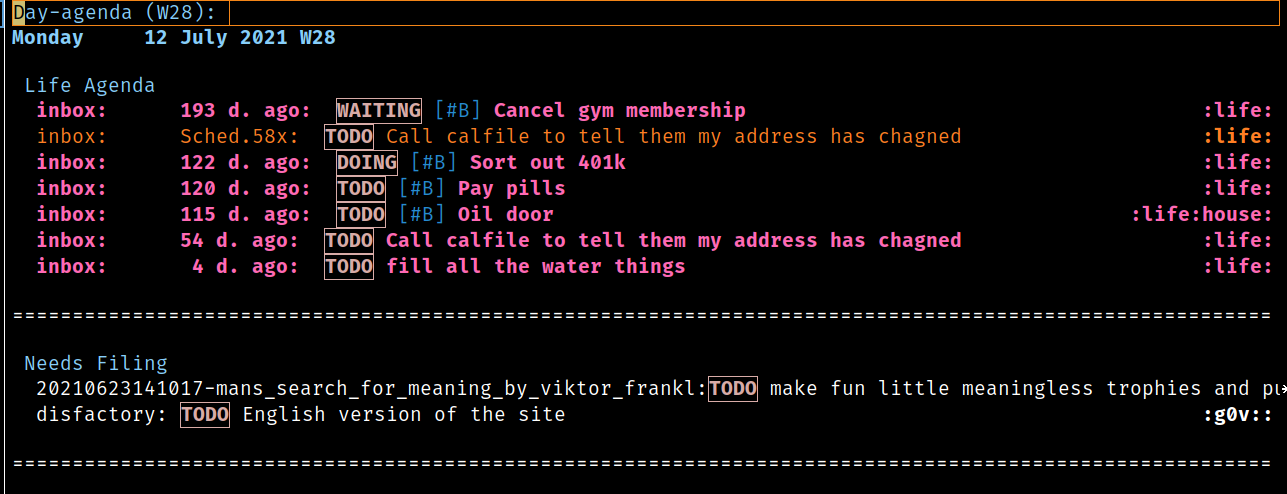
Now to bring all of this together is my super-huge “life” view.
(setq l-view
           `("l" "Life "
             (
              (agenda ""
                      (
                       (org-agenda-span 'day)
                       (org-deadline-warning-days 365)
                       (org-super-agenda-groups
                        '((:name "Life Agenda"
                                 :and (:tag ("life")))
                          (:discard (:anything t))))))

              (todo "TODO"
                         ((org-agenda-overriding-header "")
                          (org-super-agenda-groups
                           '((:name "Needs Filing"
                                    :and (:not(:tag ("life" "work" "project" "read"))))
                             (:discard (:anything t)))))
                          (org-agenda-sorting-strategy '(deadline-up priority-down tag-up)))
              (todo "TODO"
                    ((org-agenda-overriding-header "")
                     (org-super-agenda-groups
                      '((:name "Reading"
                               :and (:tag ("read")))
                        (:discard (:anything t)))))
                    (org-agenda-sorting-strategy '(deadline-up priority-down tag-up)))

              (todo "TODO"
                    ((org-agenda-overriding-header "")
                     (org-super-agenda-groups
                      '((:name "All Life Todos"
                               :and (:tag ("life")))
                        (:discard (:anything t)))))
                    (org-agenda-sorting-strategy '(deadline-up priority-down tag-up)))
              (tags-todo "project"
                    ((org-agenda-overriding-header "Projects")
                     (org-super-agenda-groups
                      '((:auto-category t))))
                    (org-agenda-sorting-strategy '(deadline-up priority-down tag-up))))
              nil))
First, my Needs Filing section contains anything missing my major tags. Then, there’s a couple groups with specific tags. Finally, anything with a project tag is auto-grouped by category. Similar to my curative file, this is achieved by having #+FILETAGS: :project: at the top of my projects.org file, and then giving a CATEGORY property to each of my headers in the projects.org file. Actually, look at that, I don’t do :auto-property "CATEGORY" here like I do for my curative view, I simply do :auto-category t. Huh. Well, try both, see what works for you.
After making views, you have to add them to org-agenda-custom-commands:
(with-eval-after-load 'org
  ;; ...
  (add-to-list 'org-agenda-custom-commands `,w-view)
  (add-to-list 'org-agenda-custom-commands `,l-view)
  (add-to-list 'org-agenda-custom-commands `,curative-view)
)
org-mode breaks window layouts obnoxiously by default, so finally, stop it from doing that with:
(with-eval-after-load 'org
  ;; ...
  (setq org-agenda-window-setup 'current-window)
)
With this setup, I can achieve the following workflows:
Example Workflows
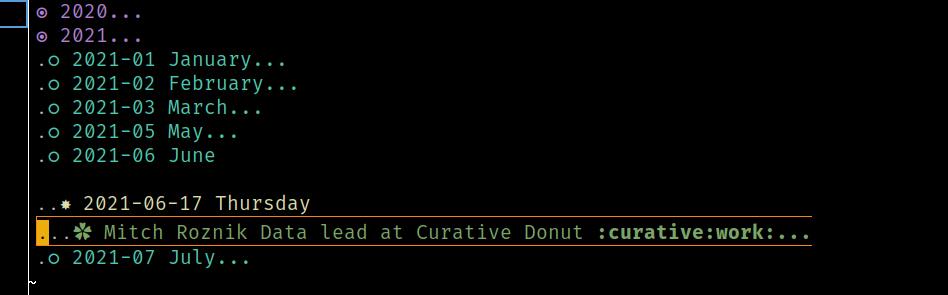
New Ticket for Work
I’ve started a ticket for curative. I open curative.org with SPC b b curative.org (the buffer list maintains a log of commonly opened files, so this works even if I haven’t opened curative.org recently). I navigate to the proper project category, in this case Accessibility, and add a new item to it with C-RET ALT-L (C-RET adds a new heading as a sibling to the current, and then ALT-L demotes the heading one level, immediately making the new heading a child of Accessibility instead of a sibling). I write the TODO:
* Accessibility
  :PROPERTIES:
  :CATEGORY: accessibility
  :END:

**  TODO Make website more accessible
And then press C-t on it to switch it to DOING state. Then I do , C i on it to clock in. I get to work. After a while, I issue a pull request. I find my current TODO heading quickly by doing SPC a o C j to run org-clock-jump-to-current-lock, then add a subheader with C-RET ALT-L, to which I add a timestamp with A , ESC , D t ENT (A , moves the cursor to the end of the current line and enters insert mode, I type a comma then ESC into command mode, then run org-time-stamp, pressing ENT to select today). I add the comma because otherwise the timestamp has no whitespace between it and the asterisks that make an org header a header, and am too lazy to find a better preventative measure. Anyway, then I add a note about issuing a pull request, and clock out with SPC a o C o.
** WAITING do a thing
   :LOGBOOK:
   CLOCK: [2021-07-12 Mon 19:27]--[2021-07-12 Mon 19:37] =>  0:10
   :END:
*** <2021-07-12 Mon>,
    issued a PR
Later, someone merges my pull request, so I find the issue again in my agenda, with SPC a o o w u to launch my custom curative agenda view, navigate my cursor to the issue in that view, and do t to change its state to DONE.
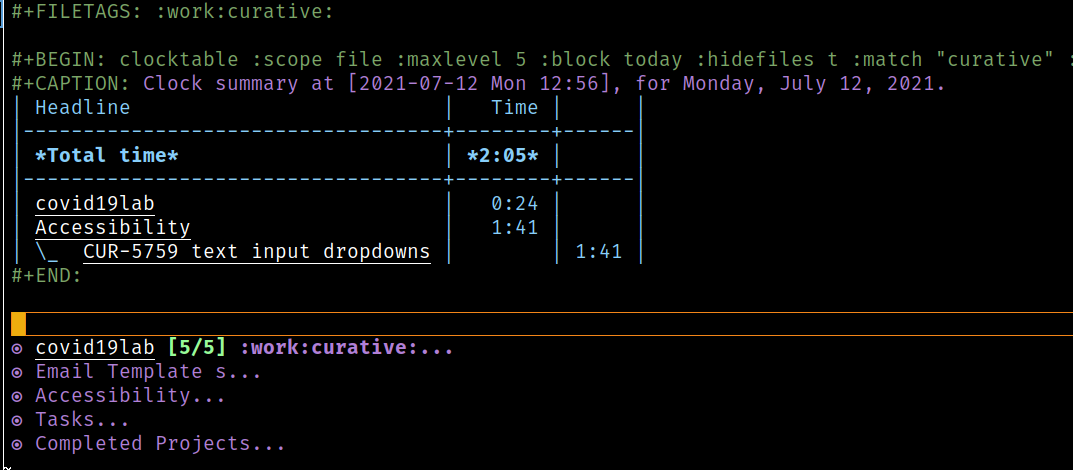
Now, it’s time to bill my client for the work done today. I create a clock table in my curative.org file:
#+BEGIN: clocktable :scope file :maxlevel 5 :block today :hidefiles t :match "curative" :fileskip0 t :link t
#+END:
I do , , on it to cause the clocktable to generate:
#+BEGIN: clocktable :scope file :maxlevel 5 :block today :hidefiles t :match "curative" :fileskip0 t :link t
#+CAPTION: Clock summary at [2021-07-12 Mon 12:56], for Monday, July 12, 2021.
| Headline                          |   Time |      |
|-----------------------------------+--------+------|
| *Total time*                      | *2:05* |      |
|-----------------------------------+--------+------|
| Accessibility                     |   1:41 |      |
| \_  CUR-5759 text input dropdowns |        | 1:41 |
#+END:
(I hid some of the above clocktable for simplicity sake, that’s why the hours don’t add up)
Tammy Wants me to Pick Up the Laundry
Tammy sends me a message to pick up the laundry. I do SPC a o c l to trigger my custom life capture template. I type “Pick up the laundry”, then do , d d to invoke org-deadline, selecting today as the deadline. I do , , to save my new TODO item to my inbox.org file with the proper tags automatically assigned by my capture template.
* TODO Get laundry                                                     :life:
  DEADLINE: <2021-07-11 Sun>
The next day, I start my day with SPC a o o l to invoke my custom life agenda view. At the top, I see my items with deadlines, and that my Get laundry TODO was due one day ago. Oops.
Taking Notes for a Meeting
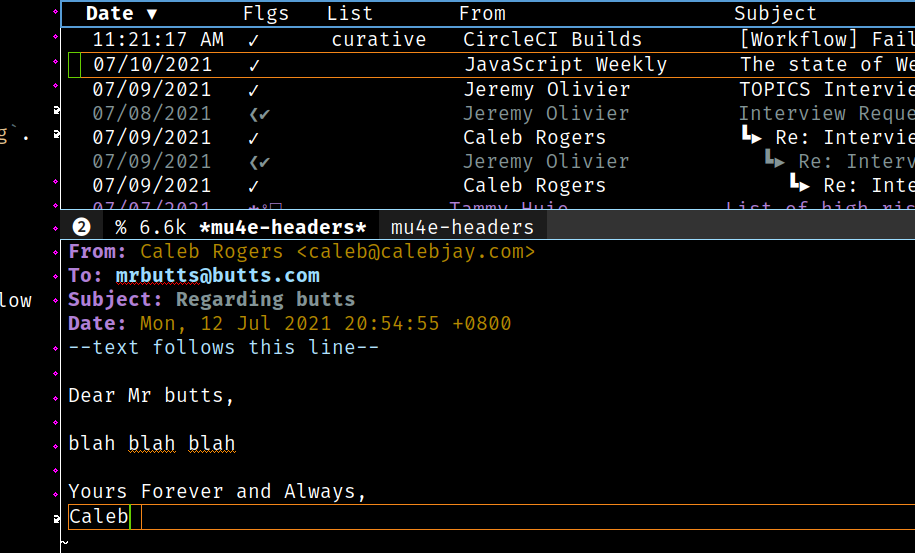
I’ve started a meeting and so create a new item in my meeting_notes.org file with SPC a o c m, invoking my custom meeting notes capture template, which creates a new date item in meeting_notes.org with the notes I enter in the capture buffer. I give the first header the :work: tag and clock in with , C i. After taking notes, I have some TODO headers as children to the main header. These will automatically display the next time I look at my work agenda view with SPC a o o w, because they have the :work: tag. I clock out with SPC a o C o and then save the note with , ,.
**** Meeting about doing a hostile takeover :work:
     :LOGBOOK:
     CLOCK: [2021-07-12 Mon 19:56]--[2021-07-12 Mon 19:57] =>  0:01
     :END:
***** blah blah
      do a thing
***** TODO turn bathroom into bunker
(the headers are already so nested because they were automatically created as children of year, month, and day time trees within meeting_notes.org)
Taking Notes
I have terrible memory and am working on actually keeping with me the things that I’m learning in the various computer science courses I’m taking, as well as the books I’m reading. To do so, I’m leveraging org-roam, which is an org-mode implementation of roam research, which is an sort of implementation of the Zettelkasten method of note-taking and personal knowledge management, focused on helping generate connections between the things you know. Once you’ve been using it for some amount of time, it starts to look like this:
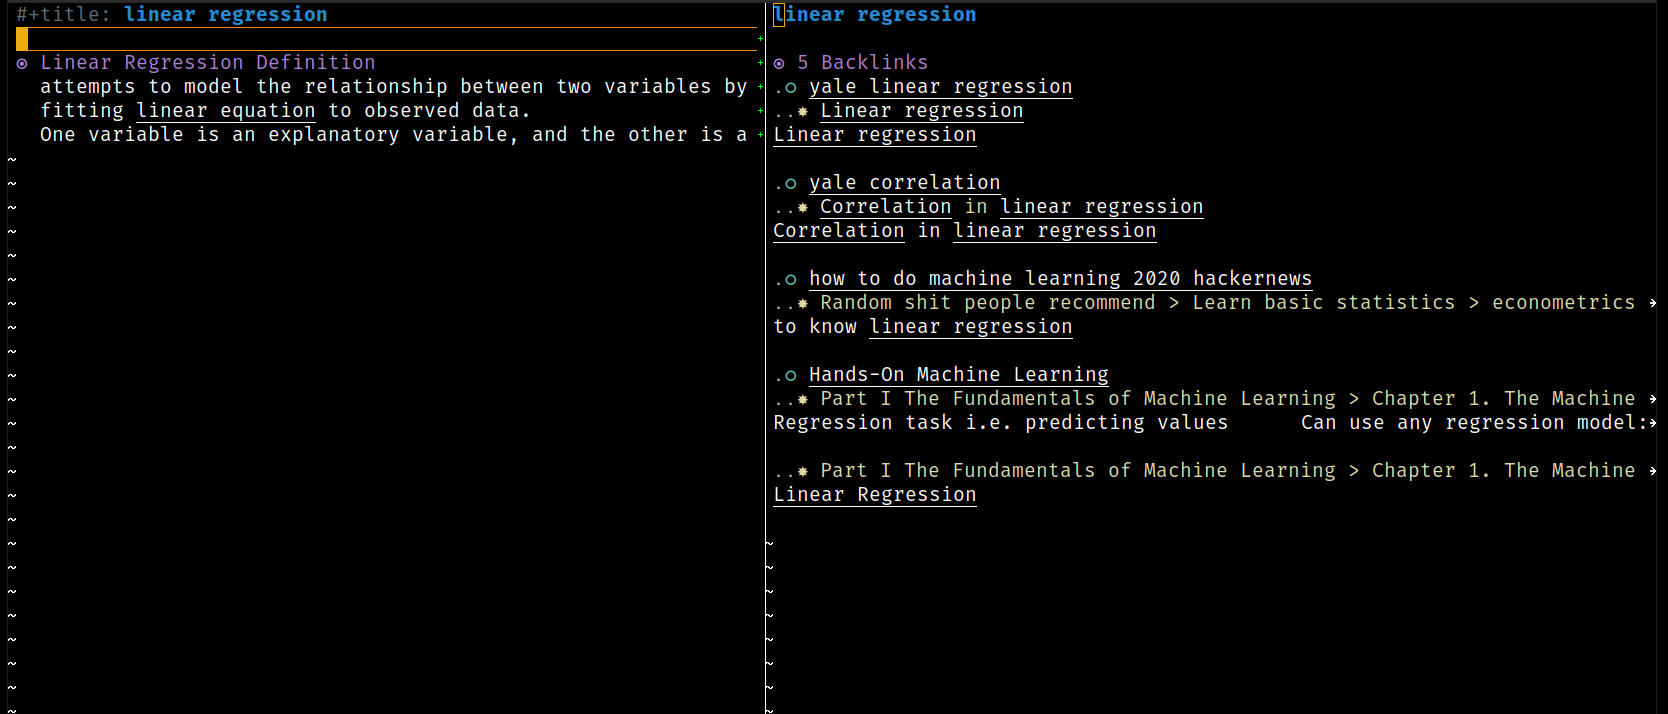
The idea is that you create .org files for both “concepts” (such as “linear regression” in the example), as well as for sources of information, such as an article, book, talk, or meeting. The “concept” files are supposed to be more “pure,” so for example when I eventually flesh out that Linear Regression file, it’ll talk only, in short, about what Linear Regression is, with the context being more filled out by the backlinks buffer, in the example on the right. But the backlinks buffer is the cool part! That shows all the other places I’ve mentioned “Linear Regression” in my org-roam directory, making it a lot easier for me to fill out that linear regression org file! Also, it can lead to connections between things you wouldn’t realize.
I’m also combining this with a method for creaking anki cards from within my .org files, so that while I take notes, I can immediately make relevant flashcards for later study.
Finally, I also use org-roam as a journaling tool, so that I can link out any relevant thoughts or reflections I have into my org-roam node map.
Setting up Org Roam and Anki
You need org-mode, but luckily in spacemacs, installing org-roam simply means passing a flag to your org :variables like so, within dotspacemacs-configuration-layers:
(org :variables
  org-directory "~/Dropbox/org"
  org-enable-roam-support t
  org-enable-org-journal-support t
  org-roam-directory "~/Dropbox/org/notes/"
  org-roam-index-file "~/Dropbox/org/notes/20200526213916-index.org"
  )
The location of the org-roam-directory is IMPORTANT, because you probably want the shitloads of files that org-roam creates in their own little special directory. org-roam creates a file for literally every concept you ever write about, which is the idea, but it means that you’ll eventually have hundreds, if not thousands, of files. So, give it its own directory, preferably as a child directory of your main org-directory and org-agenda-directory so that you can do clocktables and pull TODOs out of org-roam files. As for the index file, it’s not too important when you get started, but it can be helpful for organizing down the line. This is what my index file looks like. The long string of numbers at the front of the filename is a sort of timestamp that org-roam adds to all its files on creation, I guess to allow for duplicates or similarly named files, I’m not sure, but because you’ll be interacting with those files through org-roam, it’ll be fine, trust me.
To get anki working, you need to add anki-editor to dotspacemacs-additional-packages. Then, follow the up to date installation instructions from the website, which mostly just means installing anki and a plugin for anki.
Example Org Roam Workflows
Taking Notes for a Book
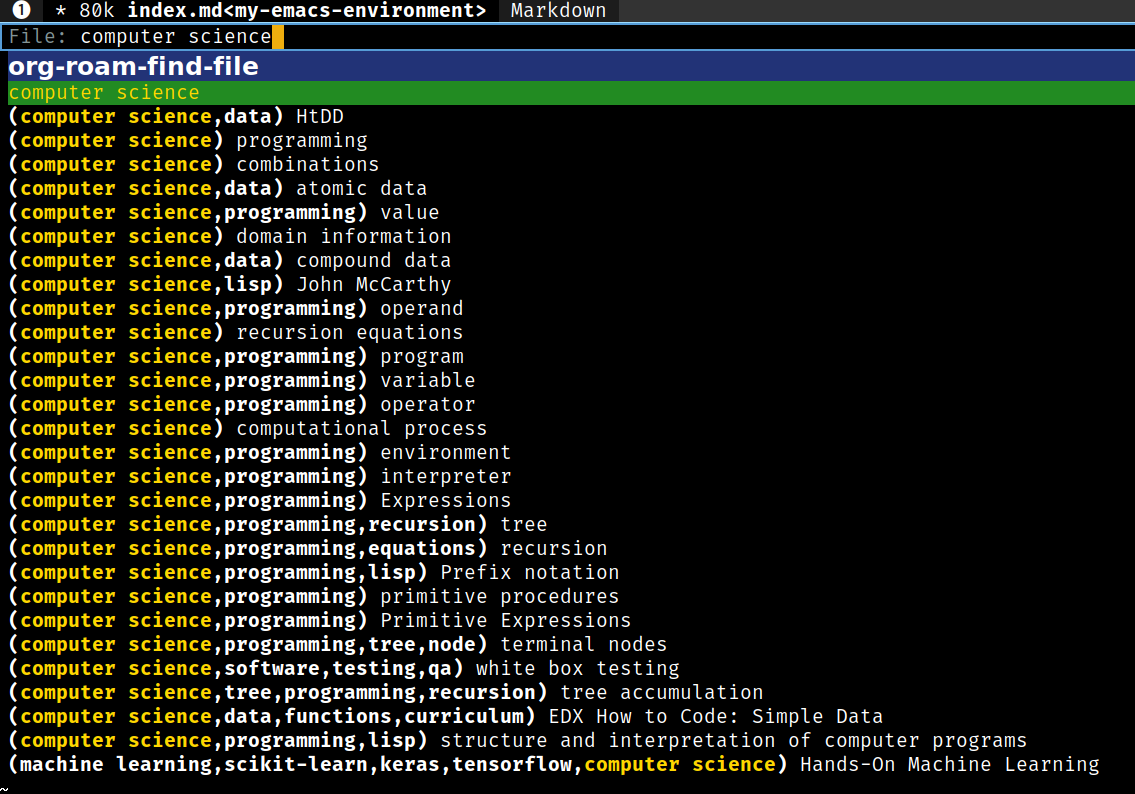
When I’m about to start reading the book, I do SPC a o r f to invoke org-roam-find-file, which will create a new file named whatever I name it, because the file doesn’t yet exist. If the file did exist, org-roam would simply open the file. A file is created, with a #+title property of whatever you input. The filename will be that same title, but with a long datetime string at the front. For example, I created a file for “Hands-On Machine Learning,” and the filename is 20210614104501-hands_on_machine_learning.org, and the title property is #+title: Hands-On Machine Learning. Here’s the actual file.
Because I know what the book is about, I’m going to add some ROAM_TAGS so as to make the file show up when I search for certain concepts. I add the following to the top of the file:
#+ROAM_TAGS: "machine learning" scikit-learn keras tensorflow "computer science"
Now whenever I do org-roam-find-file and enter “computer science,” this book will be one of the results:
As I read the book, I add headers and take notes in a hierarchical manner. Example:
* Preface
  Assumption: I know nothing about Machine Learning
  Book will give me concepts, tools, and intuition necessary to implement programs capable of learning from data.
** frameworks used
*** Scikit-learn
    easy to use
    implements many Machine Learning algorithms efficiently
    good entry point
*** TensorFlow
    Complex library
    Distributed numerical computation
    Train and run very large neural networks efficiently
      Does so by distributing the computations across 100s of multi-GPU servers
    Created at google
    open sourced in november 2015
When I find a concept that I think should be captured on its own by org-roam, I highlight that concept with the evil-mode evil-visual-char command, the equivalent of vim’s visual-mode, essentially the same thing as selecting text by clicking and dragging with a mouse. I put the cursor on “TensorFlow” in the above example and press v e to select to the end of the word. I then do , o r i to invoke org-roam-insert, which will allow me to select from a list of existent files and link this text to an existent file, or, create a new file, and then link this text to that file:

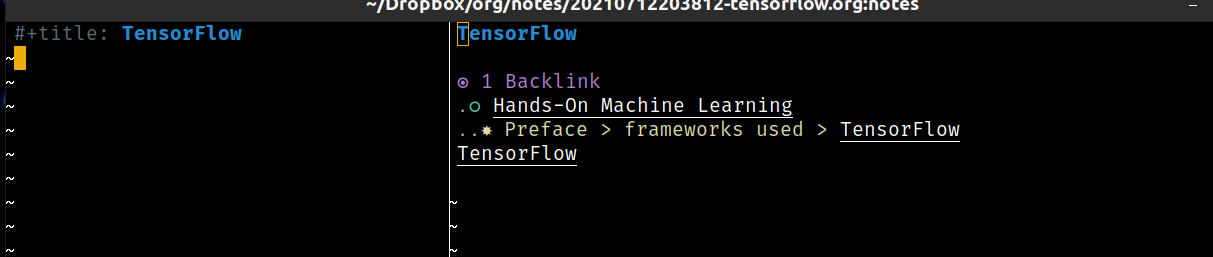
The file doesn’t exist yet, so I navigate to the “literal interpretation” of my input (rather than the autocomplete offering) with C-k (navigate up in helm buffers), then create the file with RET. An org capture buffer is opened, but I’m too lazy to input any information about TensorFlow now, so I leave it with its default state of simply a #+title property of “TensorFlow” and press , , to close and save the capture. Now, a new file has been created: 20210712203812-tensorflow.org. Also, my TensorFlow header item in my book file has been linked to that file:
*** [[file:20210712203812-tensorflow.org][TensorFlow]]
If I go to the TensorFlow file again with SPC a o r f tensorflow RET, then from within the file do SPC SPC org-roam, I can see the backlink to TensorFlow from my book file.
Adding Anki Cards
While taking notes on a book, I need to make some cards. I add a top-level header called “Anki” just to keep my headers separate, as they have a specific format and I don’t want them cluttering up my main notes. I create some “forward” and “backward” cards, because to learn a concept, one must learn the definition’s association with the word, and the word’s association with the definition. Here’s an example:
* Anki
** Training set
*** training set forward
   :PROPERTIES:
   :ANKI_DECK: Org Learning
   :ANKI_NOTE_TYPE: Basic (and reversed card)
   :END:
**** Front
     What is a training set in Machine Learning?
**** Back
     examples that a machine learning system uses to learn
*** training set back
   :PROPERTIES:
   :ANKI_DECK: Org Learning
   :ANKI_NOTE_TYPE: Basic (and reversed card)
   :END:
**** Front
     What do you call examples that a machine learning system uses to learn?
**** Back
     a Training Set
Then, after making sure anki is running and thus that that the anki-connect server is running, I do SPC SPC anki-editor-mode to activate anki commands, then SPC SPC anki-editor-push-notes. After a short while, a message in my modeline notifies me that the cards were created successfully, which I can confirm by seeing that they now have new properties indicating their card IDs:
*** training set forward
   :PROPERTIES:
   :ANKI_DECK: Org Learning
   :ANKI_NOTE_TYPE: Basic (and reversed card)
   :ANKI_NOTE_ID: 1623836976838
 :END:
Journaling
I journal using org-roam, which lets me follow similar workflows as I do within the taking notes section for my own journaling, which is common when I am writing down things I thought about on walks or while meditating.
The workflow is simple, throughout the day, I do SPC a o r d t to invoke org-roam-dailies-find-today. If I haven’t journaled today, org-roam creates a file for today. Otherwise, it simply takes me to today’s journal file. Then, I journal away, adding TODOs as needed, or following an org-roam linking flow identical to what I’d do when taking notes for a book or class. Then, if I am exploring backlinks, I can see not only instances against various books and articles I’ve read, but also instances where something was mentioned in my own journal! Very cool.
I also do weekly and monthly reviews to see what I’ve been up to. To do so, in my daily journal for the day, opened with SPC a o r d t, I add a header for my review, and under that header, I add a clocktable and populate it with , , like so. I use options :tstart and :tend to specify the block of time, :fileskip0 to clean out the file names which are irrelevant to me, and :link t to make each of the items in the clock table link to their locations (not shown below for simplicity).
* review
#+BEGIN: clocktable :scope agenda :maxlevel 5 :block 2021-7 :tstart 2017-7-1 :tend today :hidefiles t :fileskip0 t :link t
#+CAPTION: Clock summary at [2021-07-13 Tue 09:21], for July 2021.
| Headline                                       |      Time |       |       |
|------------------------------------------------+-----------+-------+-------|
| *Total time*                                   | *2d 7:39* |       |       |
|------------------------------------------------+-----------+-------+-------|
| Book club notetaking                           |      2:00 |       |       |
|------------------------------------------------+-----------+-------+-------|
| make new mandarin flashcard                    |      0:06 |       |       |
| read man's search for meaning                  |      1:00 |       |       |
| fuck with opz                                  |      0:20 |       |       |
|------------------------------------------------+-----------+-------+-------|
| read man's search for meaning                  |      1:00 |       |       |
|------------------------------------------------+-----------+-------+-------|
| Part I The Fundamentals of Machine...          |      1:00 |       |       |
| \_  Chapter 1. The Machine Learning...         |           |  1:00 |       |
| \_    Types of Machine Learning Systems        |           |       |  1:00 |
|------------------------------------------------+-----------+-------+-------|
| BOOK CLUB                                      |      3:43 |       |       |
| \_  <2021-07-01 Thu> thursday bookclub...      |           |  1:45 |       |
| \_  <2021-07-08 Thu> thursday bookclub...      |           |  1:58 |       |
|------------------------------------------------+-----------+-------+-------|
| <2021-07-07 Wed>                               |      1:05 |       |       |
|------------------------------------------------+-----------+-------+-------|
| \covid19lab\covid19lab                                     |     11:24 |       |       |
| Accessibility                                  |      8:31 |       |       |
| \_  CUR-6317 make radio inputs accessible      |           |  0:31 |       |
| \_  CUR-6362 vpat                              |           |  6:19 |       |
| \_  CUR-5759 text input dropdowns              |           |  1:41 |       |
| Tasks                                          |      1:30 |       |       |
| \_  cur-6391 add question to post-vaccine...   |           |  1:30 |       |
|------------------------------------------------+-----------+-------+-------|
| Disfactory                                     |      1:15 |       |       |
| \_  clusters                                   |           |  1:15 |       |
|------------------------------------------------+-----------+-------+-------|
| \blog\blog                                           |     22:25 |       |       |
| \_  Pending Articles                           |           | 22:25 |       |
| \_    Blogpost on emacs environment            |           |       | 22:03 |
| \_    Make blog post about wulai motorcycle... |           |       |  0:22 |
| Chinese                                        |      0:20 |       |       |
| \_  Chinese lessons preply                     |           |  0:20 |       |
#+END:
To get org-roam journal functionality, follow the org-roam installation instructions under the taking notes section above.
Checking Email
The blog is already long and I’m about to start a section that just might be as long as every previous section combined. Oh well.
I check my email in emacs. Here’s what it looks like:

It’s great, because it allows for keyboard-only navigation. Also, because images don’t display by default, it’s quite literally impossible to track whether I’ve opened an email, or do any funky user-agent identification using tracking pixels. Downside, sometimes emails display kinda weird if they have custom CSS, but upside, I don’t really like reading those kinds of emails anyway.
This kind of emacs integration is only for the most devout of the “path of the unnecessarily convoluted ways of doing shit.” I love it and find it very useful, but it involves lots more than just plugging in a tool on your .spacemacs.
Setting up Email
Add mu4e to your dotspacemacs/layers.
Install mu, which installs mu4e. Then, you’ll probably have to tell emacs how to find mu4e, so add the following to your dotspacemacs/user-init:
(add-to-list 'load-path "/usr/local/share/emacs/site-lisp/mu4e")
But wait, guess what, mu4e and mu just browse maildir directories on your computer. To actually fetch and populate those directories, you need another tool. I use offlineimap. Install it.
Create ~/.offlineimaprc. You’ll need to customize this file based on the kinds of email services you use. I use a bluehost custom domain, plus, gmail. Mine kinda looks like this:
[general]
pythonfile = ~/.offlineimap.py
accounts = gmailhome, calebjay,
maxsyncaccounts = 2

[Account gmailhome]
localrepository = gmailhomelocal
remoterepository = gmailhomeremote

[Account calebjay]
localrepository = calebjaylocal
remoterepository = calebjayremote

[Repository gmailhomelocal]
type = Maildir
localfolders = ~/Mail/gmailhome

[Repository gmailhomeremote]
type = Gmail
remoteuser = myemail@gmail.com
remotepasseval = get_pass("Gmailhome")
createfolders = False
sslcacertfile = /etc/ssl/certs/ca-certificates.crt
folderfilter = lambda folder: folder in ['INBOX', '[Gmail]/Drafts', '[Gmail]/Sent Mail', '[Gmail]/.Archive']

[Repository calebjaylocal]
type = Maildir
localfolders = ~/Mail/calebjay

[Repository calebjayremote]
type = IMAP
remotehost = my.emailserver.com
ssl = yes
remoteuser = my@email.com
remotepasseval = get_pass("calebjay")
createfolders = True
sslcacertfile = /etc/ssl/certs/ca-certificates.crt
Now you need to tell offlineimap how to read passwords. Create ~/.offlineimap.py. Make it look like this:
#! /usr/bin/env python2
from subprocess import check_output

def get_pass(account):
        return check_output("pass Google/" + account, shell=True).splitlines()[0]
Note that the pass Google/ command means that that program which we haven’t installed yet (pass) is going to look inside its Google/ directory for the given password. You could do like mu/ or something as well. If you already use pass for password management, don’t try to just use your already existent password, it won’t work, because you have to use app passwords. You’ll see.
Install pass. If you’re struggling, this dude has written a great article that I constantly reference on how to use pass.
Create a gpg key. If you’re going down this path, you’ll probably find yourself using this key and this pass store for a lot of stuff, so maybe do this part well (and choose a good password). Do gpg2 --full-gen-key. Mostly go with default options, except key length, roll with 4096. Use your full name and email, because this is how the key will be referenced. For the love of god, don’t forget the password you choose here.
Initiate pass. Do pass init {{your_email}} using the email you used to create your gpg key. If you want to have your pass store be a git repository (I do and it’s awesome), do pass git init.
Add your gmail email app password to pass. Under your google account “security” section, find “app passwords.” I’d attach screenshots, but they change the UI ever 3 months, so just… find it lol. Create an app password, and plop it in a text file that you won’t save for a second, cause I think google only lets you see it once. Now, do pass add Google/Gmailhome or whatever you want to name it. Just remember to use the prefix (Google/) that you had in offlineimap.py and the suffix that you use as the argument passed to remotepasseval in .offlineimaprc. After pass add, you should be prompted for the password. Enter the app password you grabbed earlier, press RET.
Ok, you should be sorted on that front. Try running offlineimap and see what happens! If you get an error, tell me and I’ll try to get it added to this section.
Let that run, it might take a while depending on how many emails you have. When it’s done, initialize mu so it knows where to find mail, and what your emails are. Do mu init --maildir=~/Mail --my-address=jim@example.com .
Once that’s done, let mu index your mail, and create a database. Do mu index.
Now, config your .spacemacs. Start a with-eval-after-load 'mu4e:
(with-eval-after-load 'mu4e
    ;; Sets your user agent to not a fake one
    (setq mail-user-agent 'mu4e-user-agent)
    ;; Sets a sane compose format, where you don't have to manually
    ;; enter newlines to try to enforce column widths. Trust me, do this.
    (setq mu4e-compose-format-flowed t)
    ;; Close the send buffer when you send an email. Why wouldn't you do this?
    (setq message-kill-buffer-on-exit t)
    ;; This doesn't mean delete sent messages, it means delete the draft when sent.
    ;; I think. I mean, I have emails in my sent directory, so.
    (setq mu4e-sent-messages-behavior 'delete )
    ;; Tells mu4e to use offlineimap to fetch emails. It does this for you automatically every...
    (setq mu4e-get-mail-command "offlineimap" )
    ;; 5 minutes, or whatever time you specify here
    (setq mu4e-update-interval 300 )
    ;; Set to the same as you set it above in your mu init and .offlineimaprc
    (setq mu4e-maildir "~/Mail")

    ;; Asks you what "context" before doing some actions.
    ;; Context means like, your personal gmail, or work gmail
    (setq mu4e-context-policy 'ask)
    ;; Now you actually make said contexts
    (setq mu4e-contexts
          ;; Gmail example:
          `( ,(make-mu4e-context
               :name "Personal"
               :enter-func (lambda () (mu4e-message "Entering Personal context"))
               :leave-func (lambda () (mu4e-message "Leaving Personal context"))
               ;; we match based on the contact-fields of the message
               :match-func (lambda (msg)
                             (when msg
                               (string-match-p "^/gmailhome" (mu4e-message-field msg :maildir))))
               :vars '( ( user-mail-address	    . "youremail@gmail.com"  )
                        ( user-full-name	    . "Caleb Rogers" )
                        ;; this is how gmail names its shit, don't change this
                        ( mu4e-drafts-folder . "/gmailhome/[Gmail].Drafts" )
                        ( mu4e-sent-folder   . "/gmailhome/[Gmail].Sent Mail" )
                        ( mu4e-trash-folder  . "/gmailhome/[Gmail].Trash" )
                        ( mu4e-refile-folder . "/gmailhome/[Gmail].All Mail")
                        ( mu4e-maildir-shortcuts .
                                                 (
                                                  ("/gmailhome/INBOX"  . ?i)
                                                  )
                                                 )
                        (smtpmail-smtp-user . "youremail@gmail.com")
                        ))
             ;; Personal email server example:
             ,(make-mu4e-context
               :name "Caleb"
               :enter-func (lambda () (mu4e-message "Switch to the Caleb context"))
               :leave-func (lambda () (mu4e-message "Leaving Caleb context"))
               ;; we match based on the maildir of the message
               :match-func (lambda (msg)
                             (when msg
                               (string-match-p "^/calebjay" (mu4e-message-field msg :maildir))))
               :vars '( ( user-mail-address	     . "youremail@yourwebsite.com" )
                        ( user-full-name	     . "Caleb Rogers" )
                        ( mu4e-drafts-folder . "/calebjay/INBOX.Drafts" )
                        ( mu4e-sent-folder   . "/calebjay/INBOX.Sent" )
                        ( mu4e-trash-folder  . "/calebjay/INBOX.Trash" )
                        (mu4e-refile-folder . "/calebjay/INBOX.Archive")
                        ( mu4e-maildir-shortcuts .
                                                 (
                                                  ("/calebjay/INBOX"  . ?i)
                                                  )
                                                 )
                        (smtpmail-smtp-user . "caleb@calebjay.com")
                        (smtpmail-default-smtp-server . "mail.yourwebsite.com")
                        (smtpmail-smtp-server . "mail.yourwebsite.com")
                        (smtpmail-smtp-service . 465)
                        (smtpmail-stream-type . ssl)
                        (mu4e-sent-messages-behavior . sent )
                       ))
             ))
    )
Ok that’s it, do SPC a e m to launch mu4e, I hope it works!
Example Email Workflows
I check my email with SPC a e m to launch mu4e. I have an email from a colleague at g0v telling me about an upcoming meetup. From within the email, I do C-c l to invoke org-store-link, then do SPC a o c i to launch my custom inbox org capture template. I create some sensible header (‘check out this meetup’), then on a newline, do , i l to invoke org-insert-link, choosing the link to the email that org-store-link captured for me, and pressing RET to select the default title for the link. I press , , to save the capture buffer. Now, a new TODO item has been created, with a link to this email in mu4e should I like to easily access it for further context in the future.
Reading the News
Yes, even this. Luckily, this is pretty easy to set up. Using elfeed, I can read RSS feeds of my choice. It looks like this:
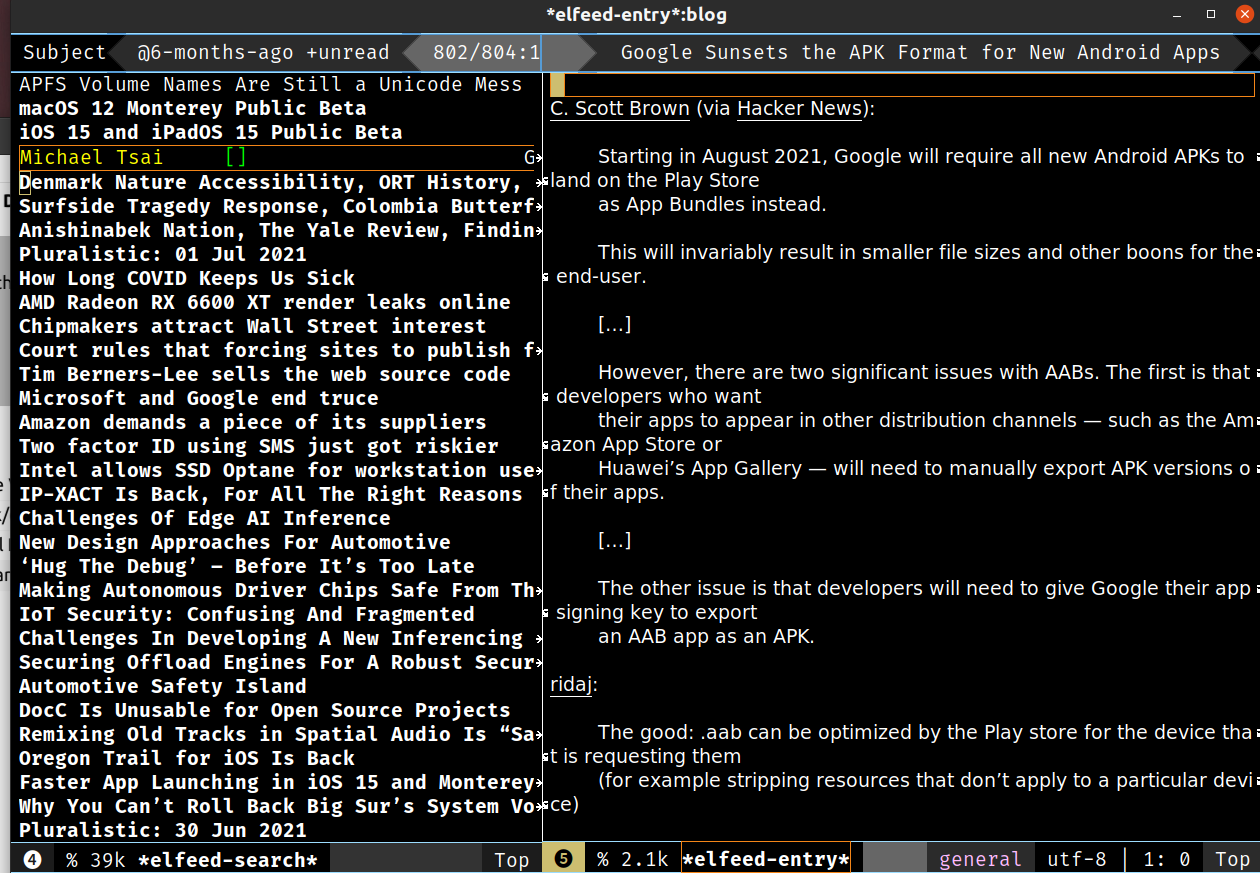
Right now I’m having some kind of display bug where the source of a given RSS item isn’t showing up, so check the elfeed repository to see how it should actually look. But, it still works.
To get elfeed, add elfeed to your dotspacemacs/layers. Then, add the RSS feeds you want under the elfeeds-feeds list, which is a variable you pass directly in dotspacemacs/layers, like so
     (elfeed :variables
             elfeed-feeds '("https://researchbuzz.me/feed/"
                            "http://n-gate.com/index.rss"
                            "https://mjtsai.com/blog/feed/"
                            "https://craphound.com/feed/"
                            "https://pluralistic.net/feed/"
                            "http://www.fudzilla.com/?format=feed"
                            "http://semiengineering.com/feed/"
                            "https://www.eff.org/rss/pressrelease"
                            "http://news.mit.edu/rss/topic/nanotech"
                            "http://news.mit.edu/rss/topic/electrical-engineering"
                            "http://www.pocketables.com/feed"
                            "https://www.quantamagazine.org/feed"
                            "https://www.sciencedaily.com/rss/computers_math/artificial_intelligence.xml"
                            "https://machinelearningmastery.com/blog/feed/"
                            "http://news.mit.edu/rss/topic/artificial-intelligence2"
                            "https://bair.berkeley.edu/blog/feed.xml"
                            "https://openai.com/blog/rss/"
                            "https://www.technologyreview.com/topic/artificial-intelligence/feed"
                            "https://www.jefftk.com/news.rss"
                             ))
My typical workflow is, I’m waiting for some long command to run or whatever, and quickly pop open an elfeed window with SPC a r e. As I read, I might pop over to my org-roam daily journal to create some note of interest, copying a link to the article in question first with SPC a o l . I might add a follow-up TODO with the read tag so it shows up in my “To Read” portion of my “life” agenda view.
Quick Notes and Tips
This is a long ass blog post so I figure I’ll leave some quickly accessible information down here.
What OS?
I use Ubuntu 20.10, with GNOME as my display manager. If you want workspace management like I have, with C-ALT-{{number}} functionality, you need to find away to install “gnome tweak tools.” In the “workspaces” section of that tool will be the settings you’ll find that allow control over workspaces. Then, you need to add “switch to workspace {number}” keybindings under your “keyboard” settings, under main ubuntu settings.
What’s that Theme?
The theme you see in my screenshots is one I made, called vscode-default-high-contrast. It’s named as such because I’m lifting the color scheme from vscode’s “default high contrast theme.” I wrote a blog post about making my own theme. I recommend doing so, it’s a great way to customize your IDE while also getting a taste of emacs lisp.
RSI Tips
You don’t have to go all in on vim and emacs with evil-mode to help prevent RSI. Here’s some quick tips:
- Rebind
CAPSto beCTRL - Use
C-[asESCrather than the actualESCkey (this may be already bound as such for your system) - Get a split keyboard. I use the kinesis freestyle pro. They don’t pay me so you can go find them on your own lol.
- When typing, keep your wrists off the keyboard. Aka, hover-type.
Can I See Your .spacemacs?
Yes, here it is.
Can I See Your Org Roam Notes?
Yes, here they are.
How Can I Ask You About Something on this Post?
You can email me. My email is my first name at calebjay.com. My first name is caleb.
Taiwan?
Yes, and I wrote a blog post in which I argue that you should live here too.
You Don’t Have a Degree but You’re an Engineer?
That’s right, and I have a lot of posts about how this is possible, and how you probably can do this too.